Practicals
These are the worksheets for the practicals of the “Engineering 2: Automated Software Engineering” module at the University of York.
The practicals are divided into two parts:
- Part 1 covers data-intensive systems with the Micronaut framework.
- Part 2 covers model-driven engineering within the Eclipse modelling ecosystem (EMF, Epsilon, and Sirius).
Part 1: data-intensive systems
- Micronaut basics
- ORM with Micronaut Data
- Integrating external services
- Reacting to events with Micronaut Kafka
- Deploying via container orchestration
Practical 1: Micronaut basics
This is the worksheet for the first practical in the Engineering 2 module.
In this practical, you will work through the basics of creating a microservice using Micronaut.
Work through every section of the practical in sequence, without missing steps. You can use the “Previous” and “Next” buttons on the left and right sides to quickly go between sections.
Introduction
In this practical, you will work through the basics of creating a microservice using Micronaut.
What you should already know
You should be able to:
- Create your own classes in the Java programming language.
- Be familiar with inheritance and implementing interfaces.
- Add annotations to classes, methods, parameters, and variables (e.g.
@Overrideon a method). - Use generics to parameterize types (e.g.
List<Integer>). - Use lists and maps from the Java Collections Framework.
- Write unit tests using JUnit.
If you need to read up on these concepts, consult the links in the Part 1 Java knowledge map in the VLE, and check the Learn Java section of the Dev.java website.
You should be familiar with these concepts from the lectures:
- The definition of software architecture as structure + architectural characteristics + decisions + design principles.
- The microservices architectural pattern.
- The REST principles and the 4 levels of the Richardson Maturity Model.
What you will learn
- How to create a new Micronaut project from scratch.
- How to import the project into IntelliJ.
- How to write controllers that handle HTTP requests in JSON format.
- How to produce a web-based interface to try out the controllers.
- How to write unit tests for the controllers.
What you will need
- Java 17 or newer: install from Adoptium.
- An IDE with Gradle and Java support: in this worksheet, we discuss IntelliJ IDEA.
What you will do
You will implement and test a minimal version of a microservice which manages a collection of books. The microservice will be able to create, retrieve, update, and delete books.
Starting your first project
Creating the project
To create Micronaut projects, the fastest way is to use Micronaut Launch.
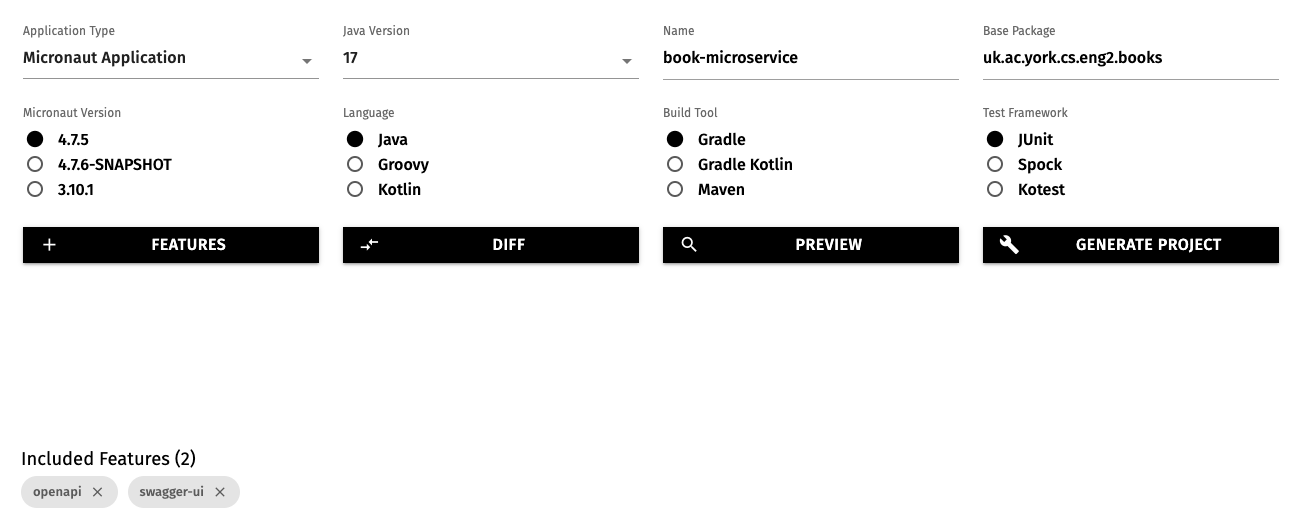
Open the above link in a new tab, and select these options:
- Application type: Micronaut Application
- Java version: 17
- Name:
book-microservice - Base package:
uk.ac.york.cs.eng2.books - Micronaut version: the latest non-SNAPSHOT 4.x version (4.7.4 as of writing)
- Language: Java
- Build tool: Gradle
- Test framework: JUnit
Click on the “Features” button, and add the openapi and swagger-ui features.
This will make Micronaut automatically produce a web-based user interface to try out our microservice.
The options will look like this:
Click on “Generate Project - Download Zip”, and unzip the produced ZIP file into a folder named book-microservice.
Importing the Micronaut project into IntelliJ
Open IntelliJ IDEA. If you have any projects open, close them with “File - Close Project”.
Select the “Projects” section on the left, and click on the “Open” button on the top right.
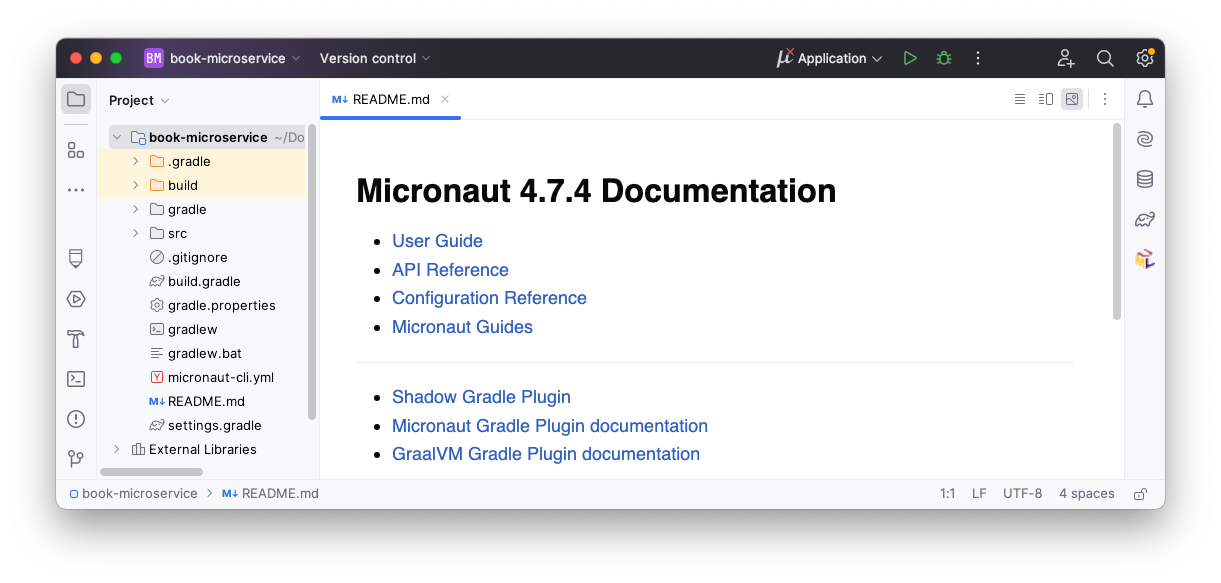
Select the book-microservice folder (the one containing the settings.gradle file produced by Micronaut Launch).
You may get a dialog from IntelliJ asking if you can trust the project: select “Trust Project”.
IntelliJ should now display your project, like this:
Setting the Java version in IntelliJ
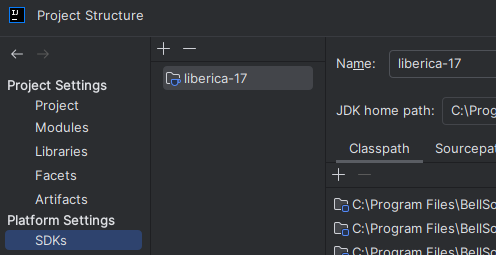
If your default Java installation is not Java 17, you will have to manually tell IntelliJ to use your Java 17 Development Kit.
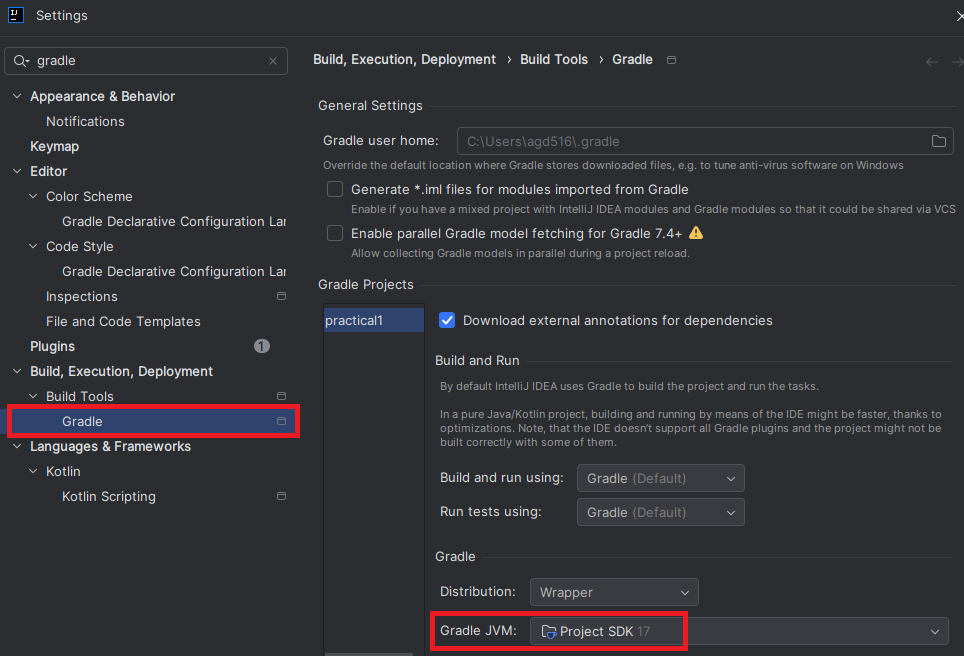
First, go to “File - Project Structure…”, and in SDK ensure that you have picked a Java 17 installation, like this:
Click on OK, and then go to “File - Settings…” and search for Gradle on the left. Select the “Gradle” item inside the category for build tools, and ensure it uses the “Project SDK”, like this:
Adding your first endpoint
Micronaut projects are intended to implement the microservices at the “back-end” of your application.
A Micronaut project is made up of multiple controllers which respond to the HTTP queries sent by clients.
A controller is a Java class annotated with @Controller, where the methods are annotated according to the HTTP method being used (e.g. @Get, @Post, or @Put).
Micronaut may have already generated a BookMicroserviceController class for us as an example: to avoid any confusion, delete it.
Instead, we will create our own controller from scratch: typically you have one controller per resource to manage (e.g. books).
Writing the controller
First, create a resources subpackage within the main uk.ac.york.cs.eng2.books package, create a BooksController class in it, and annotate it with @Controller("/books"):
package uk.ac.york.cs.eng2.books.resources;

import io.micronaut.http.annotation.Controller;

@Controller("/books")
public class BooksController {
}
Note how the @Controller annotation takes a parameter, which is the common prefix to all the URLs handled by this controller.
In this case, the controller will handle all the URLs that start with /books.
We will then add a @Get method which will list the titles of the various books in our collection.
This is just to illustrate what it’s like to work with Micronaut: we will change it later to use an internal in-memory list that is populated with our requests (which we will upgrade in later weeks to a relational database).
@Get("/titles")
public List<String> getTitles() {
    return Arrays.asList("title 1", "title 2");
}
As you can see above, the @Get annotation also takes a string, which is the additional suffix that makes up the whole URL being handled.
Trying out the controller via Swagger UI
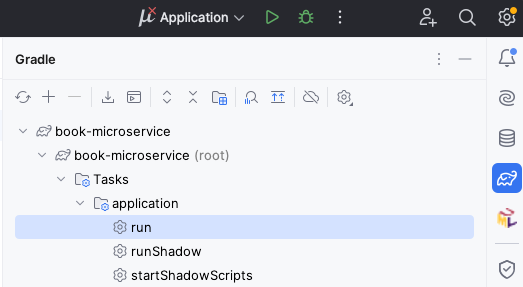
With this minimal amount of code, we can already try out the project. On the right side of IntelliJ, click on the Gradle icon (which looks like an elephant), find “Tasks - application - run”, and double click on “run”. If you have trouble finding it, see the screenshot below:
After some time, you will see a line like this:
13:07:12.346 [main] INFO io.micronaut.runtime.Micronaut - Startup completed in 249ms. Server Running: http://localhost:8080
This means that your Micronaut server is now ready to be tested.
To use the automatically generated web interface, visit http://localhost:8080/swagger-ui.
You’ll see an interface like this:
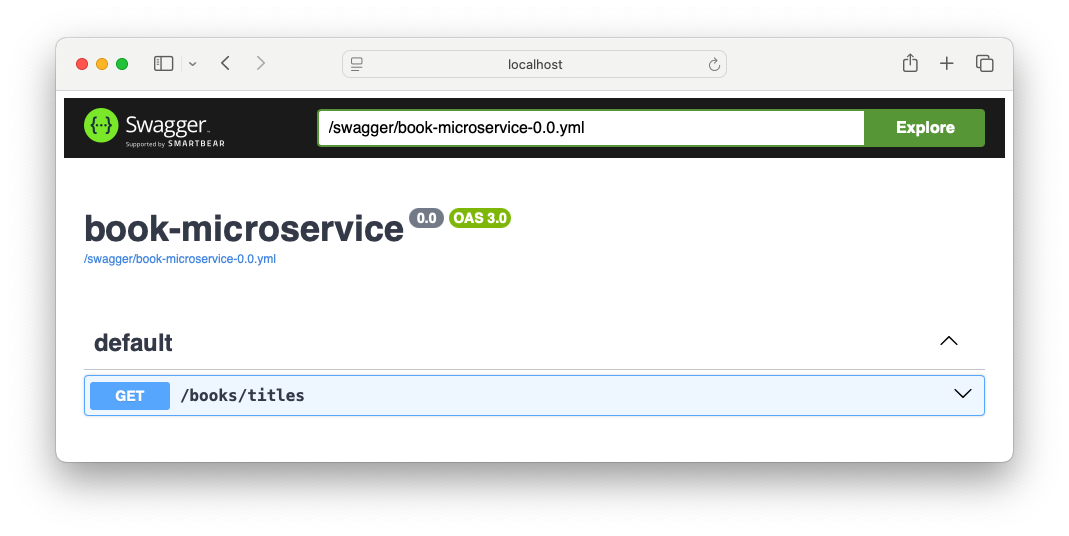
To try out your endpoint, expand the GET /books/titles element and click on the “Try it out” button.
You will then see an “Execute” button: click it to send the appropriate HTTP request.
It will look like this:
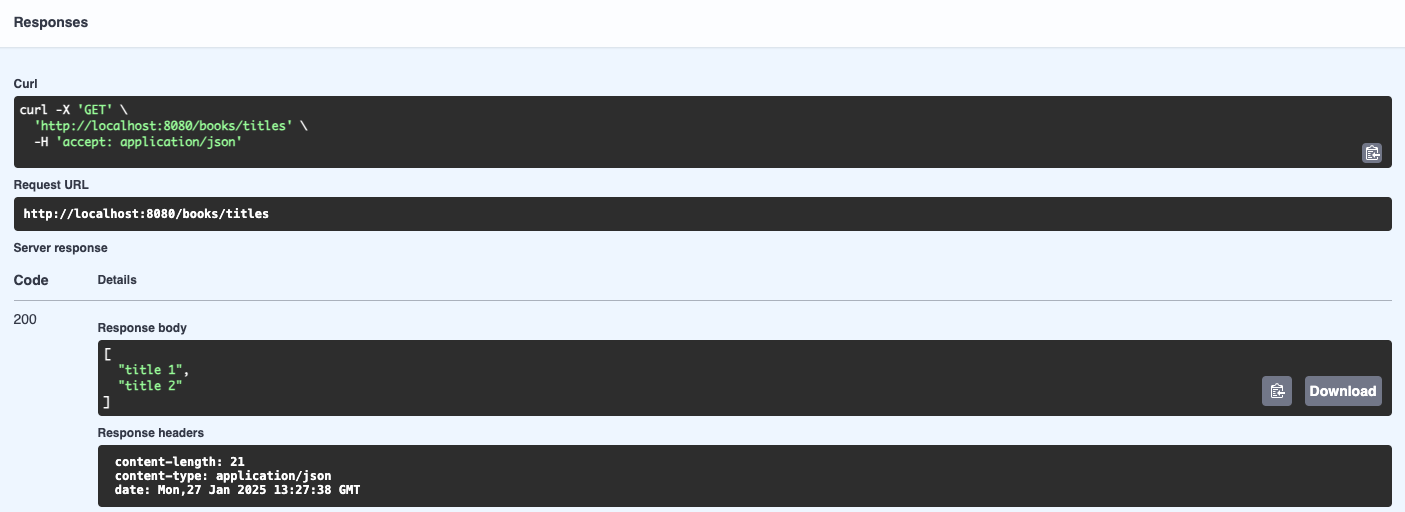
There are several parts here:
- The “Curl” section is a Unix terminal command that you can copy and paste to do the same HTTP request from outside a browser. In Windows, you can try this out from the “Git Bash” shell (Alt-right click on the desktop, and select Git Bash).
- The “Request URL” shows the full URL being targeted by our request: it combines the host and port, the
/bookspart from the controller, and the/titlesfrom the method. - The “Server response” section shows we receive an HTTP 200 status code (which means “OK”, i.e. successful response), and a JSON-formatted response with the two titles in our code. We can also read the various HTTP response headers that were produced by the server (length of the content in bytes, MIME type of the content, and the timestamp of the response).
Stop the program from IntelliJ, as we will now make some changes.
Sending Book objects
Rather than plain strings, we would like to send and receive all the information about a book in one go.
To do this, we will create a Data Transfer Object (DTO) class, which will be automatically turned to JSON by Micronaut so long as we annotate it as @Serdeable and follow certain conventions.
Writing the Book DTO
Note: the name Serdeable comes from “serialisable + deserialisable”.
Serialisation is the process of turning an in-memory object into a stream of bytes that you can send over the network or save into a file (e.g. by representing it as JSON).
Deserialisation is the reverse process of reading a stream of bytes and turning it into an in-memory object.
Create a new dto subpackage inside uk.ac.york.cs.eng2.books, and create a Book class inside it.
Annotate it with @Serdeable, to indicate to Micronaut that you want to serialise and deserialise it to/from JSON:
@Serdeable
public class Book {
}
For this example, let’s track the title and the full name of the author, and an integer id.
We will need to define them as properties to be serialised and deserialised.
There are several ways to do it (see the docs).
For this practical, we will use a pair of getter and setter methods.
For instance, to track the title:
- Add a
private String titlefield toBook. - Add a public
getTitle()method that returns the value of thetitlefield. - Add a public
setTitle(String newTitle)method that changes the value of thetitlefield.
Do the same for the author and the id.
Note: in IntelliJ, you can usually write just the fields, and then use “Code - Generate” to have it producer the getter and setter methods.
Using the Book DTO
Go back to our BooksController.
Rename the getTitles() method to getBooks(), change the @Get("/titles") to just @Get, and have it return a List<Book>.
Change the code so that it creates a few Book objects instead of just using strings.
Once you’re done with the changes, run the application as before, and try out the endpoint through the Swagger UI.
If you expand GET /books and scroll down to the “Example Value”, you’ll notice that it now shows a JSON object:
[
  {
    "id": 0,
    "title": "string",
    "author": "string"
  }
]
Click on “Try it out” and then “Execute” to run your endpoint and check that it works as intended. You should get an HTTP 200 OK response like this one:
[
  {
    "id": 1,
    "title": "Title 1",
    "author": "Author 1"
  },
  {
    "id": 2,
    "title": "Title 2",
    "author": "Author 2"
  }
]
Managing books
Of course, there wouldn’t be much point in always responding with the same books: we want to be able to manage them.
To do this, we will need to add endpoints in our BooksController for creating, updating, and deleting books:
POST /booksshould accept aBookand add it to our collection.GET /books/idshould return theBookwith thatid.PUT /books/idshould accept aBookand update the title and author of the book with thatid.DELETE /books/idshould delete theBookwith thatid.
We will keep track of the books in a Java map, so they will be lost when we restart the application. We will cover how to store the books in a database in later practicals.
Adding books
The declaration of the controller method for POST /books would look like this:
@Post
public void createBook(@Body Book book) {}
Note how the method has a book parameter annotated with @Body: this indicates to Micronaut that the endpoint will deserialise a JSON-formattted Book object from the HTTP request body.
All the possible ways in which you can take parts of the HTTP request and bind them to variables are listed in the official Micronaut documentation.
Using the Java Collections Framework, add a map from integers to Book objects to your BooksController.
If you are unfamiliar with the JCF, consult the Java Collections Framework resources in the Java knowledge map of the VLE.
Implement the createBook method so it updates the map, and change the getBooks method so it returns the values of the map.
Try restarting the application, adding a few books through POST /books, and listing them through GET /books.
Getting a specific book
The next method will be for retrieving a specific book:
@Get("/{id}")
public Book getBook(@PathVariable int id) {}
@PathVariable is for binding a part of the path of the URL to a variable: specifically, the ID of the book that we want to fetch.
You can implement this method by simply returning the Book with that id, or null if we do not have it.
Try restarting the application. Try this:
- Add a book with
POST /books. - Check that
GET /books/{id}with the givenidreturns it, with an HTTP 200 OK response. - Check that
GET /books/{id}with anidthat we do not have produces an HTTP 404 Not Found response. This is because if a controller method returnsnullinstead of a DTO, Micronaut will map that to a 404 response.
Updating a book
You should be able to write the declaration of the method for PUT /books/{id} yourself, based on the above examples: just use @Put as the annotation for the method (with the appropriate string parameter).
Follow this approach:
- Get the
Bookwith the givenidin your map. If it does not exist, respond with HTTP 404: when your method does not simply return a DTO, you can instead throw anew HttpStatusException(HttpStatus.NOT_FOUND, message), where themessageis up to you. - Update the title of the book in your map.
- Update the author of the book in your map.
Note how this HTTP endpoint does not use the id inside the Book object sent in the request, but instead uses the id in the URL.
In fact, for update endpoints like these we would normally use a dedicated BookUpdateDTO that would not list id as a valid field.
Try it out in the Swagger UI before moving on.
Deleting a book
You should be able to write this method entirely yourself from the above examples, using the @Delete annotation on the new controller method, together with the appropriate string parameter.
Automated testing
Instead of trying out all our endpoints manually after every change, we’d like to have automated tests that they work as intended. Micronaut has specific facilities for helping with tests, while emulating real HTTP requests.
Creating the declarative HTTP client
In order to test all the steps that real requests would go through, our tests will send HTTP requests to our application, instead of directly calling the methods of the controller. To simplify that task, we will use the declarative HTTP client support in Micronaut.
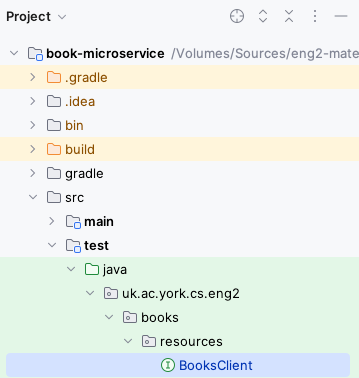
Within the test folder (which should have all the code for our tests, so we do not unnecessarily bundle it with a regular release), create a resources subpackage within uk.ac.york.cs.eng2.books.
Create a BooksClient interface in this same package.
Your project should now look like this:
The interface should be annotated with @Client (using the same URL prefix as our @Controller), and have all the public methods of the BooksController, without their bodies.
It should look like this:
@Client("/books")
public interface BooksClient {
  @Get
  List<Book> getBooks();

  @Post
  void createBook(@Body Book book);

  // ... rest of the public methods in your controller ...
}
Micronaut will automatically generate the code for the HTTP client based on this interface and its annotations.
Writing the first test
Since we will be testing the BooksController class, we will create a BooksControllerTest class in the same package as above.
Micronaut applications normally launch through the Application class that Micronaut Launch generated for you, as there is a certain process involved in their startup.
We need this startup process to happen before each of our tests as well.
To do this, add the @MicronautTest annotation to your test class, like this:
@MicronautTest
public class BooksControllerTest {
}
For your tests, you will need the declarative HTTP client generated by Micronaut. Instead of creating the instance yourself, you should ask Micronaut to provide it to your tests by adding this inside your class:
@Inject
private BooksClient booksClient;
@Inject is one of several standard annotations for dependency injection: these are originally from the JSR-330 specification (starting with javax.inject), which were later renamed to jakarta.inject.
Micronaut supports a wide range of dependency injection mechanisms: here we use the simplest form of field injection.
Let’s add the most basic test one could imagine: if we ask for the list of books without having added anything yet, we should get the empty list. It would look like this:
@Test
public void noBooks() {
  assertEquals(0, booksClient.getBooks().size());
}
Note: you may need to add import static org.junit.jupiter.api.Assertions.*; in order to have access to assertEquals and other JUnit assertions.
IntelliJ should recognise the class as a test class, and you should see an icon to the left of the public class BooksControllerTest line that you can click to run all the tests in the class.
This icon may change depending on the success or failure of your tests.
For instance, it looks like this after all tests have passed:

You can also run all the tests in your project by running the Gradle test task:
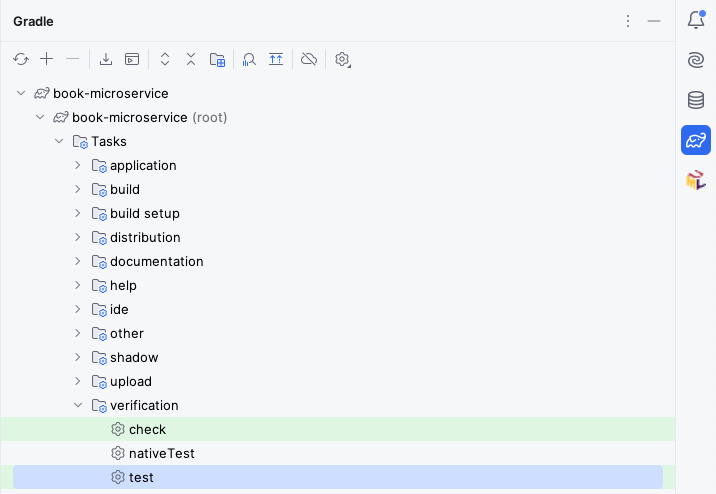
Your test should pass, and we can move on to the rest of the tests.
Measuring code coverage
Obviously, there is still much to test. We should aim to have tests that cover all the important situations in our code. One way to find out what we are missing is to perform “coverage analysis”: you can do this from IntelliJ by right-clicking on the Gradle “test” task and selecting “Run with Coverage”.
You will get a report like this:
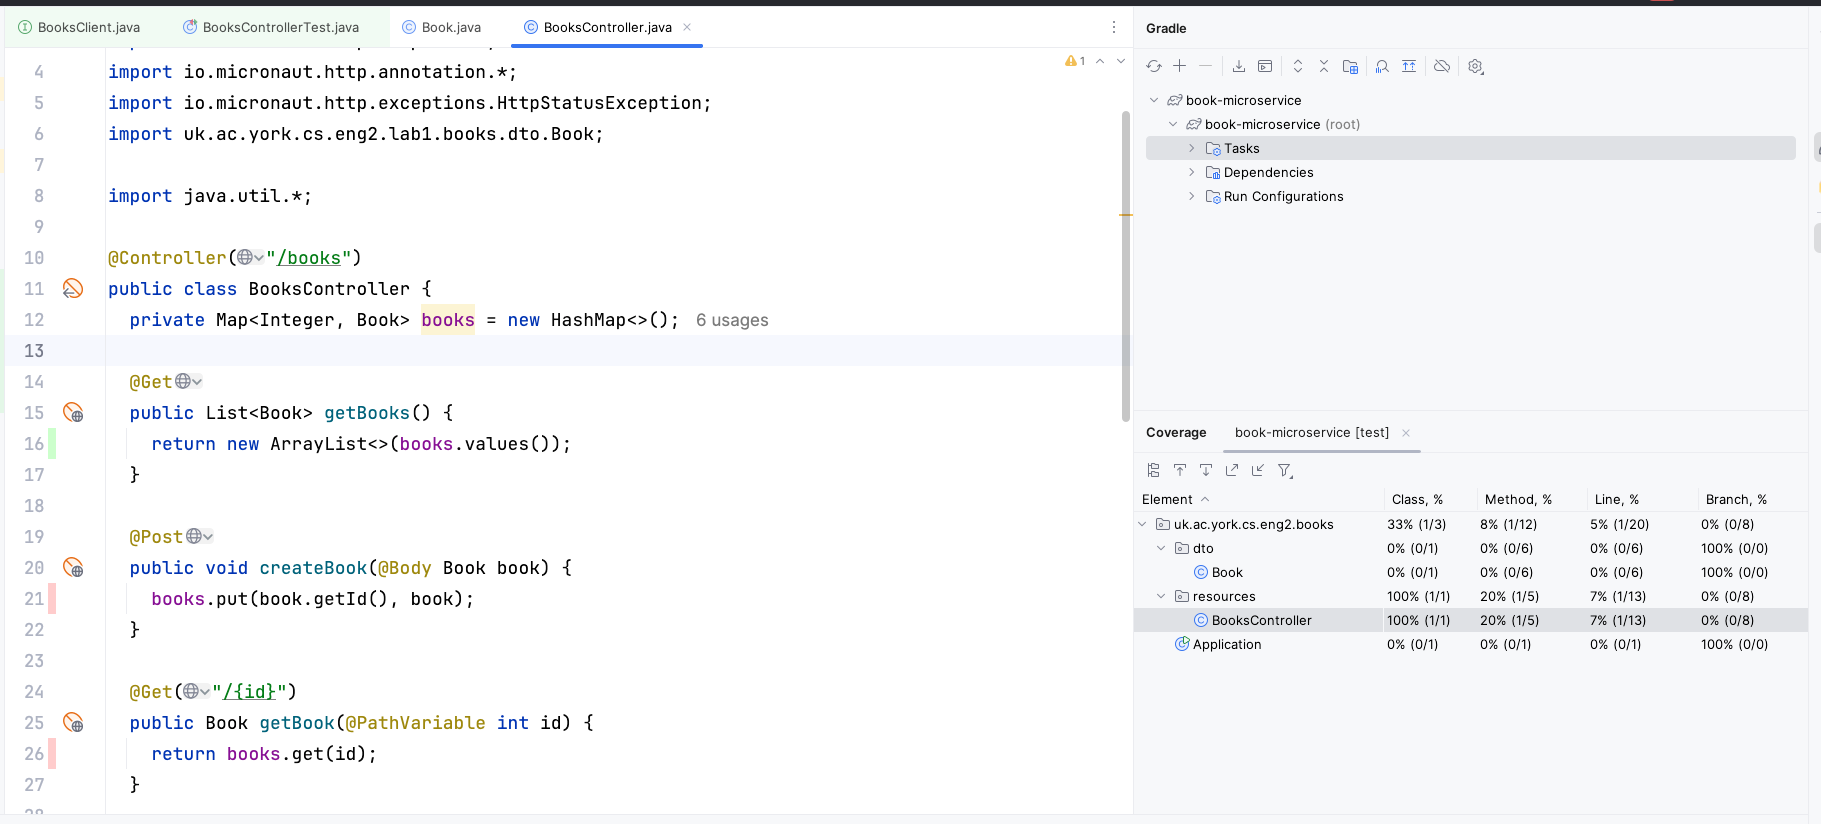
Here we have only covered 20% of the methods in the BooksController.
The lines we have missed are colored in red on the left: we have only covered getBooks() with our single test.
You may also see lines covered in yellow: this means that we only covered some of its branches (e.g. we only covered the if branch and not the else branch).
Adding the second test
Try adding a test which creates a book (via booksClient.createBook) and then gets all the books (via booksClient.getBooks).
If you run your tests again, you may notice that one of the two tests will fail.
This is because Micronaut is reusing the same BooksController object across tests, with the same underlying map from IDs to Books, so one test may interfere with the other.
To avoid this, change the @MicronautTest annotation to this:
@MicronautTest(rebuildContext = true)
public class BooksControllerTest {
    // ... leave code as is ...
}
The rebuildContext = true option will make Micronaut recreate the controller for each test, so each test will start from a clean map from IDs to Books.
In a normal application, we would use a database instead of a Java map, and instead of rebuildContext = true we would have a @Before test setup method that would clean the database between tests: we will learn how do to it in later labs.
More tests for creating and updating books
Write test methods for each of these scenarios, and ensure they pass:
- Create a book, and then check that it can be retrieved by ID.
- Retrieve a book that doesn’t exist (assert that
getBook(...)returnsnull). - Create a book, and then update only its title.
- Create a book, and then update only its author.
- Create a book, and then delete it.
Testing deletion and updating of missing books
We still need to write test methods for these scenarios:
- Update a book that doesn’t exist.
- Delete a book that doesn’t exist.
However, there is a slight complication: 404 errors are not rethrown as exceptions from the Micronaut declarative client.
We were able to test the scenario where we try to fetch a missing book by asserting that the declarative client returned null instead of a Book object, but our updateBook and deleteBook methods simply return void, so we do not have anything to check in a JUnit assertion.
Go to the BooksClient declarative HTTP client interface, and change the return type of updateBook and deleteBook to HttpResponse.
Micronaut will then return the raw HTTP response, which will include the HTTP status code.
This will allow you to assert that an HTTP 404 Not Found response was produced with:
HttpResponse response = booksClient.updateBook(update, 23);
assertEquals(HttpStatus.NOT_FOUND, response.getStatus());
You should be able to write those two tests now.
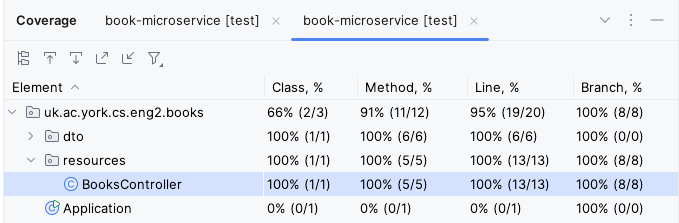
If you have written all your tests correctly, all the lines in BooksController should be highlighted in green, and you should be able to see 100% line, branch, and method coverage for that class:
Additional exercises
Congratulations! You have completed this first practical.
If you would like to gain more practice with the basics of building REST APIs with Micronaut, here are some things you could try.
For the harder exercises, we have an expanded model solution that covers some of them, in case you get stuck.
Enforcing ID uniqueness when adding books (easy)
POSTing a new book does not enforce that the ID is not already in use.
Add this logic, making it so trying to POST a Book whose ID is already in use produces an HTTP 400 Bad Request response.
Creating a DTO specific for updating (easy)
We use the same Book DTO for updating books, which allows for specifying an id that is not used.
Change the updating of books to use a dedicated BookUpdateDTO which only allows for title and author to be used.
This will make our expectations clearer to clients that use the Swagger UI or our generated OpenAPI definitions.
Managing authors (easy)
We only track books so far, but not their authors.
Create a new Author DTO and its own AuthorsController, plus the appropriate tests.
Relating authors and books (hard)
Extend Book and Author so they relate to each other: specifically, let’s assume that “a Book has at most one Author” and “an Author has zero or more Books”.
You will usually want to add a Set<Book> books field to Author, and an Author author field to Book.
Add endpoints to fetch the author of a book and the books of an author, and update existing endpoints to maintain their relationships. We suggest these:
GET /books/{id}/author: gets the author of the given book.POST /books: if the book specifies an author, make sure the author has been previously created, and add the book to the author’s set.PUT /books/{id}: if the updated book specifies an author, make sure the author has been previously created, and add the book to the author’s list. In addition, if the book had a different author before, remove the book from the old author’s set.GET /authors/{id}/books: gets the books of the given author.
You will need to annotate the books of an Author with @JsonIgnore, so they are not represented in the JSON version of an Author.
This is to avoid an endless loop where serialising an author serialises their books, which then serialise their author again.
You will need to refactor your code so the BooksController can check for the authors created so far.
There are several options:
- Use public static fields for the maps that hold the authors and the books. These are essentially mutable global variables now (which make testing and debugging harder).
- Add an
@Inject AuthorsController authorsControllerfield toBooksController, so it can ask the other controller for authors. - Move both maps to a new
ApplicationStateclass annotated as a@Singleton, and then@Injectit into both controllers.
You may notice that we have limited updating the Author-Book relationship to the Book side: this is to keep things simpler. In Practical 2, we will see this is a common practice when using databases as well: we would say that Book is the “owning” side of the Author-Book relationship as that is the side we make changes from.
Improving the generated OpenAPI specification (easy)
Micronaut automatically produces an OpenAPI description of your microservice, in YAML format. To improve its quality (making it easier to understand for humans and for things like ChatGPT function calling), you can do things like:
- Touch up the
@OpenAPIDefinitionannotation in yourApplication, as documented by micronaut-openapi. - Write better Javadoc comments for your controller methods.
Practical 2: ORM with Micronaut Data
This is the worksheet for the second practical in the Engineering 2 module.
Starting from a solution of Practical 1 (whether your own, or the model solution), you will change it to use a relational database via Micronaut Data.
Work through every section of the practical in sequence, without missing steps. You can use the “Previous” and “Next” buttons on the left and right sides to quickly go between sections.
Introduction
In this practical, you will take the microservice from Practical 1 and change it to use a database with Micronaut Data.
What you should already know
You should be able to:
- Implement basic Micronaut microservices that respond to HTTP requests (from Practical 1).
You should be familiar with these concepts from the lectures:
- The distinction between compute-intensive and data-intensive systems.
- The challenges related to the object/relational impedance mismatch.
- The differences between JDBC database drivers, ORM libraries, and Micronaut Data itself.
- The JPA annotations for persistent fields, one-to-many, many-to-one, and many-to-many relationships.
- The conventions followed by the methods in Micronaut Data
@Repositoryinterfaces. - The use of
@Transactionalto wrap invocations of controller methods in transactions.
What you will learn
- How to add Micronaut Data and Micronaut Flyway to an existing project.
- How to map a database schema to JPA annotations.
- How to query and update a database via Micronaut Data repositories.
- How to integrate the database into the tests of Micronaut microservices.
What you will need
- Java 17 or newer: install from Adoptium.
- An IDE with Gradle and Java support: in this worksheet, we discuss IntelliJ IDEA.
- A local installation of Docker Desktop.
Ensure Docker Desktop is running before you start this practical.
- Note: if using a lab machine, you will need to boot Windows as Docker Desktop is not installed in the Linux image.
If you have a recent installation of Docker Desktop (using Docker Engine 29 or newer), you will need to tell the Docker Java libraries to use version 1.44 of the Docker API, until this issue in Micronaut is fixed. From a Linux/Mac terminal, or from Git Bash in Windows, run this command:
echo api.version=1.44 > $HOME/.docker-java.properties
If you do not have Git Bash on Windows, you can run this from PowerShell instead:
"api.version=1.44" | set-content $HOME/.docker-java.properties -Encoding Ascii
What you will do
You will extend a solution of Practical 1 to use a database for persisting its data. This may be your own solution, or the model solution in the VLE.
Adding libraries
Before starting this section, you will need to have a solution to Practical 1. You can use your own, or you can start from the model solution of Practical 1.
What we need
We need to add a few things to our project from Practical 1:
- A JDBC driver: in this course we will connect to MariaDB databases.
- A connection pooling library: we will use HikariCP.
- A database migration framework: we will use Flyway.
- A database access toolkit: we will use Micronaut Data JPA.
- Micronaut Data JPA internally uses the Hibernate ORM.
Micronaut projects typically follow a modular structure, where you can add a number of features to it with support for various technologies. You already did this in Practical 1, by picking the features for OpenAPI generation and the Swagger UI. We will do the same here, but instead of creating a new project, we will be extending our existing project.
Updating our project
The easiest way to find out the changes we have to make in our project is to use Micronaut Launch.
Instead of generating a new project, we will instead produce a diff which will indicate the changes that we should make.
Open Micronaut Launch. Ensure the settings match those you used in Practical 1 (Java Version, Name, Base Package, Build Tool, and so on). Click on “Features” and select these elements:
mariadb: the JDBC driver for MariaDB.jdbc-hikari: the connection pooling library.flyway: the database migration framework.data-jpa: the Micronaut Data library in its JPA flavour.
Click on “Diff”, and it will produce a patch in the unidiff format with the changes that would have to be made, like this one:
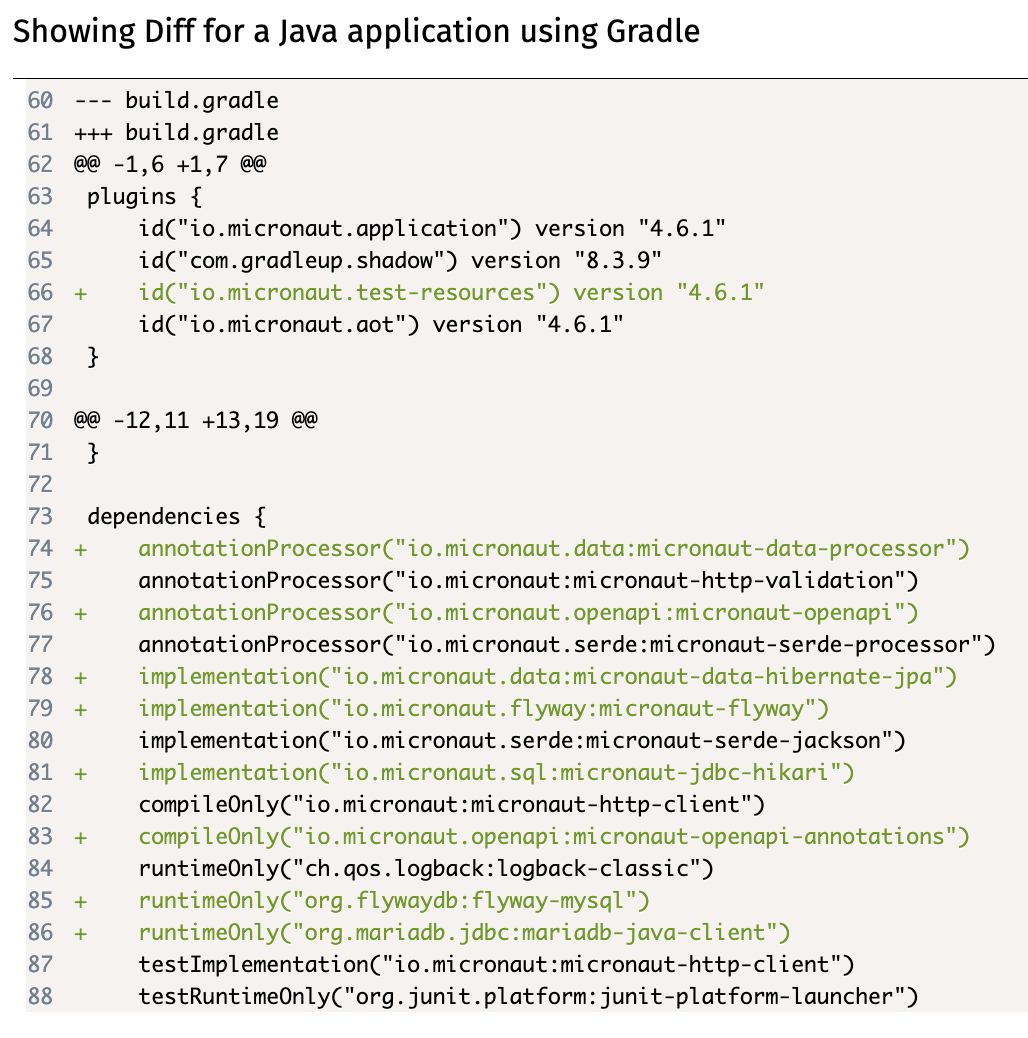
Unfortunately, this patch will often not be directly usable via automated tools (as we will have made customisations from the initially generated project), so we will have to make its changes manually. Here is a quick summary of the notation:
--- OLD_FILEand+++ NEW_FILErefer to the old and new locations of a file.OLD_FILEandNEW_FILEmay be the same if the file has not been moved.@@ -oldL, oldS +newL, newS@@start ahunkdescribing a change in the file. The hunk refers to the lines fromoldLtooldL+oldSin the old file, and to the lines fromnewLtonewL+newSin the new file.- Lines starting with
-are the old lines to be removed, compared to a default Micronaut configuration. - Lines starting with
+are the new lines to be added, compared to a default Micronaut configuration. - Lines starting with a space are just context to help understand the change.
If you read through the changes, you will see that you have to do the following:
- Optionally, add a few
featuresto the list inmicronaut-cli.yml, which match the ones you selected in Micronaut Launch. This is only used by Micronaut CLI, which is not used in the module: you may skip this. - Add the
io.micronaut.test-resourcesplugin to the list in yourbuild.gradlefile. - Add any dependencies you don’t have already to the
dependenciesblock in yourbuild.gradlefile. - Optionally, add some text to your
README.mdfile with some useful links to the relevant documentation. - Create a new
src/test/resources/application-test.propertiesfile with some content within your project. - Add a few lines to your
src/main/resources/application.propertiesfile.
When copying and pasting the new lines, remember to remove the initial + as that is just for indicating that it’s new text.
What do these changes mean?
The changes in the micronaut-cli.yml file are for integration with the Micronaut CLI, which we do not use in this module: you can skip them.
The changes in the build.gradle file make some important additions:
- They add the Micronaut Test Resources plugin to our Gradle build, which will use our local installation of Docker Desktop to automatically start anything we need for local development and testing (namely, MariaDB and later Kafka).
- They add the various Java libraries required to use Micronaut Data JPA with a MariaDB database.
As said above, the README.md changes are just some useful links that you can check while doing this practical.
The application-test.properties changes tell Hibernate that it should not try to automatically create tables in our database from our JPA-annotated classes, by setting the hbm2ddl.auto option to none. (hbm refers to Hibernate, and ddl refers to SQL Data Definition Language queries like CREATE TABLE.)
The application.properties changes do a few things:
- They indicate that the
defaultdata source is a MariaDB database, using theMYSQLdialect of SQL (used for the underlying JDBC connection), and specifying the fully-qualified class name of the MariaDB JDBC driver. - They turn on Micronaut Flyway for the
defaultdata source, so it will automatically apply all pending database migrations on startup. - Since we’re using Flyway, they also disable
hbm2ddlhere.
Ready to move on?
Once you’ve made all the changes in the patch produced by Micronaut Launch, ensure that your IDE reloads the Gradle project.
In IntelliJ, this can be done by pressing the “Reload All Gradle Projects” in the Gradle drawer:
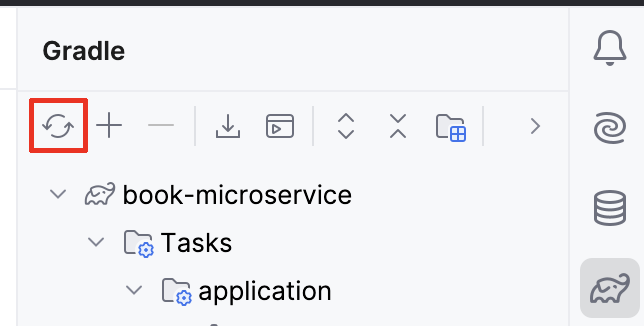
Do not try to run the project yet, as we still have some changes to make.
Book entity
Let’s migrate our in-memory Books to database records.
We will create the first migration for our database, write the JPA entity, and migrate our codebase to use it.
Creating the database migration
We are using Micronaut Flyway to maintain our database schema over multiple releases of the microservice.
In this first release, we will create the hibernate_sequence sequence needed by Hibernate to compute primary keys for new objects, and the book table needed to store books.
In IntelliJ, create the src/main/resources/db/migration/V1__create-book.sql file.
The V1 is used to indicate that this is the first migration to be run, and then we have two underscores to separate the version number from the short description of the migration.
The file should have this content:
create sequence hibernate_sequence;

create table book (
  id bigint primary key not null,
  title varchar(255) not null,
  author varchar(255) not null
);
Renaming the Book DTO class
We will be creating a Book domain class soon, so to avoid confusion we should rename our existing Book Data Transfer Object (DTO) class to BookDTO.
From now on, we will follow the convention of adding DTO at the end of the name of every DTO class.
You can do this by right-clicking on Book within the Project section of IntelliJ, selecting “Refactor - Rename” and entering BookDTO.
Do not rename similarly named fields or classes.
Creating the Book domain entity
We now need to create a JPA @Entity class that matches the book table.
Create a new domain subpackage within uk.ac.york.cs.eng2.books, and create a Book class within it.
If you remember from the lecture, mapping the book table to a JPA entity would require these steps:
- Annotate the class with
@Entityfrom thejakarta.persistencepackage. - The
idcolumn should be mapped to anidfield of typeLong, annotated as@Idand@GeneratedValue. - The
titlecolumn should be mapped to a field of the same name of typeString, annotated with@Column. - The
authorcolumn should be mapped in the same way astitle.
Add getter and setter methods for each of your fields. You can do this via the “Code - Generate…” menu item.
Creating the Book repository
We will need to perform a few common database queries, like listing the books, finding a book by its primary key, and so on.
Instead of writing SQL by hand, we will use a @Repository interface.
Create a new repository subpackage within uk.ac.york.cs.eng2.books, and create a BookRepository interface within it.
The interface should extend PageableRepository<Book, Long>, and should be annotated with @Repository from io.micronaut.data.annotation.
It will look like this:
@Repository
public interface BookRepository extends PageableRepository<Book, Long> {
}
Updating your controller
You should now revisit your BooksController, and make it use the repository instead of the Map of books it has now.
First, replace this:
private Map<Integer, BookDTO> books = new HashMap<>();
With this:
@Inject
private BookRepository repository;
This will make Micronaut automatically inject an implementation of BookRepository into your controller when the application starts.
You need to rewrite the various methods in the controller to answer the various requests through the methods in the repository. You will find these repository methods useful (there is a full reference on the Micronaut Data Javadocs):
repository.findAll()lists all the books.repository.findById(id)returns anOptional<Book>given an ID.Optional<T>is the type of aTvalue that may or may not be present. If you have anOptional<T> o, check first if it has a value witho.isPresent(): in that case, obtain the value viaget(), otherwise react accordingly (e.g. producing an HTTP 404 error response).repository.save(book)saves aBookto the database. If theBookhas an ID (which you should not set yourself: Micronaut Data will do it for you), it will perform an update of the row with that ID, otherwise it will insert a new row and return theBookwith its auto-generated ID set.repository.existsById(id)returnstrueif aBookexists in the database with that ID, andfalseif it does not.repository.deleteById(id)will delete a book from the database, given an ID.
While rewriting the methods, take these aspects into account:
- You could continue to use
BookDTOobjects for your requests and responses, or you could add@SerdeabletoBookand use it instead. DTO objects are normally used when you do not want to send or receive all the fields in the original entity, due to privacy, security, or bandwidth concerns. Domain objects can be used when you do want to send everything about the entity. - Again, you must not set the ID of a
Bookyourself: Micronaut Data will do it for you when you call the repository methods. - You will need to change the
@PathVariablearguments tolong, as the primary key ofBookis aLongvalue (since we usedbigintin the database schema). You will have to change the equivalent arguments in the declarative HTTP client interface you used for testing as well (BooksClient). - You will need a
@Transactionalannotation on the method you use to update an existing book, as you will need to first obtain the existingBook, then update its fields, and then save it. If you do not specify this@Transactionalannotation, you will get an error like this one:
This is because thedetached entity passed to persist: uk.ac.york.cs.eng2.books.domain.BookBookreturned byrepository.findById(id)would be immediately detached from its database session: without the@Transactionalannotation, each repository method call runs on its own separate transaction. The@Transactionalannotation ensures that all repository calls within the method are running as part of the same transaction.
Reporting the ID of the created books
We need to change the behaviour of the controller method responsible for creating books (createBook in the model solution), so that it lets the client know about the ID of the Book that it created, in case the client wants to make follow-up requests about the book (since the ID is auto-generated by the database).
You have two options:
-
The simplest option is to just return the
Bookthat was produced by therepository.save(book)call. ThisBookwill have the ID filled in. -
An alternative option is to return an
HttpResponsewith the appropriateLocationheader. This can be done with this code:return HttpResponse.created(URI.create("/books/" + book.getId()));This second style matches better the REST approach, as using the proper HTTP 201 Created status code with the Location of a newly created resource is part of Level 2 of the Richardson Maturity Model.
Regardless of which option you choose, make sure to update the declarative HTTP client interface in your tests (BooksClient) to match.
Updating our tests
We should now revisit our tests, as they will work from a database instead of working from an in-memory data structure.
Open the BooksControllerTest class.
Replace this @MicronautTest annotation:
@MicronautTest(rebuildContext = true)
With this annotation:
@MicronautTest(transactional = false)
This is needed so that the tests are not running within a transaction, as that would isolate them from the effects of invoking our microservice on our database (so they would not see any rows that were changed, for instance).
We need to clean the database between tests, to avoid any interference from one test to another.
Add this test setup code to your BooksControllerTest:
@Inject
private BookRepository bookRepository;

@BeforeEach
public void setup() {
  bookRepository.deleteAll();
}
Next, you should change the tests so that they do not specify an ID when sending requests to create books (as the IDs will be automatically generated by Micronaut Data). You should only send the desired title and author, and then obtain the ID of the created book from the response:
- If you decided to return the created
BookincreateBook, you can callreturnedBook.getId(). - If you are producing an HTTP 201 Created response with a Location header, you will need to extract the ID from the header.
This could be done with code like this, which you may want to extract to a utility method:
HttpResponse<Void> createResponse = booksClient.createBook(b);
Long bookId = Long.valueOf(createResponse.header(HttpHeaders.LOCATION).split("/")[2]);
If you have made all the necessary changes, ensure Docker Desktop is running, and then run your tests. Before moving on, ensure that all your tests are passing.
Automated database provisioning via Micronaut Test Resources
Launch the Gradle run task, and try out the endpoints in your microservice through the Swagger UI.
You should see them working as intended, as the tests passed.
Before stopping the application, consider one thing we haven’t done. We have not specified any database connection details, yet we have a database: how did that happen?
The answer is the Micronaut Test Resources Gradle plugin.
You may remember that we added it to our build.gradle file at the start of the practical.
This Gradle plugin sets up Micronaut so that if we do not specify a database connection URL, and the Micronaut application requires a database, it will automatically start a Docker container and connect Micronaut to it.
This is very useful for local development and testing, as we can forget about having to set up a database server ourselves!
Try opening Docker Desktop while your application is running, and you should see something like this:

One of the containers uses the mariadb:latest image: this is the MariaDB server that Micronaut Test Resources has started for us.
This server will be automatically destroyed when we shut down the application.
You can also note that its Port is 62544:3306: this means that port 62544 in our local machine points to port 3306 inside the container (3306 is the default MariaDB port).
Logging SQL queries for inspection
In some cases, you may want to log all SQL queries being executed.
For example, to check if they may be running an inefficient query that could potentially take a long time.
To do this, add the following to your application.properties file:
# Logs all queries
jpa.default.properties.hibernate.show_sql=true
jpa.default.properties.hibernate.format_sql=true
Try restarting your application, and listing all books. You should see text like this in your IntelliJ console:
Hibernate:
    select
        b1_0.id,
        b1_0.publisher_id,
        b1_0.title
    from
        book b1_0
Warning
Do not use this in production! You should remove these logging lines once done, as otherwise they could reveal sensitive information in the logs, and they would significantly increase their size. They should only be used during development, and never in production environments.
(Optional) Integrated database client in IntelliJ Ultimate
Knowing the local port can be useful if we want to inspect the database ourselves. For instance, IntelliJ Ultimate (which you can get via their education program) comes with a convenient database client out of the box. On the right side of the window, click on the “Database” icon, which looks like three stacked cylinders:

Try creating a data source of type MariaDB, connecting to localhost on the port shown in your Docker Desktop window (note that this may differ from the above screenshot, and can change every time you run Micronaut).
Use test for the user and the password.
Once you connect, you will get something like this:
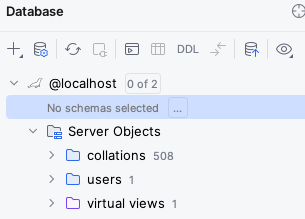
Click on the “…” next to “No schema selected”, and choose the test schema.
You should now be able to see all the objects in the database and query their contents:
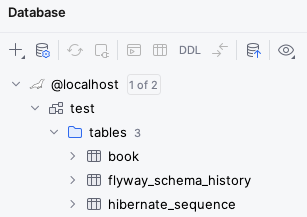
You may notice that besides the book table and hibernate_sequence that we created in our .sql file, there is also a flyway_schema_history table.
This is an additional table that Flyway uses to keep track of which migrations have already run in the database, so that it doesn’t try to run them again if you were to restart the application.
For more information on the IntelliJ database client, check its official documentation.
1:N with Publisher
We created the Book entity that mapped the rows in our book table, and we created a controller that allowed for managing these Books via HTTP requests.
However, we also need to deal with other entities that may be related to books.
For instance:
- Each
Bookis published by aPublisher(a “many-to-one” relationship). - A
Publisherpublishes manyBooks (a “one-to-many” relationship).
In this section, we will practice with implementing such a relationship in our application.
Migrating the database
We need to add a Flyway database migration that will create the appropriate publisher table, and add the publisher_id foreign key to the book table.
Create a src/main/resources/db/migration/V2__add-publisher.sql file with this content:
# Creates the table for our publishers
create table publisher (
    id bigint primary key not null,
    name varchar(255) unique not null
);

# Adds the foreign key from a book to its publisher
alter table book
add publisher_id bigint references publisher (id);
Basic functionality for publishers
Create the Publisher entity in your application and its repository.
Add a controller that allows you to create, list, update the name, and delete its entries, by handling these HTTP requests:
GET /publishers: list all the publishersPOST /publishers: add a publisherGET /publishers/{id}: get a specific publisher by IDPUT /publishers/{id}: update the name of a publisher by IDDELETE /publishers/{id}: delete a publisher
As these steps will be the same as for Book, we will not provide detailed step-by-step instructions on how to do it.
Ignore the relationship between Book and Publisher for now.
Don’t forget to write the appropriate tests for it!
Adding the relationship to the entities
Let’s extend Book and Publisher so they know about each other.
First, add this to Book:
@ManyToOne
private Publisher publisher;
Generate the getter and setter methods (getPublisher / setPublisher) as usual in your IDE.
In addition, if your Book domain entity is @Serdeable, add @JsonIgnore to the new publisher field, as we want to avoid a scenario where we serialise the entire Publisher and all their books when we’re trying to send a single Book over the network.
@JsonIgnore means that the field will not be serialised via JSON.
Likewise, add this to Publisher, as well as the appropriate getter and setter methods:
@OneToMany(mappedBy = "publisher")
private Set<Book> books = new HashSet<>();
If you remember from the lecture, in bidirectional relationships like this one, there is one side that owns the relationship: in other words, the side that you should change - the other side is only for reading.
In the case of one-to-many + many-to-one relationships, the owning side is always many-to-one.
In other words, Book is the owner of this relationship.
The side that does not own the relationship (Publisher) indicates via mappedBy the name of the property on the other side that owns the relationship (in this case, publisher in Book).
Likewise, if you made your Publisher to be @Serdeable, add the @JsonIgnore annotation to your books field.
Before we move on, check that all your tests are still passing.
Extending the controllers
We want to add support for this Book->Publisher relationship to our controllers.
Specifically, we want to support these features:
POST /books/{id}should allow for specifying the publisher.PUT /books/{id}should allow for setting and unsetting the publisher of aBook.GET /books/{id}/publishershould return the publisher of aBook.GET /publishers/{id}/booksshould list theBooks of aPublisher.
You should be able to implement these yourself with what you have learned so far for the most part. There are a few things to take into account, though:
- For specifying the publisher while creating or updating a
Book, you may now need to create aBookCreateDTOwith a dedicatedLong publisherIdfield, asBookitself will not allow you to specify that information (since it will just have aPublisher publisherfield). - Fetching the publisher of a
Bookcan be done in two main ways:-
If you use
repo.findById(id)to get theBookand then usebook.getPublisher()to get thePublisher, you will need to add the@Transactionalannotation to the controller method so both queries will run in the same transaction. Otherwise, you may get an error message on thebook.getPublisher()call, asbookwill no longer be connected to a database session. -
Alternatively, you can add a custom query method to your
PublisherRepositoryand retrieve the appropriatePublisherin one call, like this one - we picked this name specifically so we’d obtain thePublisherthat has the givenidamong itsbooks:Optional<Publisher> findByBooksId(Long id);
-
- When fetching the
Books of aPublisher, you can follow two approaches:- Use a
@Transactionalcontroller method that first finds thePublisher, copiespublisher.getBooks()to a newList<Book>(to avoid any issues with lazy collections) which it then returns. - Use a custom query method in your
BookRepositorywhich fetches thoseBooks directly - again, we picked the name specifically to find theBooks whosepublisherhas the given ID:List<Book> findByPublisherId(long publisherId);
- Use a
When testing, consider that you will need to modify the @BeforeEach method so it deletes all the Books first, and then all the Publishers.
If you try to delete all the Publishers first, you may see errors as some Books may still be pointing at them.
Once you are done with the above functionality and your tests pass, move on to the next section.
M:N with Author
In the previous section, we added Publisher entities and a bidrectional one-to-many relationship between Book and Publisher.
In this section, we will promote the authors of a book to its own Author entity, and implement a many-to-many relationship between Book and Author.
Migrate the database
Create a new database migration script named V3__add-author.sql, with this content:
-- Authors
create table author (
    id bigint primary key not null,
    name varchar(255) not null
);

-- Join table between books and authors
-- Book owns the relationship, so the name is book_author, rather than author_book
create table book_author (
    -- Name is (field name)_(primary key of referenced entity)
    books_id bigint not null references book (id),
    authors_id bigint not null references author (id),
    -- Primary key of this table is the composite of the
    constraint primary key (books_id, authors_id)
);

-- Migrate existing authors into author rows
insert into author
select nextval(hibernate_sequence), b.author
from (select distinct author from book) b;

-- Join up books and authors
insert into book_author (books_id, authors_id)
select book.id, author.id
from book join author
where book.author = author.name;

-- Drop the old author column
alter table book
drop column author;
This script creates the new table for our Author entity, and a join table between Book and Author as this is a many-to-many relationship.
You’ll notice that it also migrates the existing data into this new schema, and drops the old author column as that is no longer relevant.
This is an advantage of a database migration tool like Flyway: if we had deployed a previous version in production, this script would automatically migrate existing data during the upgrade. Obviously, migrating production data is a sensitive matter, so this migration would have to be carefully tested in your development environment first, and you would also want to do periodic backups and to perform a backup right before such a migration.
Update the Book entity
Remove the author field and its setter and getter from the Book entity, and correct any tests that may have been affected.
If you use DTOs for some of your Book-related requests or responses, remove any author fields from them as well.
Before moving on, ensure all your tests pass again.
Create the Author entity
Create the Author entity class, add the controller for it, as well as any appropriate tests.
Ignore the relationship between Author and Book for now.
Add the Book-Author relationship
Let’s add the bidrectional many-to-many relationship between Book and Author.
We will make Book own the relationship, so add this to Book, plus its getter and setter:
@ManyToMany
private Set<Author> authors = new HashSet<>();
As we said before, if you made your Book to be @Serdeable, you should add @JsonIgnore to the authors field so that it will not be part of its JSON serialisation by default.
Add this to Author, together with its getter and setter methods:
@ManyToMany(mappedBy="authors")
private Set<Book> books = Collections.emptySet();
You’ll notice that here were used mappedBy to indicate the name of the field in Book that owns this bidirectional relationship.
As said above, the mappedBy side is the one that does not own the relationship (it’s only for reading, not for modifying).
We can make the default value of the books field to be an unmodifiable empty set, so it will immediately complain if someone tries to modify it.
When we query the databse, our ORM will automatically replace this set with a lazily-loaded collection, which will be strictly limited to reading.
Extending the controllers
It’s time to expose this many-to-many relationship from our API. There are many different ways we could do it, but for this practical, implement these endpoints:
GET /books/{id}/authors: list the authors of a book.PUT /books/{id}/authors/{authorId}: add the given author to the book. Do nothing if the author is already listed on the book.DELETE /books/{id}/authors/{authorId}: remove the given author from the book. Do nothing if the author is not listed on the book.GET /authors/{id}/books: list the books of an author.
These are some aspects to take into account:
- To update the set of authors associated to a
Book, you only need to save theBookitself (i.e.repository.save(book)) after adding or removing the relevantAuthorfrombook.getAuthors(). The ORM will figure out what needs inserting and deleting. - Remember from the previous section that if you need to chain multiple queries (e.g. find a
Bookand then copy its authors to a newListto avoid issues around trying to serialise a lazily-loaded collection outside a database session), you will need to annotate the controller method as@Transactional. - You could use custom repository methods to directly find the
Authors by the ID of theBook, or find theBooks by the ID of theAuthor. Review the notes from the previous section for inspiration.
Additional exercises
Congratulations for getting this far! This has been a long practical, as we’ve had to touch upon a wide range of tasks around implementing an API to manage a set of entities in a database.
If you would like to go beyond this practical, here are some ideas you could try out.
Adding creation or update timestamps
Micronaut Data supports the @DateCreated and @DateUpdated annotations to automatically record the timestamps of when an entity was created or last updated.
Consult the Micronaut documentation and give this a try.
Adding new entity types and relationships
Consider adding another one-to-many or many-to-many relationship around your entities.
For instance:
Bookhas multipleGenres, which are also associated to multipleBooks- You can organise some
Books intoSeries(e.g. the Lord of the Rings books, or the Harry Potter books). You would have a one-to-many relationship fromSeriestoBook. How would you record the order of a givenBookin aSeries?
Adding by-name endpoints
You could add endpoints to find authors or books by name, such as:
GET /books/byName/{name}GET /authors/byName/{name}
This will require creating custom repository methods, e.g. findByName.
Adding paging
In a real application, you would never return all the records in one go. This is because you could overwhelm both the client and the server if you tried to send thousands of records in one go. Instead, a common strategy is to use pagination.
Have a look at the relevant section of the Micronaut Data documentation on how to do paginated queries, and consider changing your listing endpoints so they can accept an optional page number, like this:
@Get("/{?page}")
Page<Author> list(@QueryValue(defaultValue = "0") int page) { ... }
Note that page numbers start at zero for Pageable.
If you’d prefer page numbers to start at one in your API, feel free to make any necessary adjustments.
Practical 3: Integrating external services
This is the worksheet for the fourth practical in the Engineering 2 module.
We will start from a solution to Practical 2, and integrate an external service to fetch more information about the books. You will practice with using the Gateway pattern to encapsulate the details of accessing this external service.
Work through every section of the practical in sequence, without missing steps. You can use the “Previous” and “Next” buttons on the left and right sides to quickly go between sections.
Introduction
In this practical, you will extend the book-related microservice by adding an integration with the OpenLibrary APIs to fetch more information about the books that are added to the database.
What you should already know
You should be able to:
- Implement basic Micronaut microservices that respond to HTTP requests (from Practical 1).
- Query and update a relational database within a Micronaut microservice using Micronaut Data (from Practical 2).
You should be familiar with these concepts from the lectures:
- The differences between in-process and inter-process communication.
- How the Gateway pattern helps encapsulate the details of interacting with an external service.
- The main elements in an OpenAPI specification, and its use for generating clients.
What you will learn
- How to use the Micronaut OpenAPI Gradle plugin to generate a client from an existing specification.
- How to develop and test a Gateway for a specific external service (the OpenLibrary API).
- How to integrate the Gateway for improving the information you have about a book in the background.
What you will need
- Java 17 or newer: install from Adoptium.
- An IDE with Gradle and Java support: in this worksheet, we discuss IntelliJ IDEA.
- A local installation of Docker Desktop.
Ensure Docker Desktop is running before you start this practical.
- Note: if using a lab machine, you will need to boot Windows as Docker Desktop is not installed in the Linux image.
If you have a recent installation of Docker Desktop (using Docker Engine 29 or newer), you will need to tell the Docker Java libraries to use version 1.44 of the Docker API, until this issue in Micronaut is fixed. From a Linux/Mac terminal, or from Git Bash in Windows, run this command:
echo api.version=1.44 > $HOME/.docker-java.properties
If you do not have Git Bash on Windows, you can run this from PowerShell instead:
"api.version=1.44" | set-content $HOME/.docker-java.properties -Encoding Ascii
What you will do
You will start from a solution of Practical 2 (either yours, or our model solution) and work through the rest of the sections.
Client generation
Before starting this section, you will need to have a solution to Practical 2. You can use your own, or you can start from the model solution of Practical 2.
Obtaining the OpenAPI specification
We want to integrate an external service to have better information about our books. For this practical, we have chosen the OpenLibrary API, as they have an OpenAPI sandbox that we can experiment with.
As a first step, visit their sandbox (see link above), and download the openapi.json file linked from under the “Open Library API” header (the link in “Contribute by proposing edits to openapi.json”).
Move and rename the openapi.json file to src/main/openapi/openlibrary-0.1.0.json in your project.
Adding the Micronaut OpenAPI Gradle plugin
If we want to generate clients from the OpenLibrary OpenAPI spec, we will need to add the Micronaut OpenAPI Gradle plugin to our build.gradle.
Open your build.gradle file, and add this line to the plugins section:
id("io.micronaut.openapi") version "4.6.1"
Configuring the Micronaut OpenAPI Gradle plugin
We also need to let the Micronaut OpenAPI Gradle know about the OpenLibrary spec.
Within the micronaut section of the build.gradle file, add this block:
openapi {
  client("openlibrary", file("src/main/openapi/openlibrary-0.1.0.json")) {
    apiPackageName = "uk.ac.york.cs.eng2.books.openlibrary.api"
    modelPackageName = "uk.ac.york.cs.eng2.books.openlibrary.model"
    clientId = "openlibrary"
    useReactive = false
  }
}
Save the file and reload all Gradle projects as we did at the end of the first section of Practical 2.
If you did it correctly, the “Gradle” drawer in IntelliJ should show a new “Tasks - micronaut openapi” folder.
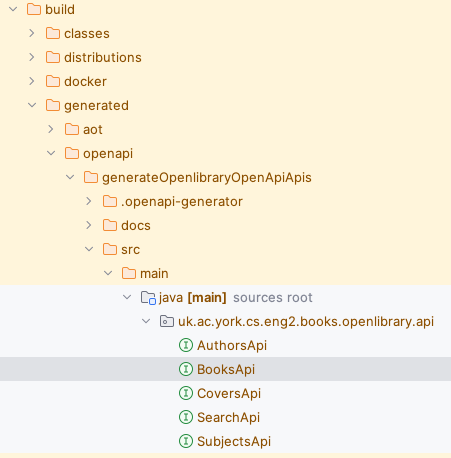
Try running the build Gradle task.
You will see that a number of classes ending in Api were generated for us within the build/generated/openapi folder:
Specifying the base URL of the OpenLibrary API
You may notice that we specified a clientId in the openapi block.
This allows us to configure the generated client from the application.properties files.
Specifically, we’ll need to tell Micronaut how to access the OpenLibrary API.
Edit the src/main/resources/application.properties file, and add these lines:
micronaut.http.services.openlibrary.url=https://openlibrary.org/api
Examining the generated code
Have a look through the generated code. You may notice one oddity - the return types are all plain Objects, like this one from BooksApi:
/**
 * {@summary Read Isbn}
 *
 * @param isbn (required)
 * @return Successful Response (status code 200)
 *         or Validation Error (status code 422)
 */
@Get("/isbn/{isbn}")
Object readIsbnIsbnIsbnGet(
    @PathVariable("isbn") @NotNull Object isbn
);
Unfortunately, it seems that at the moment the OpenAPI specification is manually written, and that they do not use schemas. We will have to write additional logic in our gateway that understands the format of the response.
Creating the gateway
Let’s say that we want to fetch additional information about a book by its ISBN from OpenLibrary.
We want to shield most of our application from the details of talking to OpenLibrary, so we will apply the Gateway pattern that we discussed in the lecture.
Adding the HTTP client to the regular dependencies
The build.gradle normally only includes the HTTP client for compilation and for testing.
We will need it for our regular implementation as well.
Remove these two lines from the dependencies of your build.gradle (they may be separate from each other):
compileOnly("io.micronaut:micronaut-http-client")
testImplementation("io.micronaut:micronaut-http-client")
Add this line to the dependencies:
implementation("io.micronaut:micronaut-http-client")
Reload all Gradle projects, since we changed the build.gradle file.
Designing the Gateway interface
Most of the application only needs to know that given an ISBN, we can get some additional information.
Let’s encode this in a new interface, within a new gateways subpackage:
public interface BookCatalogGateway {
  Optional<BookCatalogInfo> findByIsbn(String isbn);
}
Create the BookCatalogInfo within the same package.
For this practical, we will keep it simple and just keep a List<String> of publisher names in it (with the appropriate getter/setter).
Writing the scaffold of the Gateway implementation
Create an OpenLibraryBookCatalogGateway class in the gateways subpackage which implements the BookCatalogGateway.
Annotate it with @Singleton so Micronaut will automatically create an instance of it and inject it wherever a BookCatalogGateway is requested.
Inject a BooksApi into OpenLibraryBookCatalogGateway.
You would now need to implement the findByIsbn method, using the readIsbnIsbnIsbnGet method in BooksApi.
For now, just write enough for the code to compile (e.g. just return Optional.empty()).
Designing a test case for the gateway
Given that the method only returns a raw Object, we’ll need specific logic in our gateway to cast this down to the correct type and fill in the BookCatalogInfo with the appropriate information.
It’s best to do this in a test-driven way.
Create an OpenLibraryGatewayTest test class in the appropriate package within src/test/java, and write a test that uses the gateway to fetch the information of some book in the Open Library by ISBN (for instance, 1524797162 is the ISBN of a videogame book).
It should have an assertion about having “Del Rey” as its sole publisher.
Try running the test: it should fail, as we don’t have a proper implementation of the gateway method yet.
Completing the Gateway implementation
It’s time to finish implementing the gateway method so our test passes.
The problem is that the readIsbnIsbnIsbnGet method in BooksApi only returns a raw Object: you’ll need to use the debugger to find out what is its actual type, and then cast it to the correct type to extract the desired information (the names of the publishers) and put it in the BookCatalogInfo.
You may find it useful to experiment with the OpenLibrary Swagger UI yourself and see what the response looks like.
In terms of ISBNs, the endpoint only takes ISBNs of books in the Open Library: for example, use 1524797162 (it’s the ISBN of a videogame book).
You’ll most likely need to use instanceof checks and cast down to Map<String, Object> and List<String> where needed.
You should return Optional.empty() if the response is not in the format if you expect or if an exception is thrown while invoking the OpenLibrary API: you may want to print an error message in those situations (in a production website, you’d log a warning of some kind).
This downcasting is obviously somewhat fragile, as OpenLibrary may decide to change the format of their response at any time, but at least all that is encapsulated in your gateway, and you have a test to automatically detect if they have changed the API in a breaking way.
Integrating the gateway
Now that we have the gateway and a test for it, let’s integrate it into the application.
In this practical, when someone adds a book with an ISBN, we will immediately request the additional information from OpenLibrary and use it.
This simple approach has its advantages and disadvantages:
- Good: it’s the simplest to implement.
- Good: the book record will be complete by the time we respond to the addition of a book.
- Bad: it adds latency to the processing of the request.
- Bad: OpenLibrary may be down while someone is trying to add a book. If we are not careful, users may see error messages while trying to add books just because of that.
In the next practical, we will show you how to postpone this work to a background process, to reduce latency.
Adding ISBNs to books
Create a database migration script called V4__add-isbn.sql, with this content:
alter table book
add isbn varchar(13);
Add the isbn field to your entities and DTOs as needed, and update any controllers and their tests accordingly (e.g. setting the ISBN while creating and updating a Book).
Using the gateway from the controller
Inject a BookCatalogGateway into your BooksController.
Update the controller so that if a publisher is not explicitly mentioned but an ISBN is provided, the controller will try to use the gateway to obtain the names of the publishers.
If one or more publishers are found, the controller should try to reuse the Publisher in the database whose name matches the first publisher mentioned by OpenLibrary, or create a new one if it does not.
Testing the controller’s use of the gateway
You will need to update the BooksController tests to cover the use of the gateway.
To avoid having the unit tests depend on an external service, use a method annotated with @MockBean to return a Test Double of the connection object used by the gateway (the BooksApi), which always provides the same response.
You can use Mockito to quickly implement that Test Double, instead of having to write a full implementation of the interface.
Remember to add Mockito to your build.gradle first, as we did on Practical 3.
For our case, it could look like this:
BooksApi mock = mock(BooksApi.class);
when(mock.readIsbnIsbnIsbnGet(any())).thenReturn(
  Map.of("publishers", Collections.singletonList("P Ublisher"))
);
The any() call uses Mockito’s argument matchers to indicate that the mock will always return the same predefined response for any ISBN.
Once your tests pass again, continue.
Trying the gateway from the Swagger UI
Start the application via the Gradle run task, and use the Swagger UI to try an add a book with an ISBN listed in OpenLibrary.
You may notice that it does not populate the Publisher as you expected.
If you look at the messages coming from your Micronaut application, you will see something like this:
io.micronaut.http.client.exceptions.HttpClientException:
You are trying to run a BlockingHttpClient operation on a netty event loop thread.
This is a common cause for bugs: Event loops should never be blocked.

You can either mark your controller as @ExecuteOn(TaskExecutors.BLOCKING), or use the reactive HTTP client to resolve this bug. There is also a configuration option to disable this check if you are certain a blocking operation is fine here.
The error is self-explanatory, but the basic idea is that the controller methods are invoked on a loop that receives every incoming HTTP request. Anything that takes too long (like invoking an external service) could result in the event loop not being able to handle requests at a consistent pace.
As the error says, you should add @ExecuteOn(TaskExecutors.BLOCKING) to your controller class, and restart the application.
It should work now as expected: the event loop will dispatch the processing of each request to a separate thread pool, meaning that it will not be slowed down by a particular request taking longer than the others.
Additional exercises
Congratulations on completing this practical!
We hope that you found it interesting to use the Gateway pattern and use it from a controller.
Here are some ideas on things you could try to expand upon what we have covered in this practical.
Enable caching in the gateway
To reduce the load imposed on OpenLibrary from our application and improve its responsiveness, it may be good to adopt Micronaut Cache to automatically cache the results from our gateway.
For inspiration, you may want to check the example mentioned in the lecture slides for service integration.
It should be a matter of adding the library, adding some configuration to your application.properties, and adding the appropriate @Cacheable annotation to the right method in your gateway implementation.
Use the Circuit Breaker pattern
You may have noticed that the example in the service integration lecture also uses the Micronaut Retry library to implement the Circuit Breaker pattern.
This pattern would be useful if OpenLibrary had intermittent problems.
The @CircuitBreaker annotation implies a number of changes in behaviour:
- There will be a few retries when making the original request, instead of a single one.
- If several errors are observed in a given period of time, the “circuit breaker” will go into a “closed” state and all requests will immediately fail. This has several benefits:
- The application will be more responsive, as it won’t be waiting every time for a failing service.
- The failing service will see a reduction in its load, which will make it easier for its administrators to bring it back up.
- After some time, the “circuit breaker” will go to a half-open state, in which it will attempt to make a real request again. If that works, it will go back to an “open” state where requests go to OpenLibrary as usual. Otherwise, it will go back to the above “closed” state and wait for some time before trying again.
Since you cannot directly change the generated OpenAPI client (BooksApi), you may need to apply the @CircuitBreaker interface to a new subinterface of BooksApi that you would create yourself.
Use more information from OpenLibrary
You could try to pull in more information from OpenLibrary. For instance, you could get the title as well, or the authors.
Practical 4: Reacting to events
This is the worksheet for the third practical in the Engineering 2 module.
We will give you the code for a simulator of the check-in desks in an airport, and you will create an additional Micronaut project that will consume its events through Micronaut Kafka to produce a number of reports about the current state of the airport.
Work through every section of the practical in sequence, without missing steps. You can use the “Previous” and “Next” buttons on the left and right sides to quickly go between sections.
Introduction
In this practical, you will write a microservice that will consume the events from a simulated airport check-in area, and produce various reports about the check-in desks and the events so far.
To do so, you will use Micronaut Kafka.
You will also revisit the solution from Practical 3 and rework it to fetch information in the background, to reduce the latency of requests to add books. To do so, we will use Kafka consumers and producers to decouple the processing of book requests from the use of the external API.
What you should already know
You should be able to:
- Implement basic Micronaut microservices that respond to HTTP requests (from Practical 1).
- Query and update a relational database within a Micronaut microservice using Micronaut Data (from Practical 2).
- Calling other microservices from your own microservice (from Practical 3).
You should be familiar with these concepts from the lectures:
- The main components in an event-driven architecture.
- The core concepts in Apache Kafka: cluster, broker, topic, partition, record, and the structure of a record (key, message body, and a timestamp).
- The challenges around achieving durable and scalable stateful event processing, and common strategies (partitioned state, re-keying).
- The use of interaction-based testing (Mockito) for checking the correct use of Kafka producers.
What you will learn
- How to create a project that uses Micronaut Kafka.
- How to automatically create topics while starting a Micronaut microservice.
- How to implement Kafka producers and consumers using Micronaut Kafka.
- How to test Kafka producers and consumers using JUnit.
What you will need
- Java 17 or newer: install from Adoptium.
- An IDE with Gradle and Java support: in this worksheet, we discuss IntelliJ IDEA.
- A local installation of Docker Desktop.
Ensure Docker Desktop is running before you start this practical.
- Note: if using a lab machine, you will need to boot Windows as Docker Desktop is not installed in the Linux image.
If you have a recent installation of Docker Desktop (using Docker Engine 29 or newer), you will need to tell the Docker Java libraries to use version 1.44 of the Docker API, until this issue in Micronaut is fixed. From a Linux/Mac terminal, or from Git Bash in Windows, run this command:
echo api.version=1.44 > $HOME/.docker-java.properties
If you do not have Git Bash on Windows, you can run this from PowerShell instead:
"api.version=1.44" | set-content $HOME/.docker-java.properties -Encoding Ascii
What you will do
You will create a new Micronaut project that will consume the events from this simulator (also written as a Micronaut application).
You will also revisit your solution to Practical 3 (or its model solution) to move the invocations to OpenLibrary to a background process.
Creating the project
For this practical, you will need to run two Micronaut applications at the same time:
- The simulator available here, which you should download, unzip, and open in your IDE. You should only need to run its
runGradle task (with Docker Desktop running) to have it start producing events. - A new
checkin-statsMicronaut application that you will have to create via Micronaut Launch.
Using Micronaut Launch
Similarly to Practical 1, you should open Micronaut Launch on your browser, and fill in the form according to what we need. In this case, you should fill the form like this:
- Application type: Micronaut Application
- Java version: 17
- Name:
checkin-stats - Base package:
uk.ac.york.cs.eng2.checkinstats - Micronaut version: the latest non-SNAPSHOT 4.x version (4.7.4 as of writing)
- Language: Java
- Build tool: Gradle
- Test framework: JUnit
You should also pick these features:
- The
openapiandswagger-uifeatures for the Swagger UI (as we did in Practical 1). - The
data-jpa,flyway,mariadb, andjdbc-hikarifeatures for object/relational mapping (as we did in Practical 2). - The
kafkafeature that is new to this practical.
Do NOT pick the kafka-streams feature as we do not use Kafka Streams, and it can run into problems without the appropriate configuration.
Micronaut Launch will look like this:
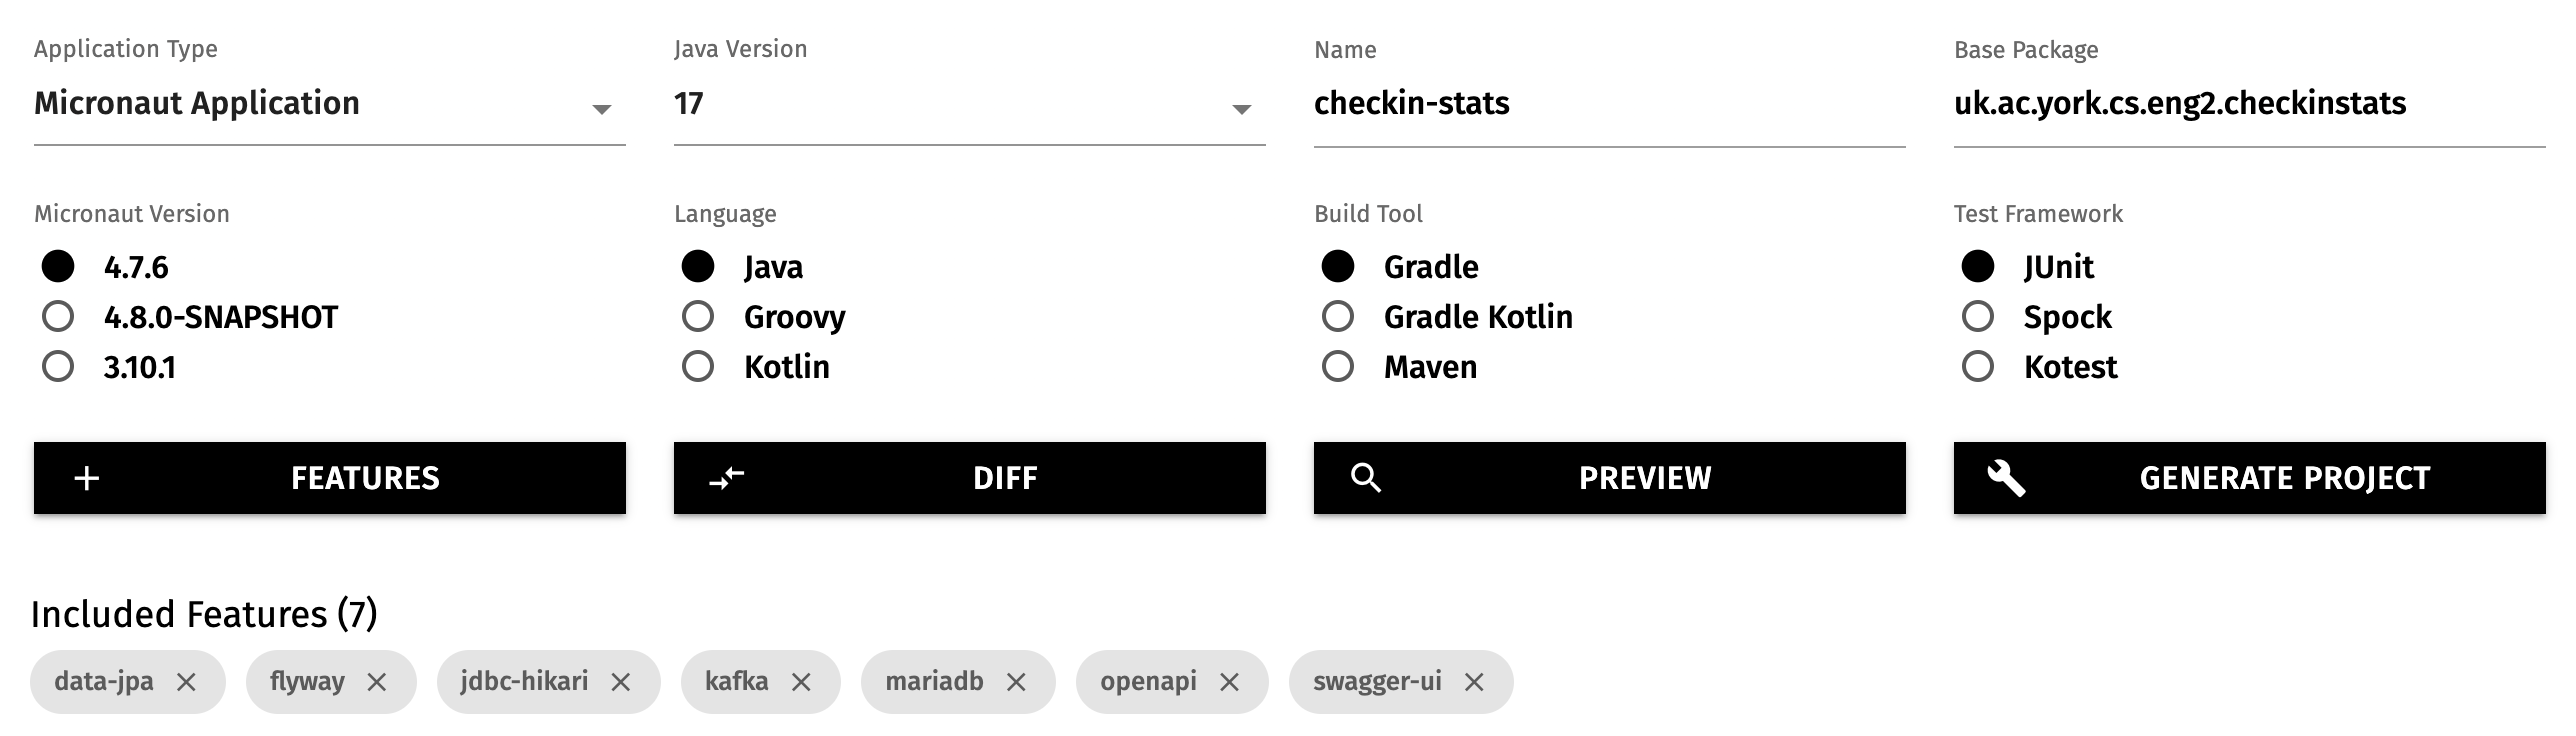
Adding the project to IntelliJ
We assume that you already downloaded the simulator at the top of this section, and opened it in IntelliJ.
Download the new checkin-stats project from Micronaut Launch, and unzip it.
Rather than opening it directly (which will prompt IntelliJ to open the project in a new window or replace this window), we will add it to our workspace so we can refer to both projects at once.
To do so, use the “+” button in the “Gradle” drawer of IntelliJ, as on this screenshot:
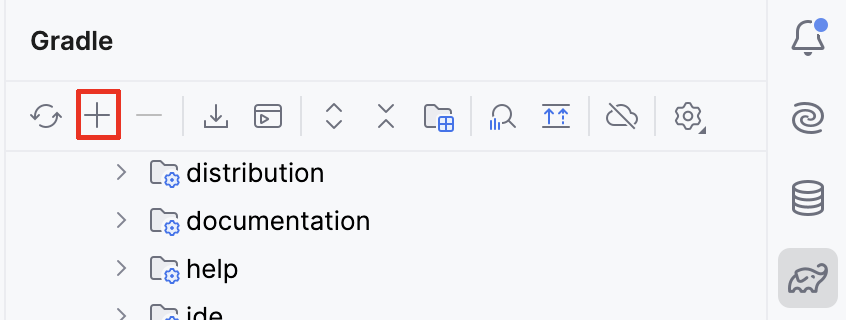
Point IntelliJ to the main folder of the new project (containing the build.gradle file), and after some time you should see both the simulator project and your own project listed in the Gradle drawer, like this:
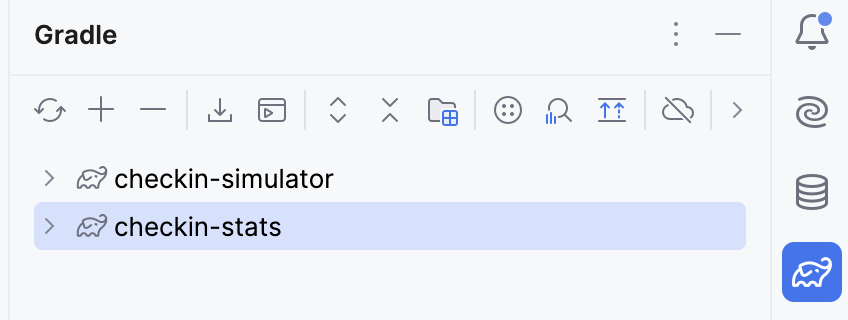
Sharing the Micronaut Test Resources server
Double check that the build.gradle files in both Gradle projects contain this text:
testResources {
  sharedServer = true
}
This bit of configuration tells Micronaut to share the Test Resources server between both projects. Remember that Test Resources is the one provisioning MariaDB database servers and Kafka clusters whenever required for local development and testing.
If at any point you want to throw away the current state of your MariaDB database and/or your Kafka cluster (to start from a clean slate), you can follow these steps:
- Stop your Micronaut applications.
- Stop the Test Resources server through
stopTestResourcesServiceGradle task in theTasks -> micronaut test resourcesfolder. - Start again your Micronaut applications.
Check-in statistics
Let’s start consuming records from Kafka. First, we will give an overview of the simulator that you downloaded, and then we’ll start with the first exercise: obtaining overall counts of automated check-ins that were started, completed, and cancelled.
The simulator project
This is the project that we asked you to download. It is a Micronaut application that regularly produces events in a number of Kafka topics. You will use it as-is: do not make any changes to it.
The core simulation
The simulator itself is the AirportSimulator class.
It is a plain Java class that implements a tick method which runs a “tick” of the simulation.
At each tick, a number of things happen:
- All working desks send a status update, confirming they still work.
- A check-in process may be started in some desks.
- A check-in process may be completed in some desks.
- Completing a check-in process will use up a piece of paper.
- When a desk has less than a certain amount of paper, it will send low-paper events.
- When a desk runs out of paper, it is considered to go out of order: it will send status updates, but it will not be able to complete check-ins.
- A check-in process may be cancelled in some desks.
- A desk may crash and stop sending status updates or completing check-ins.
- A desk may go out of order due to a mechanical failure, even if it has paper.
For each of these situations, AirportSimulator will invoke its fireEvent method mentioning the type of event and the terminal (check-in desk) involved.
Making the simulator produce Kafka records
AirportSimulator is unaware of Kafka, and does not run on its own: someone has to invoke tick regularly to make it advance the simulation.
ProducingAirportSimulator extends AirportSimulator, overriding fireEvent so that it translates the simulation event into a Kafka record which is sent to one of several Kafka topics.
Their names are in constants inside the AirportTopicFactory class:
public static final String TOPIC_CANCELLED = "selfservice-cancelled";
public static final String TOPIC_CHECKIN = "selfservice-checkin";
public static final String TOPIC_COMPLETED = "selfservice-completed";
public static final String TOPIC_LOWPAPER = "selfservice-lowpaper";
public static final String TOPIC_OUTOFORDER = "selfservice-outoforder";
public static final String TOPIC_STATUS = "selfservice-status";
ProducingAirportSimulator also overrides the tick method.
It does not change its implementation, but it adds this Micronaut annotation:
@Scheduled(fixedDelay = "${airport.tick.delay}")
This annotation means “invoke this method automatically according to a schedule”, with fixedDelay meaning “repeatedly invoke this method indefinitely, waiting for the specified time after the completion of each invocation”.
The value for fixedDelay is an expression that is expanded by Micronaut during application startup, using the value provided in the src/main/resources/application.properties file by default:
airport.tick.delay=100ms
Note how the class itself is annotated as a @Singleton, meaning that Micronaut will automatically create an instance of it, and then invoke its tick() method according to the schedule we saw above.
Producing Kafka records
Have a look at the AirportEventProducer: you’ll see that the records for these topics all have the same structure - the key is the terminal ID, and the body is a TerminalInfo record with two fields (whether it’s stuck, and how much paper is left).
Record types were introduced in Java 14 - this is what TerminalInfo looks like:
@Serdeable
public record TerminalInfo(boolean stuck, int paperLeft) {}
records are special classes intended to hold a few immutable values, and automatically provide accessor methods, equals(), hashCode(), and toString() implementations.
TerminalInfo is @Serdeable so we can turn it into JSON when we produce Kafka messages that use it, and read it back when we consume Kafka messages.
Automated topic creation
Have a quick look at the AirportTopicFactory: this is a @Factory that creates a number of @Beans on application startup.
The beans are NewTopic objects that will be used to automatically create the needed topics in the Kafka cluster, if they do not already exist.
Printing out produced messages for debugging
There is also a DebugAirportEventConsumer which consumes all of these events and just prints a message in each case.
This is mostly useful for debugging, hence the name.
First exercise
Now that you have an understanding of the simulator project and the topics it produces records for, it’s time for the first exercise.
The idea is to consume the records from the topics related to starting, completing, and cancelling check-in processes, and have a GET /stats endpoint which will return a JSON object like this one:
{
    "started": 200,
    "completed": 50,
    "cancelled":  40
}
The overall process will look like this:

This will take a number of steps: we will give you general pointers for each step.
Remember that all changes should take place in your own application (checkin-stats).
As said above, you should not have to make any changes to the simulator application.
Adding the database migration
Since this is stateful event processing, we need to maintain the state in a persistent location that will survive restarts, and will be accessible to all consumers.
Create a new database migration script called V1__create-checkin-stats.sql in the src/main/resources/db/migration folder, with this content:
create sequence hibernate_sequence;

create table partitioned_checkin_stat (
    id bigint primary key not null,
    name varchar(255) not null,
    partition_id int not null,
    value bigint not null default 0,
    constraint uk_stat_partition unique (partition_id, name)
);
You may recall from Practical 2 that hibernate_sequence is the database sequence used by Hibernate to automatically generate primary keys when it needs to.
The partitioned_checkin_stat table is an example of partitioned state, where we avoid interference between consumers by keeping different parts of the state for each Kafka partition.
A partitioned check-in statistic has a name (e.g. started), a partition ID (e.g. 1), and a value (the number of times that has happened so far).
We have also defined a unique constraint, saying that we can only have one row for a given combination of (partition_id, name).
This unique constraint has two benefits:
- It helps with data integrity, as we avoid having two values by mistake for the same combination.
- It helps with performance, as unique constraints typically imply the creation of an index (e.g. some form of B-tree) which will dramatically speed up the retrieval of the value for a given
(partition_id, name)combination.
Adding the entity and repository
Based on what you learned in Practical 2, create the PartitionedCheckInStat entity class for the above table, and its associated repository.
You will need to add a custom query to your repository, which can find the PartitionedCheckInStat that has a certain partition ID and name.
Remember that custom queries are written by naming your methods according to the conventions in the Micronaut Data documentation.
We will give you this custom query as an example, but you will have to figure out the others in this practical:
Optional<PartitionedCheckInStat> findByPartitionIdAndName(int partitionId, String name);
Copying over some useful code
You will need some bits of code from the simulator project:
- Copy over the
TerminalInforecord to a new.eventssubpackage of your main package. - Create a new
CheckInTopicsinterface inside the new.eventssubpackage, and copy over theTOPIC_*constants fromAirportTopicFactory.
Writing the actual consumer
Our database code is ready, and we have the necessary information about the topics to be consumed. We can finally write our first consumer.
Create a class called CheckInStatisticsConsumer in the .events subpackage, and add this annotation:
@KafkaListener(
    groupId="checkin-desks",
    threads = 3,
    offsetReset = OffsetReset.EARLIEST
)
The annotation has this meaning:
groupIdindicates that the consumers will join thecheckin-desksgroup in the Kafka cluster. Since we will write many different consumer classes in this practical, each class will need its own group. The default is equal to the name of the application (what you entered in Micronaut Launch).threadsindicates how many concurrent copies of the consumer we will run for each instance of our microservice. We want to ensure that our consumer works well when other consumers join or leave the group, so we have set it to the number of partitions that we have used for most topics. The default is 1 (only run one copy of the consumer per microservice).offsetResetindicates from what point should the consumer group start when first created. We are usingEARLIESTso a new consumer group will start from the beginning of each topic. The default isLATEST, which would have a new consumer group only process the records that are produced after its creation.
Inject the repository for your PartitionedCheckInStat entities into this consumer.
Define three consumer methods:
- One which takes the
CheckInTopics.TOPIC_CHECKINevents and creates or increments the value associated to the “started” statistic and the partition of the record. - Same for
CheckInTopics.TOPIC_CANCELLED, but the name is “cancelled”. - Same for
CheckInTopics.TOPIC_COMPLETED, but the name is “completed”.
The methods have to meet a number of requirements:
- They should be annotated as
@Transactional, as you will need to first check the existing value (if it exists), and then create or increment it as needed. Those are multiple database accesses that should happen all at once or not at all (hence the need for a transaction). - They should use the
@Topic(topic)annotation to indicate the topic that they will be consuming from. - Their only parameter will be
@KafkaPartition int partition: the@KafkaPartitionannotation ensures Micronaut will bind the partition of the record to thepartitionparameter.
You should know how to create or update the existing record from what you learned in Practical 2. Remember to use the custom query that we defined above.
Testing your consumer
Once you have a first version of your consumer, it’s time to test it.
Create a CheckInStatisticsConsumerTest test class within a new subpackage of your main package within the src/test/java source folder.
These tests will involve the database, so you will need to ensure a few things:
- Tests should not run within a transaction.
- All existing rows should be deleted before each test runs.
Inject the consumer into the test class.
Write test cases that call your consumer methods and check that the database is updated as expected. We recommend using separate tests for the logic associated to each topic.
Note: by invoking the consumer methods directly, we’re testing the logic of our consumer in isolation of the Kafka cluster. This simplifies the tests, as we do not need to prepare the Kafka cluster before each test. Later in the module, we will discuss how to automate end-to-end tests that cover the interactions between all the parts.
Writing the controller
Now that we know that the consumer works as intended, we can expose it as a GET /stats endpoint.
Based on what you learned on Practicals 1 and 2, create a controller that will produce a JSON output similar to the one at the top of this section.
Note that you will need to obtain all the PartitionedCheckInStat (which should be fast as there won’t be more than 9 of them), and sum their values across partitions for each unique name.
In this case, you could simply populate a Map<String, Long> and return it (which will automatically adapt to new names among the PartitionedCheckInStat entries), or you could create a dedicated DTO (which will need to be updated every time you want to track a new statistic).
Trying everything together
With the consumer and the controller both ready, try this:
- Launch the
runtask of the simulator. After some time, you will start seeing messages about check-in events taking place. Leave it running. - Launch the
runtask of yourcheckin-statsproject. - Open the Swagger UI and try invoking your endpoint. You should see the expected output, and the counts should automatically increase over time as you consume events.
Once everything works, stop both the simulator and the checkin-stats application.
We can move on to the next exercise.
Stuck check-ins
In the previous exercise, the consumer maintained overall counts of various types of events. In this exercise, we will instead maintain an updated view of the current state of every check-in desk, and provide these endpoints:
GET /desks: lists all the desks and their current state.GET /desks/outOfOrder: lists all the desks which are currently out of order.GET /desks/stuck: lists all the desks which have gone out of order after a check-in process started on them. These desks have a customer stuck on them.
Adding the database migration
Add a migration script called V2__create-check-in-desk.sql with this content:
create table check_in_desk (
    -- surrogate key (autoincremented)
    id bigint primary key not null,
    -- natural key (from Kafka)
    desk_id bigint unique not null,
    -- if not null, a check-in is currently undergoing in this desk
    checkin_started_at timestamp(3),
    -- true iff out of order
    out_of_order bool not null default false
);
This creates a new table which will hold the known status of each desk.
Note: timestamp(3) is a MariaDB type which means “timestamps at the millisecond level” (i.e. 10^-3 seconds).
The plain timestamp type only works at the level of seconds.
Creating the entity and the repository
You should be able to create the JPA entity and the repository yourself for the most part.
The only detail is that the timestamp(3) column should be mapped to a java.time.Instant.
It is currently one of the most convenient types in Java for representing a given moment in time.
Creating the consumer
Create a CheckInDeskConsumer consumer class.
You will need to give it a groupId, and you will want to use multiple threads and start from the beginning of the topics involved when the consumer group is created.
In terms of actual behaviour, you should do this:
- When a check-in is started, create or update the
CheckInDeskwith the relevantdesk_id:- Update
checkin_started_atto the timestamp of the Kafka record. - Set it as not being out of order.
- Update
- When a check-in is cancelled or completed, create or update the
CheckInDeskwith the relevantdesk_id:- Reset
checkin_started_attonull. - Set it as not being out of order.
- Reset
- When a desk goes out of order, create or update the
CheckInDeskwith the relevantdesk_id:- Set it as being out of order.
Note that the consumer methods will need these parameters:
@KafkaKey long deskId: the key of the topics is the desk ID.TerminalInfo tInfo: the unannotated parameter after the@KafkaKeyis bound to the record body.long timestamp: this parameter is bound by Micronaut to the timestamp of the record. This is because we want to use the time in the record rather than the current time in the consumer: we may be catching up with old events.
Testing the consumer
You should write tests for the above consumer.
The approach will be the same as in the previous section:
- Clear the table before each test.
- Invoke the relevant consumer methods.
- Check that they had the expected effects on the database.
Writing the controller
You can now write the controller that will handle the requests mentioned at the top of this section.
You will want to define two custom queries in your repository for CheckInDesks:
- Finding the
List<CheckInDesk>by a givenout_of_ordervalue. - Finding the
List<CheckInDesk>by a givenout_of_ordervalue whosecheckin_started_atis notnull. (This can be done as a single custom query: revisit the Micronaut Data documentation on how to specify multiple conditions.)
Trying it all together
Same as before: start the simulator, then start your application, and try invoking your endpoints while the simulation advances.
You should be able to see all your desks very soon. As the simulation advances, some of them will start showing up as out of order. Later, some of the out-of-order desks will involve stuck customers as well.
In other words, you should see that the out-of-order desks are a subset of all the desks, and that the stuck desks are a subset of the out-of-order ones.
Once you’re happy with your consumer, stop the simulator and your consumers, and move on to the next section.
Crashed desks
We have endpoints for listing the out-of-order desks and those that have a customer stuck on them. In this exercise, you will add an endpoint that will list all the “crashed” desks. We will say that a desk has crashed if it has not sent status updates in the last 12 seconds.
This is mostly an exercise to check that you understood everything so far: we will not be introducing any new concepts.
Adding the database migration
We need a new column to reflect the last time we received a status update from a desk.
Create a new V3__add-last-status.sql database migration script, with this content:
alter table check_in_desk
add last_status_at timestamp(3);
Updating the entity
Update the CheckInDesk entity to reflect this new column.
Creating the consumer
Create the StatusUpdateConsumer that will consume the CheckInTopics.TOPIC_STATUS records,
and update the lastStatusAt field in CheckInDesk to the timestamp of the given Kafka record.
Testing the consumer
As usual, write an automated unit test to ensure that the consumer works as it should.
Extend the controller
Add a GET /desks/crashed endpoint to list the desks whose last status update was from before 12 seconds ago.
You will need to write a custom query in your repository that lists the CheckInDesk whose lastStatusAt was before a given Instant.
Note that you can compute the Instant from 12 seconds ago with:
Instant.now().minusSeconds(12)
Trying everything together
Try running the simulator and your consumers, and checking that crashed desks start appearing once the system has been running for a minute or so.
Once you’re happy with the results, stop the simulator and your consumers, and move on to the final exercise.
Windowed stats
So far, we have produced overall event counts, and showed how to maintain a database with the current state of the check-in area from individual events taking place in it. Let’s imagine that there is a new requirement for reporting minute-by-minute statistics by airport area (e.g. all 0XX check-in desks belong to area 0).
We want to have a GET /stats/windowed endpoint with responses like these:
{
  "0": {
    "cancelled": {
      "2025-02-22T12:54:00Z": 18,
      "2025-02-22T12:55:00Z": 26
    },
    "started": {
      "2025-02-22T12:54:00Z": 112,
      "2025-02-22T12:55:00Z": 29
    }
  },
  "1": {... similar to above ...},
  "2": {... similar to above ...},
  "3": {... similar to above ...},
  "4": {... similar to above ...}
}
For example, the above response means that we had 18 cancelled check-ins in area 0 on the first minute of the simulation.
To do this, we will need to set up a new table to hold the appropriate state.
Given that we will need to analyse the data at a different granularity level (grouped by area and minute, rather than per-desk), we will need to re-key the records that we’re consuming from the simulation.
The new key in this case will not be a single value like before: instead, it will be a composite (area, minute) key.
The overall process will look like this:

Let’s break down the problem into steps, as usual.
Adding the database migration
Create a database migration script called V4__create-windowed-area-check-in-stats.sql, with this content:
create table windowed_area_checkin_stat (
    id bigint primary key not null,
    area int not null,
    window_start_at timestamp(3) not null,
    name varchar(255) not null,
    value bigint not null default 0,
    constraint uk_windowed_area_name unique (area, window_start_at, name)
);
This table is similar to partitioned_checkin_stat from the first exercise, but it adds two new columns (area and window_start_at) which are part of the unique constraint in this table.
In other words, this table has two keys:
- The “surrogate key”
idwhich has no meaning outside this database, and is automatically create from thehibernate_sequenceby Micronaut Data. - The “natural key”
(area, window_start_at, name)which is relevant to the problem we’re solving: we want to ensure there aren’t multiple rows with this combination, and having this constraint also implies having an index for fast retrieval of rows based on this combination of columns.
Creating the entity and the repository
Similarly to previous exercises, you will need to create a JPA entity for the rows in the table (which would be named WindowedAreaCheckInStat, based on the name of the table).
Create a repository for the entity, and add a custom query that can find the entity with a specific (area, windowStartAt, name) combination.
Creating the key record
We want to re-key (desk_id, terminal_info) records into ((area, minute), event_name) records.
This is to ensure that it will always be the same consumer manipulating the relevant row in windowed_area_checkin_stat.
Since the new key is not a predefined Java type (like long) but rather a composite of multiple values, we need to create our own @Serdeable class with that combination.
The simplest thing is to use a record.
Create a windowed subpackage inside your events package, and add this CheckInAreaWindow record to it:
@Serdeable
public record CheckInAreaWindow(int area, long windowStartEpochMillis) {}
We will use CheckInAreaWindow instances as the key of our internal topic.
Note that internally, Kafka sees the key of a record as just an arbitrary sequence of bytes, which is hashed to decide the partition.
In this case, the @Serdeable annotation will ensure that it is serialised on the fly into JSON before being sent to Kafka.
Creating the internal topic
We will need an internal topic as destination for the re-keyed ((area, minute), event_type) records.
Within the new windowed subpackage, create a WindowedAreaCheckInsTopicFactory class that sets up this topic:
- It should be annotated with
@Requires(bean=AdminClient.class), so Micronaut sets up the Kafka administration client before this one. - It should also be annotated with
@Factory, so Micronaut knows it’s a class that contains factory methods (i.e. methods that create new beans to manage). - It should have a method annotated with
@Beanwhich takes no parameters and returns aNewTopicwith a unique topic name of your choosing, 3 partitions, and replication factor equal to 1. Note that we’re using replication factor 1 for simplicity, as Micronaut Test Resources only sets up a single-node cluster. Most likely, we’d want to make this configurable, but this is outside the scope of this practical.
You should keep the name of the internal topic in a TOPIC_WINDOWED_CHECKINS String constant inside this class, as you will need to refer to it from elsewhere.
In case you’re unsure about how to write this factory, you may want to refer to the AirportTopicFactory in the simulator project as an example.
Creating the producer for the internal topic
We have the key type and the factory for the internal topic: we need the producer interface for it.
Create the WindowedAreaCheckInsProducer interface in the windowed subpackage.
It should be annotated with @KafkaClient (as it is a producer).
The interface should have a method that doesn’t return anything and is annotated with @Topic(TOPIC_WINDOWED_CHECKINS).
It should take two parameters:
@KafkaKey CheckInAreaWindow key, the key for the record.- The event type (e.g. a String within {“started”, “completed”, “cancelled”}).
Writing the consumers
We’re finally ready to write the consumer class. The consumer should do the following:
- Consume
(desk_id, terminal_info)events from the topics related to starting, completing, and cancelling checkins, and produce new events into the internal topic. Each new event would have aCheckInAreaWindowas key, and an indication of whether the check-in is being started, completed, or cancelled as the body.- The area of the key will just be the hundreds digit of the desk ID (
deskId / 100): we have 500 desks in the simulation so this will be enough. - The
windowStartEpochMillisrefers to the start of the 60-second time window that this record refers to, and it will be measured in milliseconds since the epoch (UNIX time 0, or1970-01-01 00:00). For instance, if the current time (measured in milliseconds since the epoch) iscurrentTimeEpochMillis, this can be computed as:currentTimeEpochMillis - (currentTimeEpochMillis % 60_000)
- The area of the key will just be the hundreds digit of the desk ID (
- Consume the re-keyed events in the internal topic, and create or update the relevant
WindowedAreaCheckInStat.
Testing the re-keying via Mockito
Before writing the controller that will return the data collated by the new consumers, we need to test those consumers. The consumer class has two behaviours to test: the re-keying (which involves producing records), and the updating of the database. We will test them separately, so we do not need to involve the Kafka cluster for our unit testing.
Create a new WindowedAreaCheckInsConsumerTest test class.
To test that the consumer re-keys events as expected, we will swap the producer during testing with a mock.
Instead of sending the event to an actual Kafka cluster, we will capture the method invocation so we can check the producer was called with the right arguments.
We need the Mockito library for this, so add it to the dependencies in your build.gradle file:
// For the producer tests
testImplementation("org.mockito:mockito-core:5.15.2")
Since you changed the build.gradle file, make sure that your IDE reloads the Gradle project as needed.
In IntelliJ, you would need to press the “Reload All Gradle Projects” button as we did at the beginning of Practical 2.
Now that we have Mockito for testing, create a new WindowedAreaCheckInsConsumerTest test class.
As usual, you will want to annotate it with @MicronautTest(transactional = false), and you will need to inject the consumer, the producer, and the repository that you developed in this section.
You should also have a test setup method that deletes all the rows before each test.
The next step is to add the following method, which will create the mock that Micronaut should use during testing:
@MockBean(WindowedAreaCheckInsProducer.class)
public WindowedAreaCheckInsProducer getProducer() {
  return mock(WindowedAreaCheckInsProducer.class);
}
The method works as follows:
@MockBeantells Micronaut to swap the producer that would normally be used with the object returned by this method. It’s only active during this test.- The
mockmethod is from Mockito (org.mockito.Mockito.mock). It creates a mock implementation of the given type: its methods will have mostly empty implementations which only capture the parameters they were called with.
We can now add the proper test, which should invoke the consumer method that does the re-keying, and then check that the producer was appropriately called through the verify method in Mockito.
For instance, if we sent an event that a check-in was started at millisecond 60100 after the epoch, we could check that the producer was correctly invoked like this:
verify(producer).checkin(
  eq(new CheckInAreaWindow(1, 60_000)),
  eq("started"));
The eq method is also from Mockito, and it is an example of an argument matcher.
The above code means “producer.checkin() should have been called with arguments equivalent to these”.
Testing the consumer’s database updates
Since we tested the re-keying on its own, we can now test the database updates separately as well.
Add test methods to WindowedAreaCheckInsConsumerTest that check that the database is updated as it should from the re-keyed events.
Extending the controller
Once we know that the consumer works as it should, you can extend your /stats controller with a new endpoint for GET /stats/windowed that returns JSON output like the one at the beginning of this section.
Given the shape of the expected JSON output, you could use one of these return types for the new controller method:
Map<Integer, Map<String, Map<String, Long>>>(just using standard Java collections): an area -> statistic name -> timestamp -> value map. You can produce the timestamp from anInstantobject by calling itstoString()method.Map<Integer, AreaStatistics>(whereAreaStatisticswould be a new DTO).
Using one return type or the other is up to your preference.
Trying everything together
Start the simulation, then start your application, and try calling your GET /stats/windowed endpoint periodically.
You should see it start to aggregate events by the minute as time passes on, and it should automatically separate check-ins by minute and area.
Background processing
In Practical 3, we changed the controller so it would immediately try to obtain the publisher while adding or updating a book.
That created temporal coupling between our application and the external service, as it requires OpenLibrary to be available at the same time a book is being added or updated. This may not always be the case: OpenLibrary may be down at that time, in which case we may want to leave that until later.
There is another problem. This synchronous blocking approach, where we wait for OpenLibrary to respond before we respond to the user, introduces latency: if OpenLibrary is busy, this could make our entire application feel sluggish as well.
To address these issues, we will move the use of the gateway to a Kafka consumer. This means adding books will feel faster again, but users may not immediately see the publisher after creating the book.
Adding Kafka to the project
Add Kafka support to your Practical 3 project (or start from its model solution).
Remember from Practical 2 that you can use the “Diff” button in Micronaut Launch to tell you what needs to be changed to support a new feature (in this case, the kafka one).
Creating the Kafka topic
Create a Kafka topic factory which sets up an internal isbn-updated topic, with 3 partitions and replication factor of 1.
Consult the lecture slides or the relevant part of Practical 3 if you are unsure about how to do that.
Creating the Kafka producer
Define a Kafka producer interface that sends records to the isbn-updated topic about books changing the ID.
We suggest that record keys are book IDs, and record bodies mention the old and new ISBNs.
When the book is created, the old ISBN can be null.
Producing the event
Update the controller for creating and updating books, so that it produces an event when the ISBN of a book changes.
Add tests checking the producer is used as expected in those scenarios.
Using OpenLibrary from a consumer
Create a new Kafka consumer which will handle the records arriving to the isbn-updated topic.
Move the controller logic that uses the gateway to populate the Publisher there.
Keep in mind that there may be a long delay between the book being created and the isbn-updated event being consumed, so you may want to tweak its logic somewhat.
We suggest something like this:
- Try to fetch the book by ID. If it does not exist anymore, stop processing this event.
- Check if the book already has a publisher. If it does, stop processing this event.
- Try to fetch the publisher(s) via your gateway. If the gateway fails or it does not return any results, stop processing this event. Note: if the gateway throws an exception, print it to the standard error stream with
exception.printStackTrace(). - Find the
Publisherwith the first name listed by the gateway, and associate it with theBook. Create thePublisherif it does not exist. - Update the
Book. Note that since this should always be an update, you can dorepo.update(book)instead ofrepo.save(book)(which can sometimes be an insert, and sometimes be an update).
Update your controller tests accordingly, and write tests for your new consumer. We recommend having one separate test for every possible situation above.
For testing, it may be easier to mock the gateway and set it up with a few ISBNs that will make it behave in specific ways (an ISBN with a known publisher, an ISBN that will cause the gateway to throw an exception, an ISBN which will return an empty response, and so on).
Removing the old ExecuteOn annotation
Now that you no longer perform a synchronous blocking HTTP requests from your BooksController, you should remove the @ExecuteOn annotation that you added in the previous section.
You should also be able to remove the injection of the gateway into the BooksController.
Practical 5: Deploying as containers
This is the worksheet for the fifth practical in the Engineering 2 module. This is also the last practical for Part 1 (data-intensive systems).
We will start from a solution to Practical 4, and write a Compose file to run the microservices as an orchestration of multiple Docker containers, similarly to how we would do it in production. Before doing that, we will write some end-to-end tests to check if the application is working as intended with the database and Kafka cluster, which we will reuse to check if our container orchestration is working as intended.
Work through every section of the practical in sequence, without missing steps. You can use the “Previous” and “Next” buttons on the left and right sides to quickly go between sections.
Introduction
In this practical, you will deploy the book-related microservice as an orchestration of Docker containers. Micronaut Test Resources is great for local development, but it is not designed for deployment.
You will write a Compose file that includes your databases, your Kafka cluster, and your microservices. Then, you will run it via Docker Compose.
However, before we do that, we will write some end-to-end tests for the integration between the microservice, the database, and the Kafka cluster. This will help us test that the container orchestration is working as intended.
What you should already know
You should be able to:
- Generate clients from OpenAPI specifications (from Practical 3).
You should be familiar with these concepts from the Week 3 lectures:
- How to write test assertions about the expected eventual state of the system using Awaitility.
You should be familiar with these concepts from the Week 5 lectures:
- The differences between containerisation and virtualisation.
- The basic syntax of a
Dockerfile, and how Docker images are structured in layers. - The core elements of a Compose file, and the differences between bind mounts and volumes.
What you will learn
- How to use clients generated from OpenAPI specifications for end-to-end testing.
- How to write a Compose file that orchestrates several Micronaut applications into a single deployable unit.
- How to test that the container orchestration is working as intended via end-to-end tests.
What you will need
- Java 17 or newer: install from Adoptium.
- An IDE with Gradle and Java support: in this worksheet, we discuss IntelliJ IDEA.
- A local installation of Docker Desktop.
Ensure Docker Desktop is running before you start this practical.
- Note: if using a lab machine, you will need to boot Windows as Docker Desktop is not installed in the Linux image.
If you have a recent installation of Docker Desktop (using Docker Engine 29 or newer), you will need to tell the Docker Java libraries to use version 1.44 of the Docker API, until this issue in Micronaut is fixed. From a Linux/Mac terminal, or from Git Bash in Windows, run this command:
echo api.version=1.44 > $HOME/.docker-java.properties
If you do not have Git Bash on Windows, you can run this from PowerShell instead:
"api.version=1.44" | set-content $HOME/.docker-java.properties -Encoding Ascii
What you will do
You will start from a solution of the Background Processing exercise of Practical 4 (either yours, or our model solution) and work through the rest of the sections.
End-to-end testing
If you remember from Practicals 3 and 4, we typically prefer testing components in isolation of each other, as these smaller tests are faster to run, easier to understand, and more reliable.
However, at some point we do need to have some tests that check that everything is working together: these are the end-to-end tests.
Since we already have thorough unit tests, we can keep end-to-end tests to the minimum needed to check that the various parts of our application can talk to each other. In this section, you will create a separate Micronaut project which will use the OpenAPI specification of the microservice to automate a typical workflow in your application, and ensure things work as intended.
Creating the end-to-end test project
End-to-end tests can span multiple microservices working together, which could be developed by different teams. One common practice is to have these end-to-end tests in a separate project which all the teams involved can contribute to.
Additionally, in order to avoid depending on internal details that could change at any moment and break the tests, end-to-end testing is best done by focusing on the public interfaces of our microservices (our OpenAPI specifications).
Due to the above reasons, we will generate a separate Micronaut project which will only be used for end-to-end testing. Use Micronaut Launch as usual, but this time, do not add any features:
- Application type: Micronaut Application.
- Java version: 17.
- Name:
e2e-tests. - Base package:
uk.ac.york.cs.eng2.books.e2e. - Micronaut version: latest 4.x version.
- Language: Java.
- Build tool: Gradle.
- Test framework: JUnit.
- Features: do not select any features.
Download the project and import it to your IDE. For this practical, you will need to have in your IDE both a solution to Practical 4 (either yours or the model solution), and the end-to-end test project.
NOTE: in this practical we will not make any changes to book-microservice at all.
We will only develop e2e-tests and a Compose file that deploys book-microservice.
For loading multiple Gradle projects at the same time into IntelliJ, check how we did it in Practical 4. Once you have loaded both, your Gradle drawer should look like this:
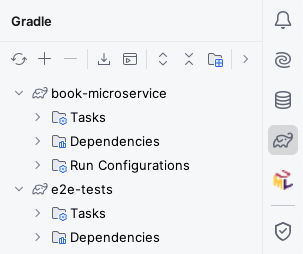
Generating the OpenAPI client
Run book-microservice, download its OpenAPI specification from its Swagger UI into src/main/openapi, and configure the Gradle build of the e2e-tests project to produce a Micronaut declarative HTTP client from it.
Leave it running as you will need it for the actual end-to-end tests.
You should be able to follow the same process as in Practical 4, adapting the clientId, package names, and file names accordingly.
Getting HTTP responses from the generated client
If you need the generated client to have HttpResponse<T> return types (e.g. for accessing status codes or response headers), you may want to add this inside the client block:
alwaysUseGenerateHttpResponse = true
Specifying the URL to the microservice under test
For the application.properties in e2e-tests, you will have to specify the URL to the book-microservice.
Assuming you used books for your clientId, it would look like this:
micronaut.http.services.books.url=http://localhost:8080
Writing the end-to-end test
Having generated the client, you can now try writing test cases that cover the integration between the database, the Kafka cluster, and your microservice. You do not need to exhaustively cover all the functionality: just focus on those aspects that your unit tests did not cover.
For example, our unit tests checked the OpenLibrary gateway, producers, and consumers in isolation, but not in combination. We should do that from here.
Since we will need to make assertions about the eventual state of the system, you will need to add the Awaitility library to the Gradle build of e2e-tests.
Add this dependency to your build.gradle file, and reload all Gradle projects:
testImplementation("org.awaitility:awaitility:4.3.0")
Create a @MicronautTest test class, and write a JUnit test case that does the following:
- Create a book with an ISBN listed in OpenLibrary (for example, this one).
- Assert that the response had the expected HTTP status code, and obtain the book ID from it.
- Create an author.
- Assert that the response had the expected HTTP status code, and obtain the author ID from it.
- Use Awaitility to wait for up to 20 seconds for the publisher of the book to become the one listed in OpenLibrary.
Run the test and ensure it passes.
If it does not pass, you will have to double check your book-microservice (unless it’s the model solution), and also this test.
Once the test passes, shut down book-microservice and move on to the next section.
Refresher on Awaitility assertions
Remember that the basic syntax of an Awaitility test assertion is something like this:
await().atMost(Duration.ofSeconds(SECONDS)).until(callable_of_expectation);
In the above code:
SECONDSis the number of seconds you want to wait for.callable_of_expectationis aCallable<Boolean>object which encodes your expectation as to what should be the eventual state of the system (in this case, that asking for the publisher of the book would give you the expected result). It’s common to instantiate such aCallable<Boolean>through lambda expressions (which we discussed in the Week 3 lectures).
Re-running the end-to-end test from a clean slate
Keep in mind that this test assumes we start from a clean database and a clean Kafka cluster. If you need to re-run this test, it’s best to start from an empty slate by stopping your Micronaut Test Resources server and waiting for its Docker containers to be shut down. You can do this by following these steps:
- Shut down the
book-microservice. - Run the
stopTestResourcesServerGradle task insidebook-microservice. - Open Docker Desktop and wait for the Test Resources, MariaDB, and Kafka containers to shut down and disappear.
- Start the
book-microserviceagain and wait for it to fully start. - You can now re-run your end-to-end test.
Docker basics
Before we dive into writing Docker Compose files, let’s spend some time picking up the basics of running Docker images.
For most of this section, you will only need a text editor and a Bash shell (e.g. Git Bash on Windows).
Make sure Docker is running before you start this section.
We recommend that you try running the shell commands that we show in this section for yourself.
These will be the lines starting with $ or / # (don’t type the $ or / #: these are just the shell prompting for a command).
If using a lab machine, we recommend that you run these commands from the C: drive.
From Git Bash, you would switch to the relevant folder first:
$ cd /mnt/c/Users/yourUsername
$ mkdir -p docker-lab
$ cd docker-lab
$ export MSYS_NO_PATHCONV=1
Note
The
export MSYS_NO_PATHCONV=1line is needed to prevent the MSYS system underlying Git Bash to turn Unix-style paths to Windows-style paths, which breaks the bind mounts in some of the commands of this section.You will need this line for your own machine as well, if you are doing this section from Git Bash on Windows.
Running the Hello World image
The most basic test you can perform on a Docker installation is to run the hello-world image.
Run this shell command:
$ docker run hello-world
You should see a greeting from Docker, along with some indications of what went on:
- Your
dockerclient connected to the Docker daemon process (started by Docker Desktop in the Windows lab machines). - The daemon downloaded (“pulled”) the
hello-worldimage from the Docker Hub that matched your CPU architecture. - The daemon created a container that uses the image.
- The daemon streamed the output from the container to your terminal, until it completed its execution.
If you go to Docker Desktop, you will see that the container still exists, but it’s not running, as it completed its execution.
You can also check this through your shell - note that your container will most likely not be named awesome_davinci, as autogenerated container names are random:
$ docker container ls -a | grep hello
d75ffbb8d8b9   hello-world  "/hello"  5 minutes ago   Exited (0) 3 minutes ago              awesome_davinci
If we wanted to start it without streaming its output to the terminal, we would use the start subcommand and pass the name of the container:
$ docker start awesome_davinci
It will immediately complete again. We could check its logs on Docker Desktop, or do that from the terminal:
$ docker logs awesome_davinci
You should see the greeting message repeated twice (once for each time the container executed). We can now delete the container, as we will not be needing it anymore:
$ docker container rm awesome_davinci
Note that deleting the container will not delete the image from the system, so you can at any time start another container without having to pull it again.
If you want to automatically let Docker delete the container after it has finished running, you can use the --rm flag in docker run:
$ docker run --rm hello-world
Running the Alpine image
Alpine Linux is a minimal Linux distribution that is ideal for building compact Docker images. Its image on Docker Hub is a popular base for many other Docker images.
Let’s try to run it:
$ docker run --rm alpine
It immediately exited without printing anything. Let’s inspect the image a bit further:
$ docker inspect alpine
You will see a JSON document with various types of information.
In this case, we’re looking for the Cmd and Entrypoint keys, which you can find here:
"Config": {
    "Env": [
        "PATH=/usr/local/sbin:/usr/local/bin:/usr/sbin:/usr/bin:/sbin:/bin"
    ],
    "Cmd": [
        "/bin/sh"
    ],
    "WorkingDir": "/"
},
We can interpret these entries as follows:
- The image sets the
PATHenvironment variable to a certain list of folders. - The image will run by executing the
/bin/shcommand (a Bourne shell). - The command will be executed while having the root of the image’s filesystem as its current working directory.
Since the image just runs a shell, and Docker containers are not allocated an interactive terminal by default, the shell immediately exits without doing anything.
If we want an interactive terminal, we need to ask for it by passing the -i (“interactive”) and -t (“allocate TTY”) flags (or -it together):
$ docker run --rm -it alpine
The above command will start a shell inside the Docker container.
You can run most Linux commands there, although some may not be available as the image is very minimal.
Once you are done, you can press Control+d or enter the exit command to exit the terminal and have it exit.
Working with layers
Docker images are made up in layers, with each layer adding and changing files on top of the previous one.
You can use docker image history IMAGE to check the layers of a given image.
However, the alpine image is minimal, so it will not be particularly interesting:
$ docker image history alpine
IMAGE          CREATED       CREATED BY                                      SIZE      COMMENT
25109184c71b   5 weeks ago   CMD ["/bin/sh"]                                 0B        buildkit.dockerfile.v0
<missing>      5 weeks ago   ADD alpine-minirootfs-3.23.3-aarch64.tar.gz …   9.36MB    buildkit.dockerfile.v0
In this case, the image is made up of two layers:
- The bottom layer was made by unpacking the contents of a compressed root filesystem (
rootfs). - The top layer was made by indicating the command to be run by default should be
/bin/sh.
Image layers are read-only: when Docker creates a container from an image, it creates an additional layer that can be modified.
This time we will run and keep an alpine container, creating a file inside it, and exiting:
$ docker run --name alpine-layers -it alpine
/ # echo hello > world.txt
/ # exit
We can start it again while attaching an interactive console to it, and the file will still be there:
$ docker start -ia alpine-layers
/ # cat world.txt
hello
/ # exit
We can ask Docker what are the changes stored on the mutable top layer of the container:
$ docker container diff alpine-layers
A /world.txt
C /root
A /root/.ash_history
In this case, we see that the top layer has our world.txt file, as well as some changes to the shell’s history file.
It is important to remember that this mutable layer is only usable by this container. If we delete the container at any point, its contents will be lost. The only option we’d have is to create a new image from this container, with the current contents of the mutable layer as its new top layer:
$ docker container commit -m "Save world.txt" alpine-layers my-alpine
sha256:b1b8a7e2e8ce4e743149bb138b24c566d40347bf747f5bdbec2e1eddb971f98f
The SHA-256 checksum identifies the layer, which is useful for saving storage space (e.g. by having multiple images share the same base layer for the operating system).
You can now check the layers of our new my-alpine image:
$ docker image history my-alpine
IMAGE          CREATED         CREATED BY                                      SIZE      COMMENT
b1b8a7e2e8ce   5 minutes ago   /bin/sh                                         16.4kB    Save world.txt
25109184c71b   5 weeks ago     CMD ["/bin/sh"]                                 0B        buildkit.dockerfile.v0
<missing>      5 weeks ago     ADD alpine-minirootfs-3.23.3-aarch64.tar.gz …   9.36MB    buildkit.dockerfile.v0
You will notice that there is one more small layer at the top (just a few kilobytes), with our comment. We can try using it as an image now, and it will come with our created file:
$ docker run --rm -it my-alpine
/ # cat world.txt
hello
/ # exit
Dockerfiles are a way to automate the creation of images based on this idea of piling layer upon layer.
We will not ask you to write custom Dockerfiles in this practical, but it is useful to understand the underlying concepts behind Docker images.
Working with volumes
Suppose that we are running a database server from Docker. We would not want to have the database itself in the mutable layer, as it would be lost if we deleted and re-created the container (e.g. because a new version of the database server’s image came out). Instead, we should keep it in a volume: a storage location that is kept separate from the layers of a container, and mounted to a particular mountpoint or location inside the container.
There are two types of volume mounts:
bindmounts attach a location in our filesystem to the container, allowing the container to change its contents.- Named mounts attach a named volume (maintained by Docker in a special location) into the container.
Let’s try bind mounts first, by creating a sqlite folder and letting a sqlite container modify its contents.
You will need to run a few shell commands, and also paste the SQL command below:
$ mkdir sqlite
$ docker run --rm -it -v ./sqlite:/apps -w /apps alpine/sqlite test.db
sqlite> CREATE TABLE users (id INTEGER PRIMARY KEY, name TEXT);
sqlite> .quit
If you look at your sqlite folder, you should see that the test.db file was created:
$ ls sqlite
test.db
You will also have noticed a few more elements in that command than usual:
-v ./sqlite:/appsmeans “perform a bind mount of the local directorysqliteinto/appsin the container”. The initial./is needed in order to tell Docker that this is a bind mount and not a named mount (as the part before the:is a filesystem path and not just a name).-w /appsmeans “change the working directory inside the container to/apps”.- We added
test.dbafter the image name, which will be treated as the “command” to be run.
test.db is just the name of the SQLite file to be managed, rather than the name of an executable: how did Docker know to run the SQLite shell on it?
The answer is that the SQLite image also defines an entrypoint: if defined, Docker will pass the command to be run to it.
You can check the entrypoint of the image using docker inspect as usual:
$ docker inspect alpine/sqlite
"Config": {
    ...
    "Entrypoint": [
        "sqlite3"
    ],
    "Cmd": [
        "--version"
    ],
    ...
},
Since the entrypoint is sqlite3, our previous docker run command translated to running sqlite3 test.db inside the container, with /apps as the working directory.
You will also note that the default command is --version, so if you run the same command without test.db, the container will print the version of SQLite being used and immediately exit:
$ docker run --rm -it -v ./sqlite:/apps -w /apps alpine/sqlite
3.51.2 2026-01-09 17:27:48 b270f8339eb13b504d0b2ba154ebca966b7dde08e40c3ed7d559749818cb2075 (64-bit)
In production environments, we will usually prefer volumes to live on their own rather than being attached to a regular folder.
These will be named volumes, which we manage through our Docker client.
We can manage them through the docker volume command - let’s create one and use it with the SQLite image:
$ docker volume create sqlite-db
$ docker run --rm -it -v sqlite-db:/apps -w /apps alpine/sqlite test.db
sqlite> CREATE TABLE users (id INTEGER PRIMARY KEY, name TEXT);
sqlite> INSERT INTO users (name) VALUES ('Bob');
sqlite> .quit
$ docker run --rm -it -v sqlite-db:/apps -w /apps alpine/sqlite test.db
sqlite> SELECT * FROM users;
1|Bob
sqlite> .quit
You’ll notice that despite the use of --rm (which meant the container was deleted upon completion), we didn’t lose data.
The database was stored in the named volume sqlite-db, and attached to the container created in the second command.
Working with ports
The last aspect that we want to cover with plain Docker is the networking. Docker containers typically live in their own virtual sub-network that is private to the host machine.
Let’s try to run an nginx Web server:
$ docker run --rm --name web-server nginx
However, this Web server isn’t accessible from our host system’s Web browser in many setups. We can find out the IP address it has in Docker’s default virtual subnet.
Leave the command running, and open a separate terminal. In this new terminal, run this command, and note the IP address (it may differ from the example):
$ docker inspect --format '{{ .NetworkSettings.Networks.bridge.IPAddress }}' web-server
172.17.0.2
Try to enter the IP address in your browser: if you’re using Docker Desktop, it will not work. This is because Docker Desktop runs containers inside a virtual machine, which is a different network host than the rest of your system. It will only work if you’re running Docker natively from Linux (using the Docker Engine, instead of Docker Desktop).
Clearly, this is a problem - we want to be able to try the web server from our browser. What we can do is tell Docker to forward a port in our host system to a port in the container.
Switch back to the nginx terminal and use Control+c to shut down the server.
This time, run it as follows:
$ docker run --rm --name web-server -p 8080:80 nginx
You should now be able to access your nginx server from here:
You can now shut down the server with Control+c.
Note
This so-called subnet where containers run is known as the “default bridge subnet”. In the default bridge subnet, containers can only refer to each other by their internal IP addresses, which is inconvenient.
Thankfully, the Docker Compose tool that we cover in the next section will automatically set up named bridge subnets that integrate Docker’s embedded DNS server, allowing containers to refer to each other by name.
Congratulations - you’ve gone through the most important aspects of using Docker images: understanding the distinction between layers and volumes, and the basics of exposing them from your host.
In the next section, we will cover setting up multiple containers and connecting them to each other via Docker Compose.
Writing and testing the Compose spec
We have developed the book-microservice and we now want to deploy it to production.
In a production environment, we obviously want to retain data indefinitely, unlike Micronaut Test Resources where data is automatically lost once we shut down the Test Resources server. We will also want to configure the database and the Kafka cluster more carefully, and use a multi-node Kafka cluster instead of a single-node one, for horizontal scaling of throughput and storage capacity, and improved durability via replication.
We will approximate such a production environment by repackaging our application as an orchestration of multiple Docker containers, configured to talk with each other in a private network, with only the strictly necessary endpoints exposed to the outside.
Building the Docker image
We will need to build the Docker image for book-microservice.
To do so, run the dockerBuild Gradle task in the build group.
After some time, if all has gone well, you will see a message like this:
Successfully tagged book-microservice:latest
This means that your local Docker installation now has a book-microservice image, with the latest tag.
In a real-world environment you would normally push this image to a registry (e.g. Docker Hub, Github Packages, or your company’s), but in ENG2 we will limit ourselves to local images.
Starting the Compose file: initial skeleotn
Create a compose.yml file inside the root directory of e2e-tests (the same one that has the build.gradle file).
Let’s start with the most basic skeleton, with just two keys at the top level:
services:
volumes:
These are the two main keys of a Compose file. Note that the full documentation for the Compose file format is available online: it was originally specific to Docker Compose, but it has since evolved into an independent spec used by multiple tools (similarly to how OpenAPI specifications were previously specific to Swagger).
A Compose file is written in YAML: you may also want to read the official overview if you are not familiar with YAML.
The services key is a map that contains one key for each service that we want to deploy, and volumes is a map that contains one key for each persistent volume we want to use from our containers.
Adding the MariaDB database server
For our first service, we will add a db key inside the services to run a MariaDB container, using the official image.
Looking at their instructions, we figure out that we want to update our Compose file to look like this:
services:
  db:
    image: mariadb:12
    environment:
      MARIADB_USER: books
      MARIADB_PASSWORD: bookspw
      MARIADB_ROOT_PASSWORD: iamroot
      MARIADB_DATABASE: booksdb
    volumes:
      - mariadb_data:/var/lib/mysql
    healthcheck:
      test: ['CMD', 'healthcheck.sh', '--su=mysql', '--connect', '--innodb_initialized']
      timeout: 10s
      retries: 3
volumes:
  mariadb_data:
The above fragment means the following:
- The
dbservice runs the MariaDB 12 image from the Docker Hub. - The
dbservice mounts themariadb_datanamed volume into/var/lib/mysqlso the database can survive the re-creation of the container, as suggested in the image documentation (see “Where to Store Data”). - The
dbservice sets a few environment variables that are used by the image to set the username and password for the default database, as well as the password of the root MariaDB user. - The
dbservice includes an automated healthcheck (based on the image instructions). This is used in two ways:- To detect when the database server has fully started and is ready for connections.
- To monitor the ongoing health of the service in case it goes down.
Running the Compose file from IntelliJ
You can try this Compose file now.
If you are using IntelliJ IDEA with its Docker support, you will see an icon with two green triangles next to the services: line, like this:
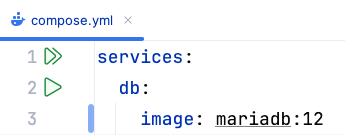
Clicking that button is equivalent to running docker compose up from a Git Bash console.
The up command tells Compose to update the set of running containers based on the current contents of the Compose file, recreating them as needed.
After clicking that button, IntelliJ will display a “Services” drawer with the current status of the Docker Compose project:
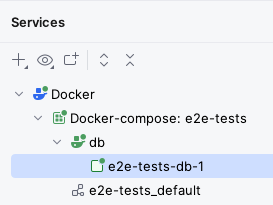
After some time, you should see the db service become healthy inside the Services tab: this means the server is working correctly.
The “Services” drawer has “Restart”, “Stop”, and “Down” buttons which are all equivalent to these commands:
- Restart:
docker compose restart, restarts all services. - Stop:
docker compose stop, stops all services but does not delete their containers. - Down:
docker compose down, stops all services and deletes the containers (but not their volumes).
The “Services” drawer has a “Volumes” item as well that lists all the volumes.
You should be able to see the e2e-tests_mariadb_data volume that will store the MariaDB database.
You should also be able to see the e2e-tests_default virtual network that has been created for this Compose project:
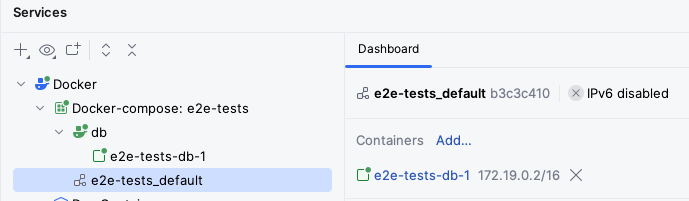
The above screenshot shows how the db service is bound to the 172.19.0.2/16 IP address.
If you wanted to connect to it directly, you would have to use that IP address.
Alternatively, you can map some of its ports to be accessible from other machines in your network and from your 127.0.0.1 (aka localhost) IP address: we’ll do that later for our microservice.
Adding the Kafka cluster
The next part is to add a multi-node Kafka cluster: specifically, in this practical we will add a 3-node cluster.
The configuration of Kafka is quite involved, but for this module we will just ask you to reuse the configuration we use for the todo-microservice.
Specifically, you should copy over the configurations for:
- The
kafka-0,kafka-1, andkafka-2services. - The
kafka_0_data,kafka_1_data, andkafka_2_datavolumes.
You could also copy over the configuration for the kafka-ui, if you would like to have a user-friendly UI to inspect your Kafka topics.
Note that administrative user interfaces like kafka-ui would need to be adequately secured in a production environment.
If you look closely at these configurations, you’ll notice that we have set up automated healthchecks for each Kafka node as well.
Click again on the “Run All” button at the top of the compose.yml file (or run docker compose up -d from the same directory as the compose.yml file in a Git Bash console), and after some time you should see all three Kafka nodes running, with healthy next to kafka-0.
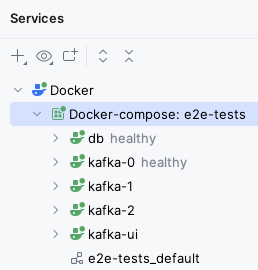
If you copied over the kafka-ui service, you should also be able to access it via your browser.
Here are some details of how we have configured this cluster. If you would like to know more, read on, otherwise go to the next step:
- We use the Apache Kafka image, which is based from its open-source release without any Confluent extras.
- We choose 3 nodes as that is the minimal number we need in order to reach consensus (2 nodes would run into ties).
The overall multi-node setup is as follows:
- Each node has a unique ID (
KAFKA_NODE_ID) within the cluster. - Kafka nodes can have different roles (controller, broker), but here we have all 3 nodes take on both roles (
KAFKA_PROCESS_ROLES). - Nodes need to know about each other for voting processes (
KAFKA_CONTROLLER_QUORUM_VOTERS).
- Each node has a unique ID (
- Each node has a number of “listeners” that accept connections, with different roles:
- Within the Compose network, regular users (like our microservice) will use the
PLAINTEXTlisteners which listen on port 9092. - Controllers will talk to each other via the
CONTROLLERlisteners bound to port 9093. - Only the
PLAINTEXTlistener is advertised to regular users (KAFKA_ADVERTISED_LISTENERS). - We use plaintext security for both listeners (
KAFKA_LISTENER_SECURITY_PROTOCOL_MAP): in a production environment we will use stronger security. - We use
KAFKA_CONTROLLER_LISTENER_NAMESandKAFKA_INTER_BROKER_LISTENER_NAMEto indicate the listeners used for inter-controller and inter-broker communication.
- Within the Compose network, regular users (like our microservice) will use the
- We have some default topic settings: 6 partitions (
KAFKA_NUM_PARTITIONS), 3 replicas (KAFKA_OFFSETS_TOPIC_REPLICATION_FACTOR,KAFKA_TRANSACTION_STATE_LOG_REPLICATION_FACTOR), and a minimum of 2 replicas must confirm each write when producing events (KAFKA_TRANSACTION_STATE_LOG_MIN_ISR).- The settings in our
NewTopicinstances take precedence over these, however.
- The settings in our
- We have disabled topic autocreation (
KAFKA_AUTO_CREATE_TOPICS_ENABLE): instead, we use our topic factories. This prevents unintentional creation of topics. JMX_PORTenables the Java Management Extensions instrumentation to automatically obtain certain metrics, such as memory usage.- In this module, we will not secure it to keep things simple, but this must be done for a production environment.
Adding the microservice
With a working MariaDB database and Kafka cluster, we are ready to add our microservice.
Add this service to your compose.yml file:
books:
  image: book-microservice:latest
  ports:
    - 8080:8080
  environment:
    DATASOURCES_DEFAULT_URL: jdbc:mariadb://db/booksdb
    DATASOURCES_DEFAULT_USERNAME: books
    DATASOURCES_DEFAULT_PASSWORD: bookspw
    KAFKA_BOOTSTRAP_SERVERS: kafka-0:9092,kafka-1:9092,kafka-2:9092
  depends_on:
    db:
      condition: service_healthy
    kafka-0:
      condition: service_healthy
    kafka-1:
      condition: service_healthy
    kafka-2:
      condition: service_healthy
This service uses the image we built before, and has some settings of its own:
- The
portskey tells Docker to expose the 8080 port of the container from the host machine.- This means that you’ll be able to use
http://localhost:8080from your browser to connect to the container, without having to use the internal Docker network IP. - It also means that other machines in your network will be able to access it, so long as they know your IP address.
- This means that you’ll be able to use
- The environment variables point to our database server and Kafka cluster:
DATASOURCES_DEFAULT_URLis equivalent to settingdatasources.default.urlin ourapplication.properties. It is set to the JDBC URL used to connect to the database, which follows the formatjdbc:DRIVER://HOST/DB_NAME. We use themariadbJDBC driver, connect to the MariaDB server atdb(its hostname is set to its key withinservices), and use thebooksdbschema in it.DATASOURCES_DEFAULT_USERNAMEandDATASOURCES_DEFAULT_PASSWORDmatch what we used for the username and password in thedbservice.KAFKA_BOOTSTRAP_SERVERSis equivalent to settingkafka.bootstrap.serversin ourapplication.properties. It is a comma-separated list of the Kafka brokers that the microservice should connect to, which matches thePLAINTEXTlisteners we set up to listen on port 9092 of each Kafka node. Note again how the hostnames match the service names of the Compose file.
- We use
depends_onto indicate that this service should only be started afterdband all Kafka nodes have started and passed their health check, by using thecondition: service_healthyoption.
Save your compose.yml file and click on the “Run All” button next to its services: line.
After some time, you should see the books service running as well (with a green icon):
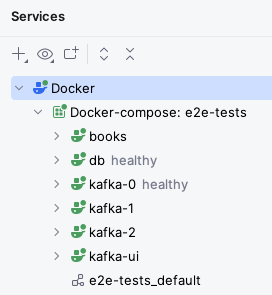
Try using your microservice from the browser, using Swagger UI. It should work as normal.
Re-running the end-to-end tests on the containerised version
We have a production-like deployment now, with a multi-node Kafka cluster and a database that will persist across container upgrades. It’s time to see if this containerised version also passes our end-to-end tests.
Since we have not changed our end-to-end tests, we will have to clean the cached tests results first by running the clean Gradle task.
Once that is done, run the test Gradle task: since your container is exposed from the same URL as before (http://localhost:8080), the test should pass without requiring any changes.
If at some point you need to re-run the tests from a clean database and Kafka cluster, you can follow these steps:
- Use the “Down” button to destroy the containers.
- Go to the “Volumes” section in the “Services” drawer (or in Docker Desktop) and delete all volumes.
- Run your Compose file again and wait for all services to start.
- Re-run your tests by running the
cleanandtestGradle tasks in thee2e-testsproject.
End of the practical
Congratulations, you have now containerised your Micronaut microservice!
If you were happy with a single-node deployment, you could take this Compose file as a starting point for your deployment. You would need to add authentication and authorisation as needed, and create a front-end on top of the microservice, of course: these are topics outside this module.
Additional exercises
Here are some ideas for things that you could try to go beyond what we cover in this practical.
Add a healthcheck to the microservice
Micronaut provides a built-in health endpoint. Try using it from your Compose file. The command for it would be something like this:
curl --fail http://localhost:8080/health
curl is a very popular command-line tool for accessing HTTP endpoints, and --fail means “produce a non-zero status code if the HTTP request produces a 4xx or 5xx status code”.
Adding a database administration UI
The todo-microservice example also includes an adminer service which provides a convenient web-based UI to inspect your database.
Try copying it over and using it.
Keep in mind that Adminer itself is running from inside the Docker network, so it can connect to the database server through the db hostname.
Advanced: Podman instead of Docker
There are other containerisation options besides Docker, which you could try on your own computer. These options can have less restrictive licenses than Docker, which has an open-source core but many closed-source additional features.
For example, there is Podman, which provides similar functionality while not requiring an ongoing “daemon” process like Docker (which can be a security liability).
Podman has a GUI similar to Docker Desktop (Podman Desktop), and the podman command can be set up as a drop-in alias of the docker command.
Keep in mind that for the assessment, we will still be using the Docker toolset for the time being, as it is the most mature option in the market at the moment. This exercise is only for your own experimentation.
Advanced: Kubernetes instead of Compose
You could experiment with a tool such as Kompose, which converts Compose files to the format required to run them within Kubernetes clusters.
Kubernetes is much more complex than Compose though, so this is not for the faint of heart! For your first time with Kubernetes, we recommend using Minikube from a Linux OS. That said, proceed at your own risk - we do not teach Kubernetes in this module.
Part 2: model-driven engineering
- Metamodelling and modelling
- Graphical syntax and editor development
- Model querying
- Model validation
- Model transformation
- Model management workflows
Practical 6: Metamodelling and modelling
This is the worksheet for the sixth practical in the Engineering 2 module.
In this practical you will define domain-specific metamodels and models that conform to them. You will use these metamodels and models in the remaining practicals of the module.
Work through every section of the practical in sequence, without missing steps. You can use the “Previous” and “Next” buttons on the left and right sides to quickly go between sections.
Introduction
In this practical you will design domain-specific metamodels using Emfatic. You will also create models conforming to these metamodels, using a reflective tree-based editor and/or Flexmi.
What you should already know
- You must have attended or watched the Eclipse Modelling Framework lecture.
What you will learn
- How to define domain-specific metamodels using Emfatic.
- How to create models that conform to such domain-specific metamodels.
What you will need
- An Eclipse installation with EMF and Epsilon (see the Tools section of this practical).
Tools
- A ready-to-use Eclipse bundle with all required tools (EMF, Emfatic, Flexmi) pre-installed is available in the lab machines
- Once you have logged into Windows, search for
Epsilon 2.8in the Start Menu - When prompted to select the location of your Eclipse workspace, you must select a folder under the
H:drive e.g.H:/eng2-workspace

Warning
Do not use backslashes in your workspace directory path under the
H:drive as this is a network drive and there are issues with paths under network drives that we’ve brought to the attention of IT Services. As a workaround, please use forward slashes instead (i.e.H:/eng2-workspaceinstead ofH:\eng2-workspace).Also, when you launch Eclipse for the first time it may prompt you to place your workspace under a network path (e.g.
\\userfs\ab123\w2k\Desktop) as shown below. If you select such a path instead of a path under theH:drive, you are likely to receive cryptic error messages later on.
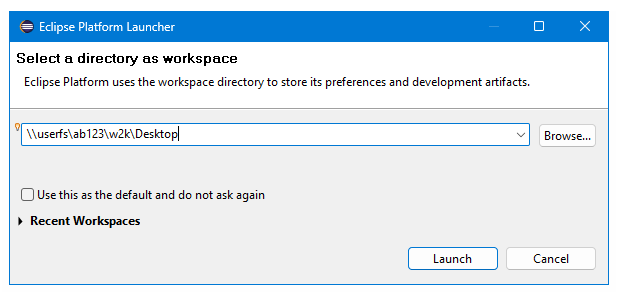
Tip
As an alternative to the
H:drive, you can place your workspace somewhere under theC:drive and use a GitHub/GitLab repo to store your work so that you can also access it from home.
- Close the
Welcomeview
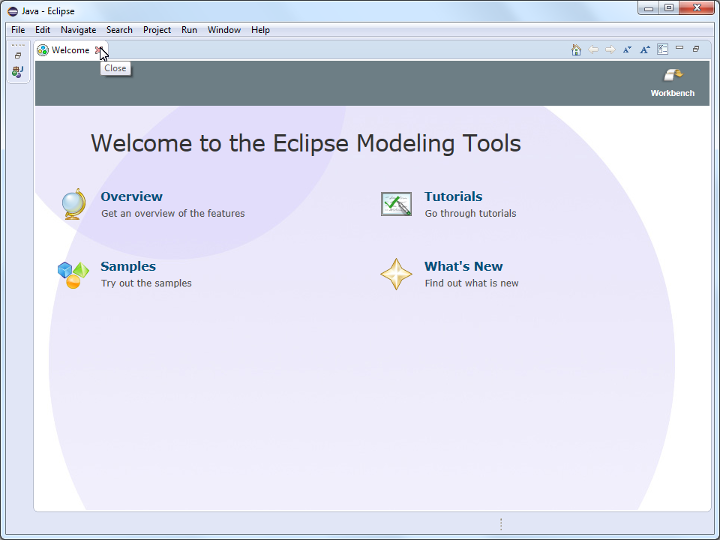
- Open the
Epsilonperspective
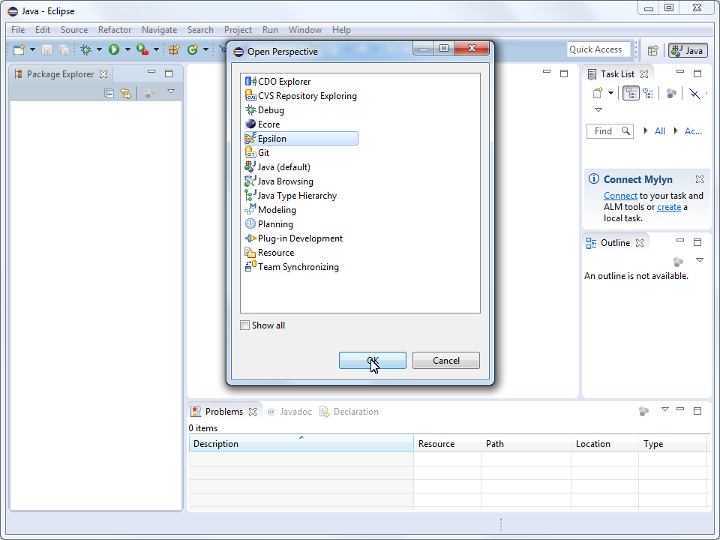
Installing the ENG2 tools on your computer
- If you prefer to install the ENG2 tools in your computer, please follow the instructions under the
How to set up Eclipse in your computer for Part 2 (model-driven engineering)page on VLE - If you already have a copy of Eclipse installed in your computer, it will most likely not contain the tools you need for ENG2
Warm up
- Follow the steps in this tutorial to create your first Ecore metamodel using Emfatic, and a model that conforms to it using the reflective EMF tree editor
- Take a few minutes to read through the Emfatic language reference
Conference DSL
Design the metamodel of a DSL for modelling conferences using Emfatic. Below are key concepts and relationships your language must support.
- A conference runs over several days
- On every day, there are several talks organised in (potentially parallel) tracks
- There are breaks between tracks (e.g., for lunch/coffee)
- Each track/break takes place in one room
- Each talk is delivered by one speaker
- Each talk also has a pre-arranged discussant, whose role is to provide critical feedback
- Each talk has a pre-defined duration
Why?
- To ensure that the conference program is clash-free e.g.
- Parallel tracks happen in different rooms
- The total duration of the talks of a track does not exceed the duration of the track
- Breaks don’t overlap with tracks
- To generate booklets, web-pages etc. from the program in a consistent manner instead of maintaining them manually (and risking inconsistency)
Solution
Try to design your own metamodel before you check out the solution below (or download the solution ZIP).
@namespace(uri="conference", prefix="")
package conference;

class Conference{
	val Person[*] participants;
	val Room[*] rooms;
	val Day[*] days;
}

class Person {
	attr String fullName;
	attr String affiliation;
}

class Day {
	attr String name;
	val Slot[*] slots;
}

abstract class Slot {
	attr String start;
	attr String end;
	ref Room room;
}

class Break extends Slot {
	attr String reason;
}

class Track extends Slot {
	attr String title;
	val Talk[*] talks;
}

class Talk {
	attr String title;
	attr int duration;
	ref Person speaker;
	ref Person discussant;
}

class Room {
	attr String name;
}
A diagrammatic representation of the metamodel above can be found below.
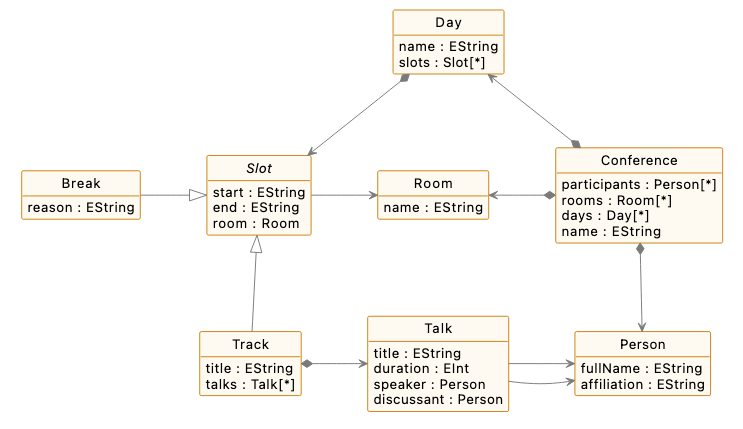
Notes on the solution
- This is only one possible solution. If your solution is not identical it does not mean that it is incorrect.
- If you have any questions, please ask!
- The name of meta-class
Slotappears in italics because it is an abstract class (i.e. it cannot be instantiated) - References that start with a black diamond (val in Emfatic) are containment references
- A talk can appear only under one track
- A track can appear only under one day
- Another way to think about it
- If we delete a track, all its contained talks should be deleted with it
- References that don’t start with a black diamond (
refin Emfatic) are non-containment references- Many slots can share the same room
- Many talks can be given by the same speaker
- Another way to think about it
- Deleting a track should not cause the deletion of the respective room from the model
- Deleting a talk should not cause the deletion of the respective speaker
- There are two “artificial” containment references in the model to keep EMF happy
Conference.participantsConference.rooms
- In the absence of these references,
PersonandRoominstances could not be contained anywhere in the model and would have to appear as top-level elements EMF-based tools don’t like models with multiple top-level elements- Hence we need to introduce these references so that all model elements can be contained somewhere under a root
Conferencemodel element
- Hence we need to introduce these references so that all model elements can be contained somewhere under a root
Create a conference model
Create a model that conforms to the conference metamodel and exercises all its features at least once (i.e. instantiates all classes, contains values for all attributes/references) using the tree-based EMF editor or using Flexmi.
Solution
Here is a sample model (contained in the model solution) that conforms to the Conference DSL.
<?xml version="1.0" encoding="ASCII"?>
<Conference xmi:version="2.0" xmlns:xmi="http://www.omg.org/XMI" xmlns:xsi="http://www.w3.org/2001/XMLSchema-instance" xmlns="conference" xmi:id="_e-mNEObZEe-uj-1n3DNKPg">
  <participants xmi:id="_e-mNEebZEe-uj-1n3DNKPg" fullName="Person 1" affiliation="University 1"/>
  <participants xmi:id="_e-mNEubZEe-uj-1n3DNKPg" fullName="Person 2" affiliation="University 2"/>
  <participants xmi:id="_e-mNE-bZEe-uj-1n3DNKPg" fullName="Person 3" affiliation="University 3"/>
  <participants xmi:id="_e-mNFObZEe-uj-1n3DNKPg" fullName="Person 4" affiliation="University 4"/>
  <participants xmi:id="_e-mNFebZEe-uj-1n3DNKPg" fullName="Person 5" affiliation="University 5"/>
  <participants xmi:id="_e-mNFubZEe-uj-1n3DNKPg" fullName="Person 6" affiliation="University 6"/>
  <participants xmi:id="_e-mNF-bZEe-uj-1n3DNKPg" fullName="Person 7" affiliation="University 7"/>
  <participants xmi:id="_e-mNGObZEe-uj-1n3DNKPg" fullName="Person 8" affiliation="University 8"/>
  <participants xmi:id="_e-mNGebZEe-uj-1n3DNKPg" fullName="Person 9" affiliation="University 9"/>
  <participants xmi:id="_e-mNGubZEe-uj-1n3DNKPg" fullName="Person 10" affiliation="University 10"/>
  <rooms xmi:id="_e-mNG-bZEe-uj-1n3DNKPg" name="Room 1"/>
  <rooms xmi:id="_e-mNHObZEe-uj-1n3DNKPg" name="Room 2"/>
  <rooms xmi:id="_e-mNHebZEe-uj-1n3DNKPg" name="Room 3"/>
  <rooms xmi:id="_e-mNHubZEe-uj-1n3DNKPg" name="Room 4"/>
  <days xmi:id="_e-mNH-bZEe-uj-1n3DNKPg" name="Day 1">
    <slots xsi:type="Track" xmi:id="_e-mNIObZEe-uj-1n3DNKPg" start="09:00" end="12:30" room="_e-mNHubZEe-uj-1n3DNKPg" title="Morning">
      <talks xmi:id="_e-mNIebZEe-uj-1n3DNKPg" title="Talk 1" duration="20" speaker="_e-mNE-bZEe-uj-1n3DNKPg" discussant="_e-mNF-bZEe-uj-1n3DNKPg"/>
      <talks xmi:id="_e-mNIubZEe-uj-1n3DNKPg" title="Talk 2" duration="20" speaker="_e-mNEubZEe-uj-1n3DNKPg" discussant="_e-mNEubZEe-uj-1n3DNKPg"/>
      <talks xmi:id="_e-mNI-bZEe-uj-1n3DNKPg" title="Talk 3" duration="20" speaker="_e-mNEubZEe-uj-1n3DNKPg" discussant="_e-mNFObZEe-uj-1n3DNKPg"/>
      <talks xmi:id="_e-mNJObZEe-uj-1n3DNKPg" title="Talk 4" duration="20" speaker="_e-mNEebZEe-uj-1n3DNKPg" discussant="_e-mNE-bZEe-uj-1n3DNKPg"/>
      <talks xmi:id="_e-mNJebZEe-uj-1n3DNKPg" title="Talk 5" duration="20" speaker="_e-mNGubZEe-uj-1n3DNKPg" discussant="_e-mNGebZEe-uj-1n3DNKPg"/>
    </slots>
    <slots xsi:type="Break" xmi:id="_e-mNJubZEe-uj-1n3DNKPg" start="12:30" end="14:00" room="_e-mNG-bZEe-uj-1n3DNKPg" reason="Lunch"/>
    <slots xsi:type="Track" xmi:id="_e-mNJ-bZEe-uj-1n3DNKPg" start="14:00" end="17:00" room="_e-mNHebZEe-uj-1n3DNKPg" title="Afternoon">
      <talks xmi:id="_e-mNKObZEe-uj-1n3DNKPg" title="Talk 6" duration="20" speaker="_e-mNGObZEe-uj-1n3DNKPg" discussant="_e-mNFubZEe-uj-1n3DNKPg"/>
      <talks xmi:id="_e-mNKebZEe-uj-1n3DNKPg" title="Talk 7" duration="20" speaker="_e-mNFubZEe-uj-1n3DNKPg" discussant="_e-mNEubZEe-uj-1n3DNKPg"/>
      <talks xmi:id="_e-mNKubZEe-uj-1n3DNKPg" title="Talk 8" duration="20" speaker="_e-mNF-bZEe-uj-1n3DNKPg" discussant="_e-mNE-bZEe-uj-1n3DNKPg"/>
      <talks xmi:id="_e-mNK-bZEe-uj-1n3DNKPg" title="Talk 9" duration="20" speaker="_e-mNF-bZEe-uj-1n3DNKPg" discussant="_e-mNFubZEe-uj-1n3DNKPg"/>
      <talks xmi:id="_e-mNLObZEe-uj-1n3DNKPg" title="Talk 10" duration="20" speaker="_e-mNEubZEe-uj-1n3DNKPg" discussant="_e-mNF-bZEe-uj-1n3DNKPg"/>
    </slots>
  </days>
  <days xmi:id="_e-mNLebZEe-uj-1n3DNKPg" name="Day 2">
    <slots xsi:type="Track" xmi:id="_e-mNLubZEe-uj-1n3DNKPg" start="09:00" end="12:30" room="_e-mNHObZEe-uj-1n3DNKPg" title="Morning">
      <talks xmi:id="_e-mNL-bZEe-uj-1n3DNKPg" title="Talk 11" duration="20" speaker="_e-mNGubZEe-uj-1n3DNKPg" discussant="_e-mNFebZEe-uj-1n3DNKPg"/>
      <talks xmi:id="_e-mNMObZEe-uj-1n3DNKPg" title="Talk 12" duration="20" speaker="_e-mNF-bZEe-uj-1n3DNKPg" discussant="_e-mNGebZEe-uj-1n3DNKPg"/>
      <talks xmi:id="_e-mNMebZEe-uj-1n3DNKPg" title="Talk 13" duration="20" speaker="_e-mNFubZEe-uj-1n3DNKPg" discussant="_e-mNF-bZEe-uj-1n3DNKPg"/>
      <talks xmi:id="_e-mNMubZEe-uj-1n3DNKPg" title="Talk 14" duration="20" speaker="_e-mNFebZEe-uj-1n3DNKPg" discussant="_e-mNEubZEe-uj-1n3DNKPg"/>
      <talks xmi:id="_e-mNM-bZEe-uj-1n3DNKPg" title="Talk 15" duration="20" speaker="_e-mNGObZEe-uj-1n3DNKPg" discussant="_e-mNFubZEe-uj-1n3DNKPg"/>
    </slots>
    <slots xsi:type="Break" xmi:id="_e-mNNObZEe-uj-1n3DNKPg" start="12:30" end="14:00" room="_e-mNHObZEe-uj-1n3DNKPg" reason="Lunch"/>
    <slots xsi:type="Track" xmi:id="_e-mNNebZEe-uj-1n3DNKPg" start="14:00" end="17:00" room="_e-mNHebZEe-uj-1n3DNKPg" title="Afternoon">
      <talks xmi:id="_e-mNNubZEe-uj-1n3DNKPg" title="Talk 16" duration="20" speaker="_e-mNFObZEe-uj-1n3DNKPg" discussant="_e-mNGubZEe-uj-1n3DNKPg"/>
      <talks xmi:id="_e-mNN-bZEe-uj-1n3DNKPg" title="Talk 17" duration="-10" speaker="_e-mNGebZEe-uj-1n3DNKPg" discussant="_e-mNEubZEe-uj-1n3DNKPg"/>
      <talks xmi:id="_e-mNOObZEe-uj-1n3DNKPg" title="Talk 18" duration="20" speaker="_e-mNGubZEe-uj-1n3DNKPg" discussant="_e-mNF-bZEe-uj-1n3DNKPg"/>
      <talks xmi:id="_e-mNOebZEe-uj-1n3DNKPg" title="Talk 19" duration="20" speaker="_e-mNFebZEe-uj-1n3DNKPg" discussant="_e-mNEebZEe-uj-1n3DNKPg"/>
      <talks xmi:id="_e-mNOubZEe-uj-1n3DNKPg" title="Talk 20" duration="20" speaker="_e-mNF-bZEe-uj-1n3DNKPg" discussant="_e-mNGubZEe-uj-1n3DNKPg"/>
    </slots>
  </days>
  <days xmi:id="_e-mNO-bZEe-uj-1n3DNKPg" name="Day 3">
    <slots xsi:type="Track" xmi:id="_e-mNPObZEe-uj-1n3DNKPg" start="12:30" end="09:00" room="_e-mNHubZEe-uj-1n3DNKPg" title="Morning">
      <talks xmi:id="_e-mNPebZEe-uj-1n3DNKPg" title="Talk 21" duration="20" speaker="_e-mNGebZEe-uj-1n3DNKPg" discussant="_e-mNGubZEe-uj-1n3DNKPg"/>
      <talks xmi:id="_e-mNPubZEe-uj-1n3DNKPg" title="Talk 22" duration="20" speaker="_e-mNFubZEe-uj-1n3DNKPg" discussant="_e-mNGebZEe-uj-1n3DNKPg"/>
      <talks xmi:id="_e-mNP-bZEe-uj-1n3DNKPg" title="Talk 23" duration="20" speaker="_e-mNFubZEe-uj-1n3DNKPg" discussant="_e-mNGebZEe-uj-1n3DNKPg"/>
      <talks xmi:id="_e-mNQObZEe-uj-1n3DNKPg" title="Talk 24" duration="20" speaker="_e-mNEubZEe-uj-1n3DNKPg" discussant="_e-mNGebZEe-uj-1n3DNKPg"/>
      <talks xmi:id="_e-mNQebZEe-uj-1n3DNKPg" title="Talk 25" duration="20" speaker="_e-mNF-bZEe-uj-1n3DNKPg" discussant="_e-mNFebZEe-uj-1n3DNKPg"/>
    </slots>
    <slots xsi:type="Break" xmi:id="_e-mNQubZEe-uj-1n3DNKPg" start="12:30" end="14:00" room="_e-mNHObZEe-uj-1n3DNKPg" reason="Lunch"/>
    <slots xsi:type="Track" xmi:id="_e-mNQ-bZEe-uj-1n3DNKPg" start="14:00" end="17:00" room="_e-mNHubZEe-uj-1n3DNKPg" title="Afternoon">
      <talks xmi:id="_e-mNRObZEe-uj-1n3DNKPg" title="Talk 26" duration="20" speaker="_e-mNGubZEe-uj-1n3DNKPg" discussant="_e-mNF-bZEe-uj-1n3DNKPg"/>
      <talks xmi:id="_e-mNRebZEe-uj-1n3DNKPg" title="Talk 27" duration="20" speaker="_e-mNGObZEe-uj-1n3DNKPg" discussant="_e-mNF-bZEe-uj-1n3DNKPg"/>
      <talks xmi:id="_e-mNRubZEe-uj-1n3DNKPg" title="Talk 28" duration="20" speaker="_e-mNGubZEe-uj-1n3DNKPg" discussant="_e-mNEebZEe-uj-1n3DNKPg"/>
      <talks xmi:id="_e-mNR-bZEe-uj-1n3DNKPg" title="Talk 29" duration="20" speaker="_e-mNGubZEe-uj-1n3DNKPg" discussant="_e-mNE-bZEe-uj-1n3DNKPg"/>
      <talks xmi:id="_e-mNSObZEe-uj-1n3DNKPg" title="Talk 30" duration="20" speaker="_e-mNE-bZEe-uj-1n3DNKPg" discussant="_e-mNEubZEe-uj-1n3DNKPg"/>
    </slots>
  </days>
</Conference>
Research Project DSL
- Research projects are typically conducted in a collaborative manner by a number of partners (universities, companies, charities etc.) and have a fixed duration (in months – e.g. 36 months)
- A project is split into a number of work-packages
- Each work-package has a start and an end month and is further broken down into more fine-grained tasks and deliverables
- Tasks also have a start and an end month and each deliverable is due on a specific month
- Each partner declares how much effort (in person/months) they will allocate to each task
Exercise
- Create a DSL for designing such projects
- Create a model that conforms to the DSL and exercises all its features at least once
Why?
- Proposal documents contain several tables with overlapping information (see screenshots below) e.g.
- Effort per partner per task for a work-package
- Effort per partner for the whole project
- Table of deliverables for the whole project in chronological order
- A Gantt chart that summarises the timeline of the project
- Unless these tables are generated from a common source (i.e. a model) they can become inconsistent with each other
- e.g. a partner may change their effort for a task but forget to change the overall effort figure for the entire project
- Other consistency problems can also appear e.g.
- Tasks that start before / end after the work-package in which they are contained
- Deliverables that are due after their work-package ends
- This is how we actually write proposals for research projects
Examples
Below are a few screenshots of actual tables generated from a model of an EC-funded research project.
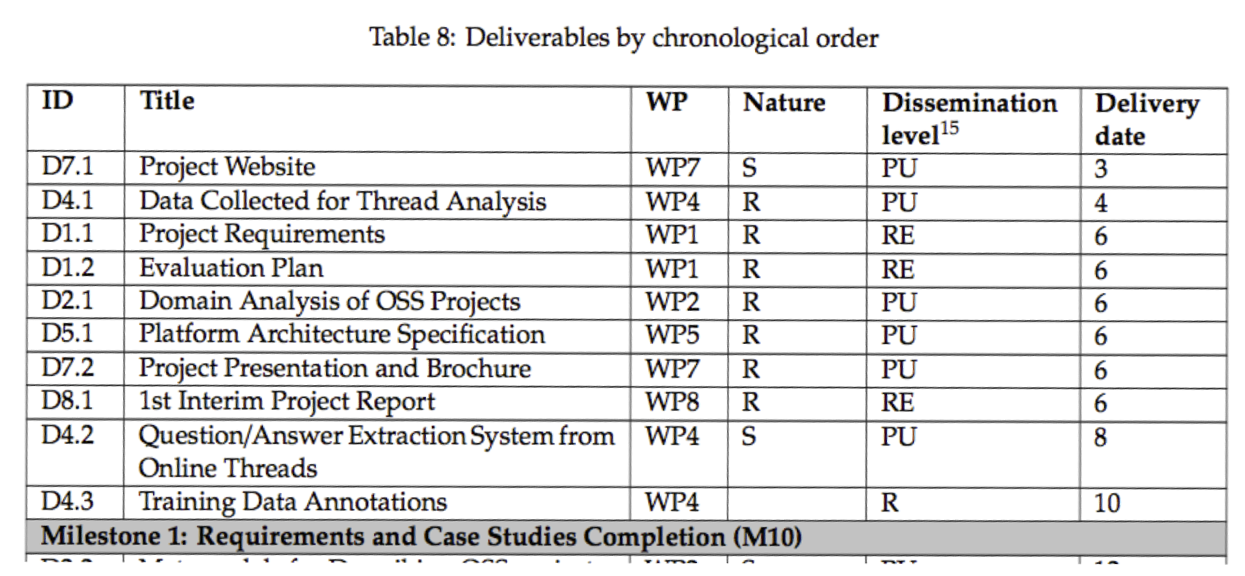

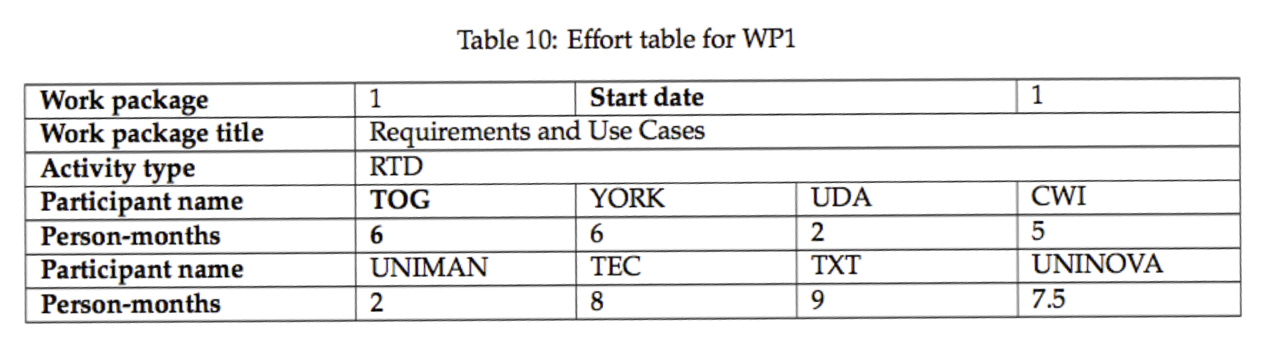
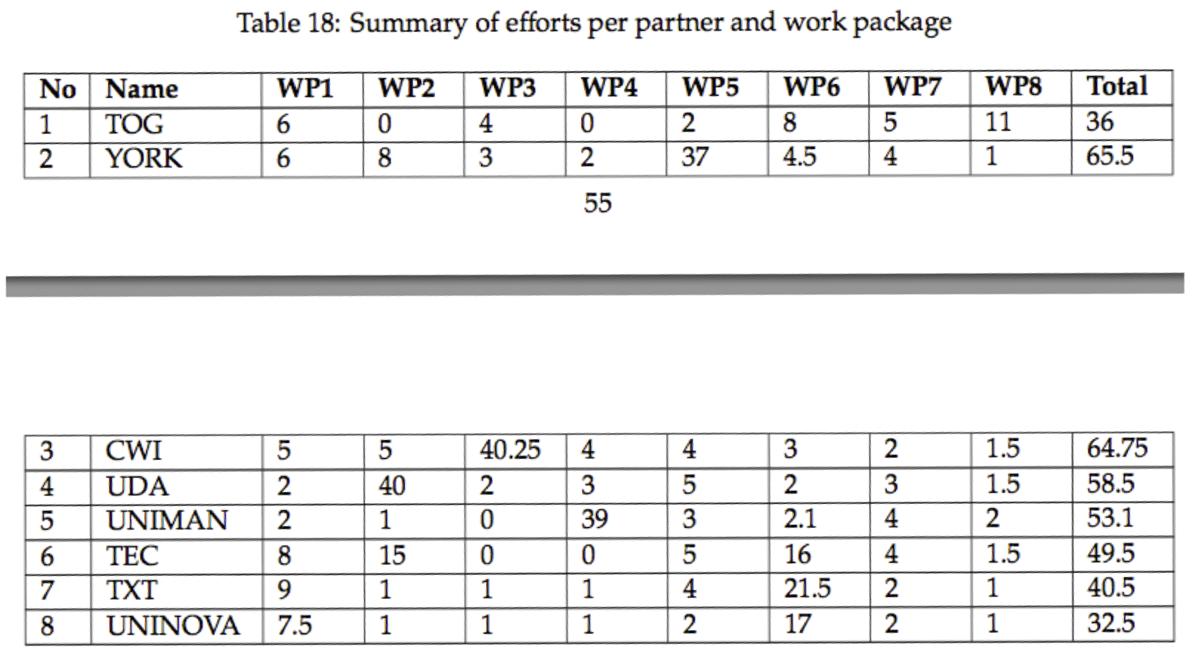
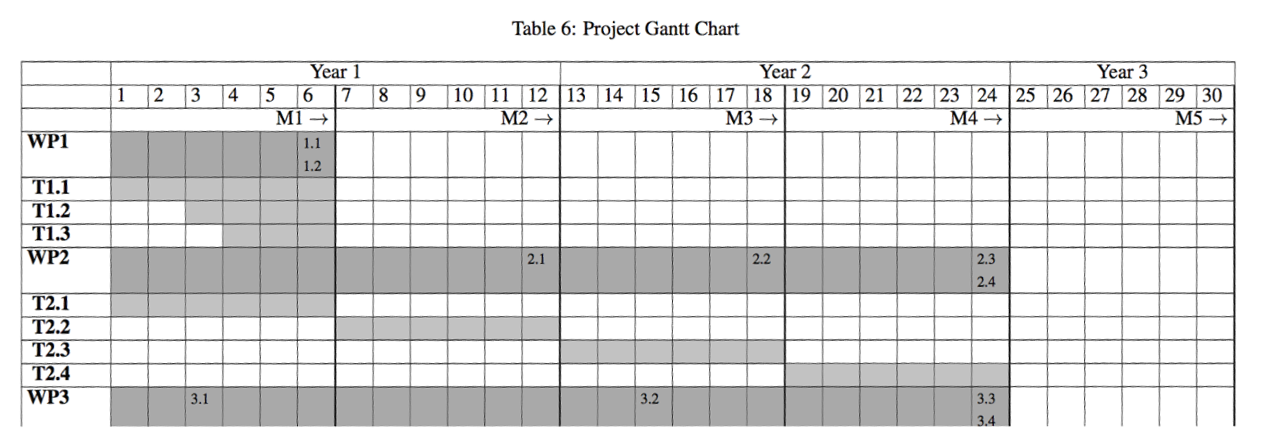
Solution
Try to design your own metamodel before you check out the solution below. It is also available in the model solution ZIP file.
@namespace(uri="research_project", prefix="")
package research_project;

class Project {
   attr String name;
   attr int duration; // in months
   attr String title;
   val WP[*] wps;
   val Partner[*] partners;
}

class WP { // work-package
   val Task[*] tasks;
   attr String title;
   ref Partner leader;
   attr String type; // research, development, management etc.
   val Effort[*] effort;
   val Deliverable[*] deliverables;
}

class Task {
   attr String title;
   attr int start; // month from the start of the project
   attr int end; // month from the start of the project
   ref Partner[*] partners;
}

class Deliverable {
   attr String title;
   attr int due; // month from the start of the project
   attr String nature; // software, report etc.
   attr String dissemination; // public, consortium, funder etc.
   ref Partner partner;
}

class Effort {
   ref Partner partner;
   attr float months;
}

class Partner {
   id attr String ~id;
   attr String name;
   attr String country;
}
Software Distribution DSL
- Software vendors need to build several bundles for different types of customers
All these bundles are typically assembled from the same pool of components
- Different bundles contain different subsets of these components
- Components have dependencies between them
- e.g. if component C2 depends on component C1, then bundles that contain C2 must always also contain C1
Exercise
- Create a DSL for designing such bundles
- Create a model that conforms to the DSL and exercises all its features at least once
Example
- You are a vendor of an Enterprise Resource Planning system implemented in Java that consists of several components
- e.g. Sales, Warehouse, Payroll
- Each component consists of a number of JAR files
- Components can share JARs
- The dependencies between your components are as shown below
- You wish to assemble different bundles for e.g.
- Sole Traders: Core, Sales, CRM
- Service Companies: Core, Payroll, CRM
- Manufacturing Companies: All components excluding Real-Time Warehouse Analytics
- Large Manufacturing Companies: All components
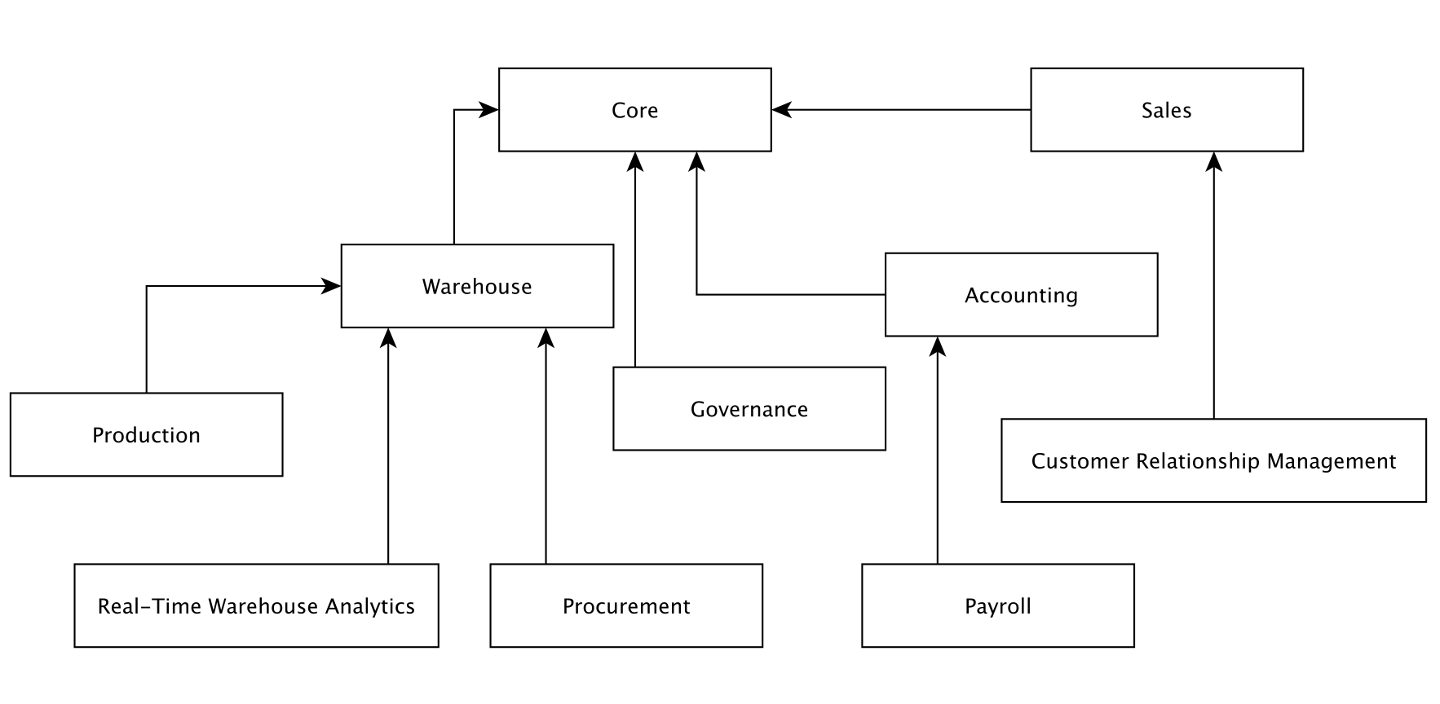
Why?
- You could write a packaging (e.g. shell, ANT, Gradle) script for each distribution manually however
- It would be error-prone
- They would contain a lot of duplication
- They would be hard to maintain for a large set of components
- Using a domain-specific model
- You can capture bundle configurations at an appropriate level of abstraction
- You can perform checks for e.g.
- components with cyclic dependencies
- components/JARs that are not used in any products (obsolete?)
- You can generate these packaging scripts automatically and they will be correct by construction
Solution
Try to design your own metamodel before you check out the solution below (part of the solution ZIP).
@namespace(uri="sdl", prefix="")
package sdl;

class Vendor {
	attr String name;
	val Bundle[*] bundles;
	val Component[*] components;
	val Jar[*] jars;
}

class Bundle {
	attr String name;
	ref Component[*] components;
}

class Component {
	attr String name;
	ref Component[*] dependencies;
	ref Jar[*] jars;
}

class Jar {
	attr String filename;
}
Collaborative Project Requirements DSL
- A collaborative research project has several use-case partners, each contributing one or more use-cases, that will drive the requirements and evaluate the technologies developed in the project.
- Requirements are grouped into semantically cohesive clusters (work-packages)
- The importance of each requirement can be different for every use-case (shall/should/may)
- An example from a real project is below
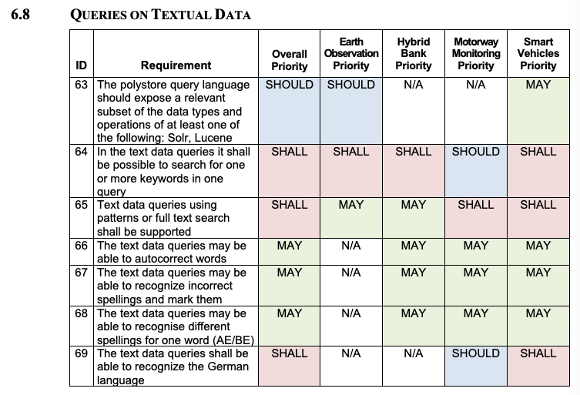
Exercise
- Create a DSL for designing such requirements
- Create a model that conforms to the DSL and exercises all its features at least once
Solution
Try to design your own metamodel before you check out the solution below (part of the solution ZIP).
@namespace(uri="http://cs.york.ac.uk/eng2/requirements/1.0")
package requirements;

// A Project has partners that will drive the requirements
class Project {
	val Partner[*] partners;
	val WorkPackage[*] workPackages;
}

// A partner contributes one or more use-cases
class Partner {
	attr String name;
	val UseCase[*] useCases;
}

// Requirements are grouped into work-packages
class WorkPackage {
	attr String name;
	attr String description;
	val Requirement[*] requirements;
}

class Requirement {
	id attr String identifier;
	attr String description;

	// The importance of each requirement can be different for every use case
	val RequirementPriority[*] priorities;
}

class RequirementPriority {
	ref UseCase useCase;
	attr Priority priority;
}

enum Priority {
	SHALL;
	SHOULD;
	MAY;
	NOT_APPLICABLE;
}

class UseCase {
	attr String name;
	attr String description;
}
Additional exercises
- Generate dedicated tree-based editors for your metamodels as demonstrated in the EMF lecture
- Replace the default icons of your editor
- Icons under
<dsl>.edit/icons/full/obj16 - You will need to find appropriate 16x16 icons
- Icons under
- Customise the labels of model elements on the tree editor by modifying the
getText(...)methods of<dsl>.edit/src/<dsl>.provider/<type>ItemProviderclasses- Don’t forget to set them to
@generated NOT
- Don’t forget to set them to
Practical 7: Graphical syntax and editor development
This is the worksheet for the seventh practical in the Engineering 2 module.
In this practical you will create a graphical syntax for one of the languages from Practical 6 on paper, and you will then implement a graphical editor for it using Eclipse Sirius.
Work through every section of the practical in sequence, without missing steps. You can use the “Previous” and “Next” buttons on the left and right sides to quickly go between sections.
Introduction
In this practical you will create a graphical syntax for one of the languages from Practical 6 on paper, and you will then implement a graphical editor for it using Eclipse Sirius.
What you should already know
- You must be familiar with defining domain-specific metamodels using Emfatic.
- You must have attended or watched the graphical modelling / Sirius lectures.
What you will learn
- How to define graphical syntaxes and editors using Sirius.
- How to use graphical Sirius editors to create and edit models.
What you will need
- An Eclipse installation with EMF, Epsilon and Sirius (see the Tools section of Practical 6).
Paper prototype
Design a paper prototype of a graphical concrete syntax for one of the languages from Practical 6.
- What shapes/colors/icons would you want to use to represent your model elements graphically?
- How should your model elements be connected?
Sirius-based notation
- Create a generic Eclipse project with the Emfatic metamodel
- Name the project after your metamodel (e.g. if the filename of your metamodel is
sdl.emf, name the projectsdl)
- Name the project after your metamodel (e.g. if the filename of your metamodel is
- Generate the
.ecorefile from the Emfatic metamodel, and use it to generate themodel,edit, andeditorplugins- For detailed steps, check the recording of the second lecture of Week 6 (“The Eclipse Modeling Framework”)
- Define a Sirius graphical editor following the steps in the Sirius lectures on Week 7
- Run a nested Eclipse instance
- Right-click on your project and select
Run as -> Eclipse Application
- Right-click on your project and select
- Create a model using your Sirius-based editor in the nested workspace
Example editors
Below are three Sirius-based editors from which you can draw inspiration.
Call Centre Language
GitHub repository: https://github.com/uoy-cs-eng2/callcentre-sirius
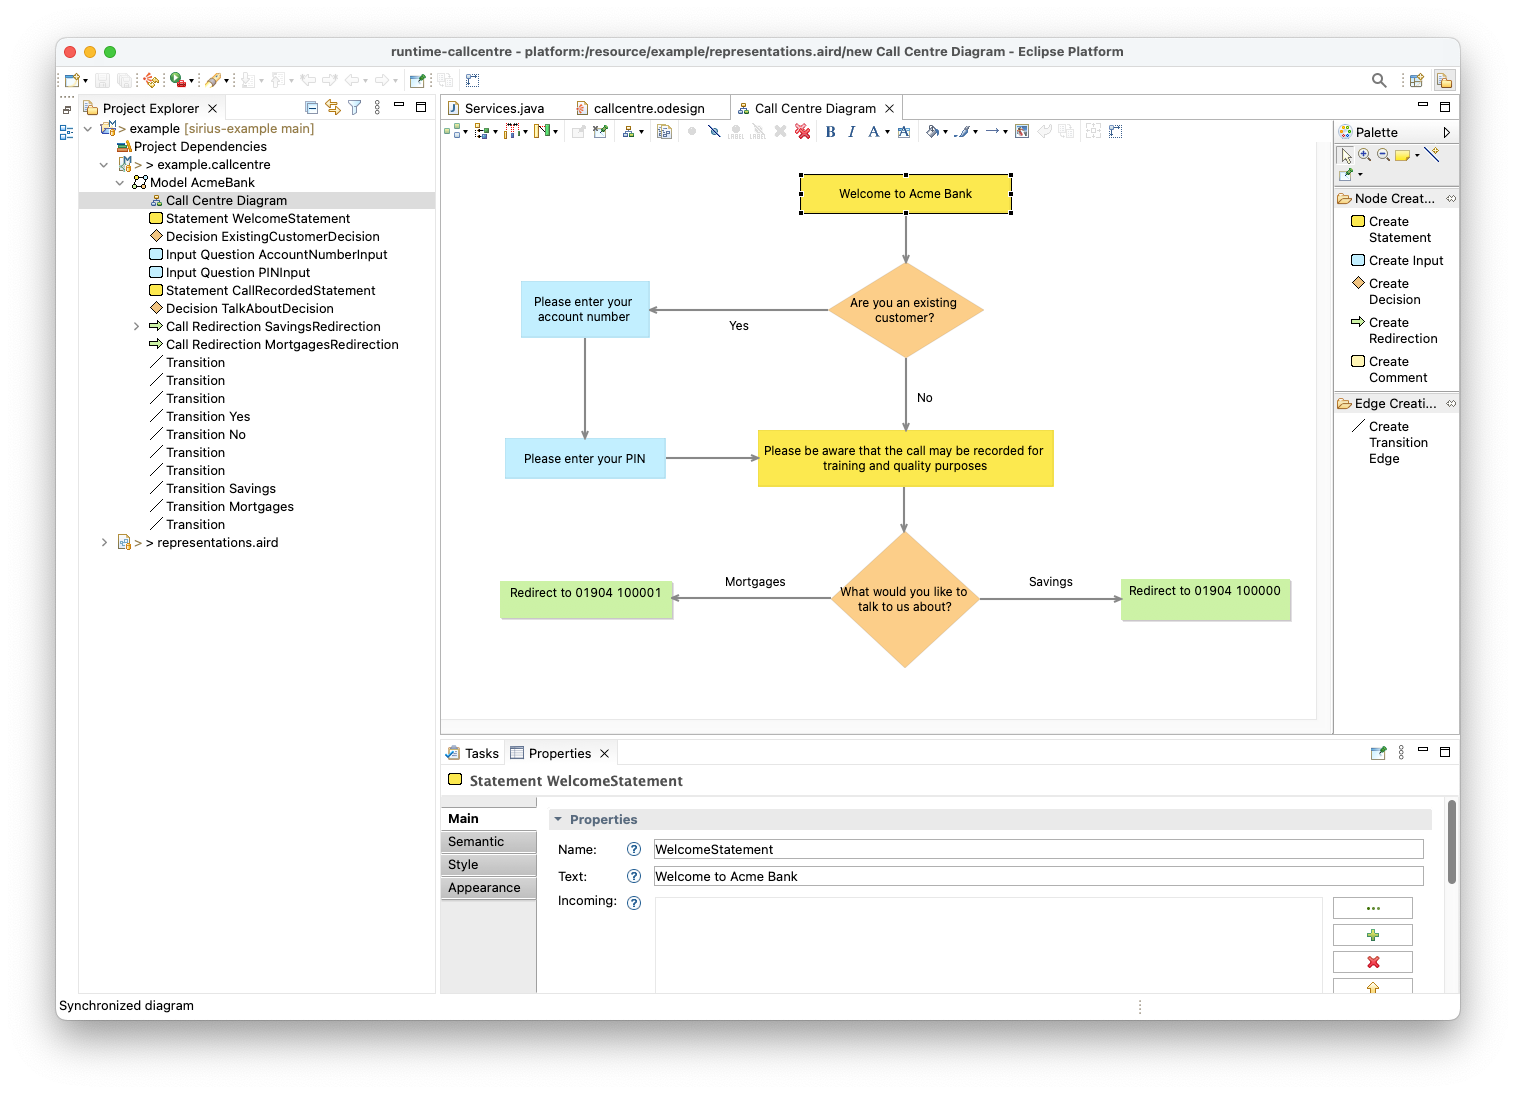
Project Scheduling Language
GitHub repository: https://github.com/uoy-cs-eng2/psl-sirius
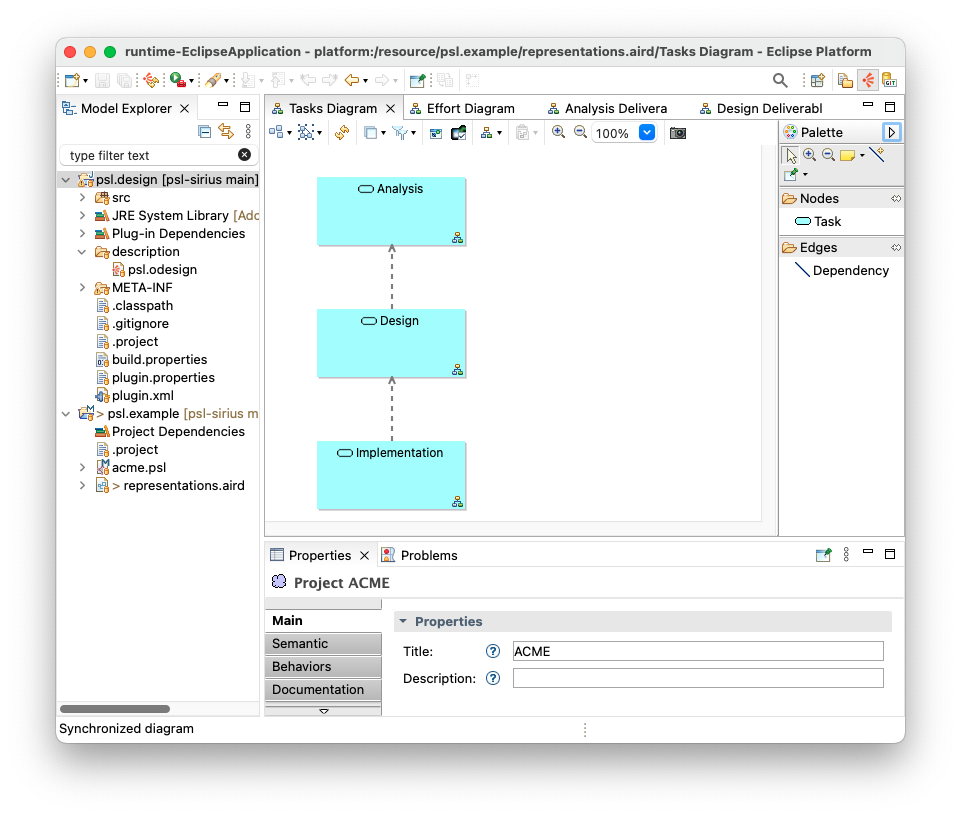
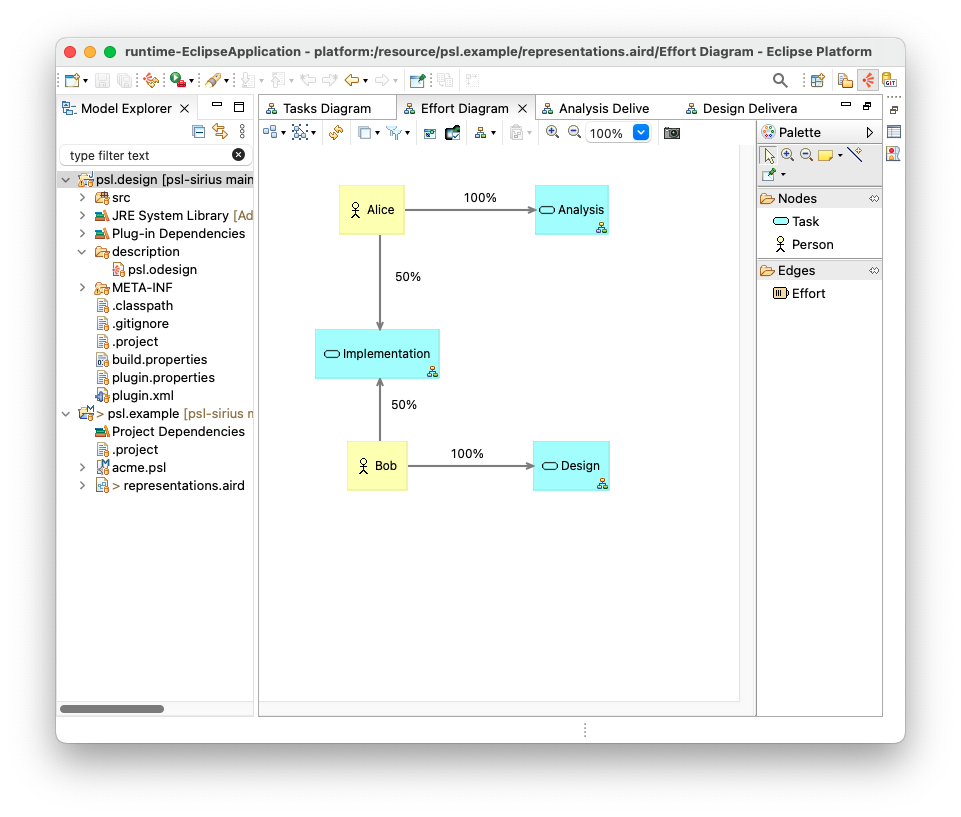
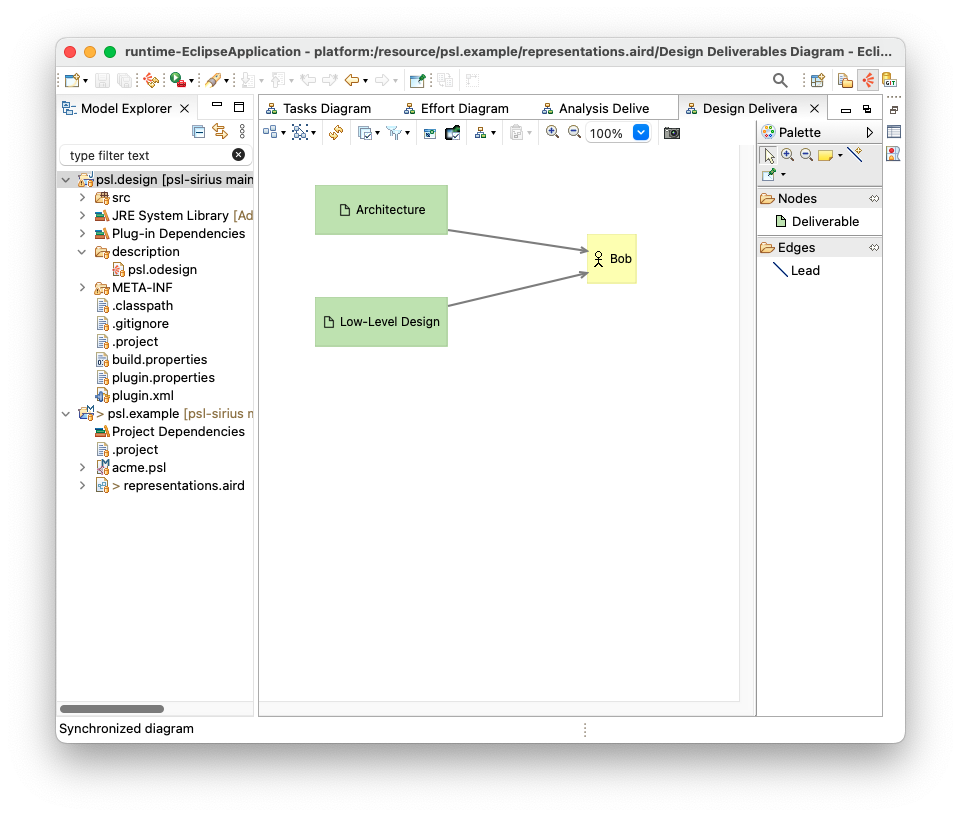
Docker Network Language
GitHub repository: https://github.com/uoy-cs-eng2/docker-network-diagrams
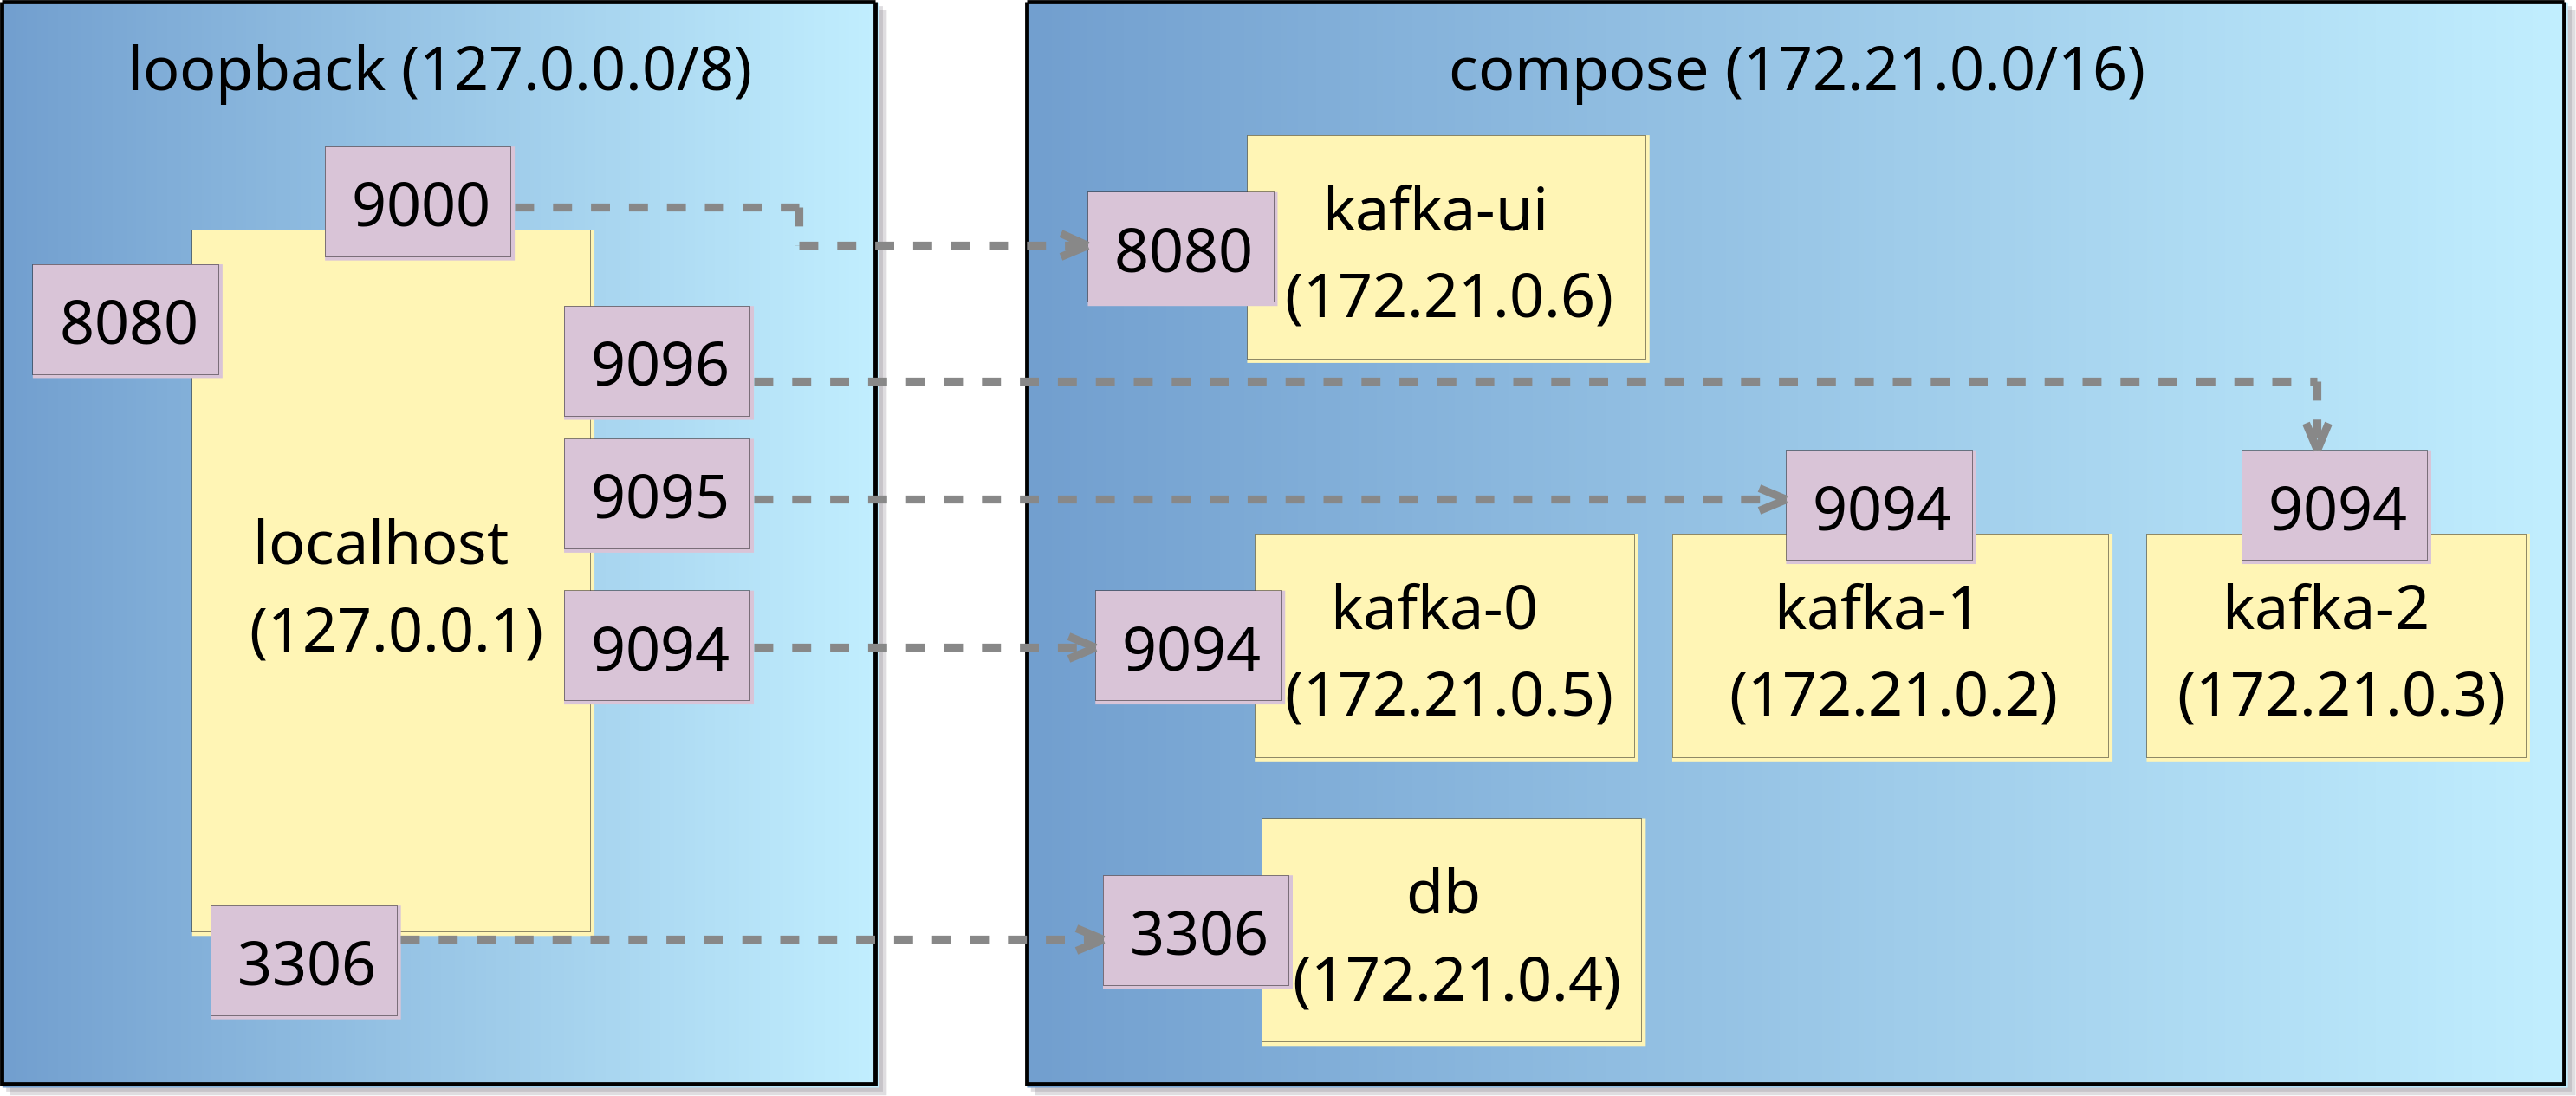
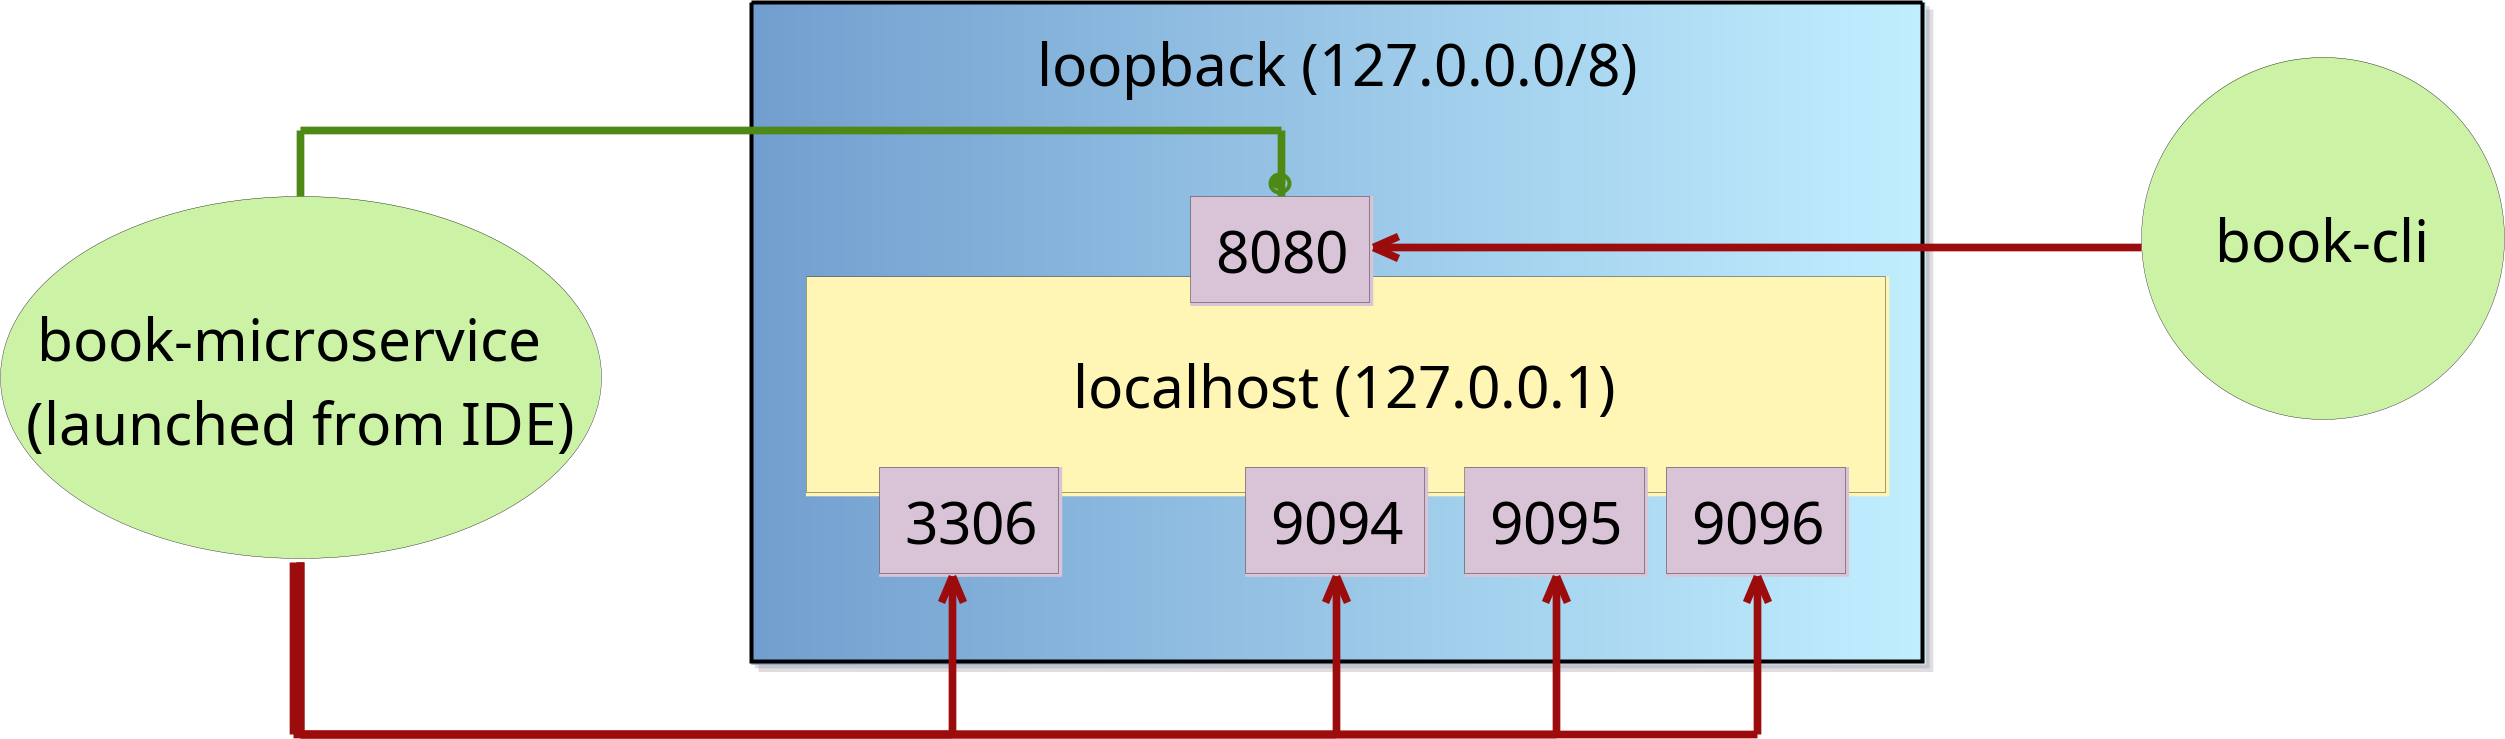
Sirius documentation
- Getting Started with Sirius
- Sirius documentation
- Within this documentation, the Sirius Specifier Manual will be very useful if you are creating your own Sirius-based notation
- BasicFamily tutorial
For additional resources, please check the links at the end of the Sirius lecture.
Practical 8: Model querying
This is the worksheet for the eight practical in the Engineering 2 module.
In the sixth practical, you developed three metamodels and constructed models that conform to them. In this practical you will write model management programs and run them against models to query them.
Work through every section of the practical in sequence, without missing steps. You can use the “Previous” and “Next” buttons on the left and right sides to quickly go between sections.
Introduction
In this practical you will use the Epsilon Object Language (EOL) to query models.
What you should already know
- How to define domain-specific metamodels using Emfatic.
- How to create models that conform to such domain-specific metamodels.
What you will learn
- How to write and run EOL queries on EMF-based models.
What you will need
- An Eclipse installation with EMF and Epsilon (see the Tools section of Practical 6).
- Before you attempt the exercises in this practical you will also need to
- Download this zip file that contains Eclipse projects with metamodels, models etc. from Practical 6.
- Import the projects in the zip file to your Eclipse workspace using the
File -> Import -> Existing Projects into Workspacewizard as shown below.
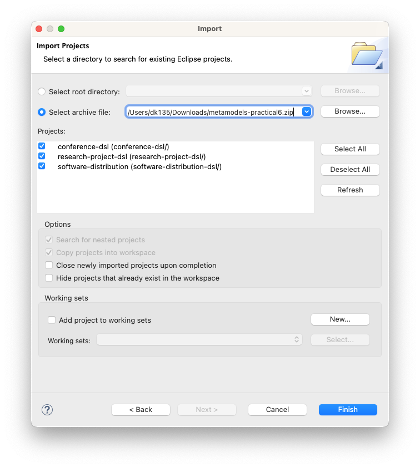
Conference DSL queries
Write five EOL queries (Q1-Q5) that print:
- Q1: The number of days the conference lasts
- Q2: A set of unique affiliations of participants of the conference
- i.e. if multiple persons have the same affiliation, the affiliation should appear only once in this set
- Q3: The total duration of all talks in the conference
- Q4: A set of all the names of the rooms in which breaks take place
- Q5: The number of tracks that start before noon
- Reminder:
Slot.startandSlot.endare strings that use theHH:MMformat (e.g. 15:30).
- Reminder:
Instructions for running your EOL queries against a conference model are provided below.
Solutions
// Q1
// Day.all returns a collection
// with all the instances of
// Day in our model
Day.all.size().println();

// Q2
// Collect the affiliations of
// all persons, and then filter
// out duplicates using asSet()
Person.all.collect(p|p.affiliation).asSet().println();

// Q2
// More verbose version that uses
// a for loop instead of .collect()
// You should avoid writing such code
var affiliations : Set;
for (p in Person.all) {
    affiliations.add(p.affiliation);
}
affiliations.println();

// Q3
// Get a list with the durations
// of all talks and compute their
// sum
Talk.all.collect(t|t.duration).sum().println();

// ... or more concisely
Talk.all.duration.sum().println();

// Q4
// Collect the rooms of all
// breaks and then collect
// the names of these rooms
Break.all.collect(b|b.room).asSet().collect(r|r.name).println();

// ... or more concisely
Break.all.room.asSet().name.println();
For Q5, we will need to define a few helper operations for working with HH:MM-formatted times first. For now, we assume that string values under Slot.start and Slot.end conform to the HH:MM format. Later on, we will encode (and check) this assumption using a validation constraint.
// Q5
// Select all tracks that start before noon
// and compute the size of the returned collection
Track.all.select(t|t.start.isBefore("12:00")).size().println();

// Get the hours part of the string
// and convert it to an integer
// e.g. for 15:45 it returns 15
operation String getHours() {
    return self.split(":").at(0).asInteger();
}

// Same for the minutes part
operation String getMinutes() {
    return self.split(":").at(1).asInteger();
}

// Compares the string on which it is invoked
// with its time parameter e.g.
// "15:15".isBefore("18:00") returns true
operation String isBefore(time : String) {
    return (self.getHours() < time.getHours()) or
        (self.getHours() = time.getHours() and
        self.getMinutes() < time.getMinutes());
}
Warning
The EOL execution engine ignores any statements that appear after the definition of the first operation in a
.eolfile. Therefore, if you were to move the first statement in the example above (Track.all.select(t|t.start.isBefore("12:00")).size().println();) to the end of the file, it would not get executed.
Running queries Q1-Q5
- To run these queries you will need
- The Ecore metamodel of the Conference DSL;
- A sample model that conforms to it;
- An EOL file that contains your queries.
- You should already have
conference.ecore(Ecore metamodel) andconference.model(sample model) in your workspace after following the instructions at the start of this practical. - Create an empty text file named
conference-queries.eolwithin yourconference-dslproject. - Right-click on
conference.ecore.
- Click on the
Register EPackagesmenu item. This will register the metamodel with EMF so that it can load models (such asconference.model) that conform to this metamodel.
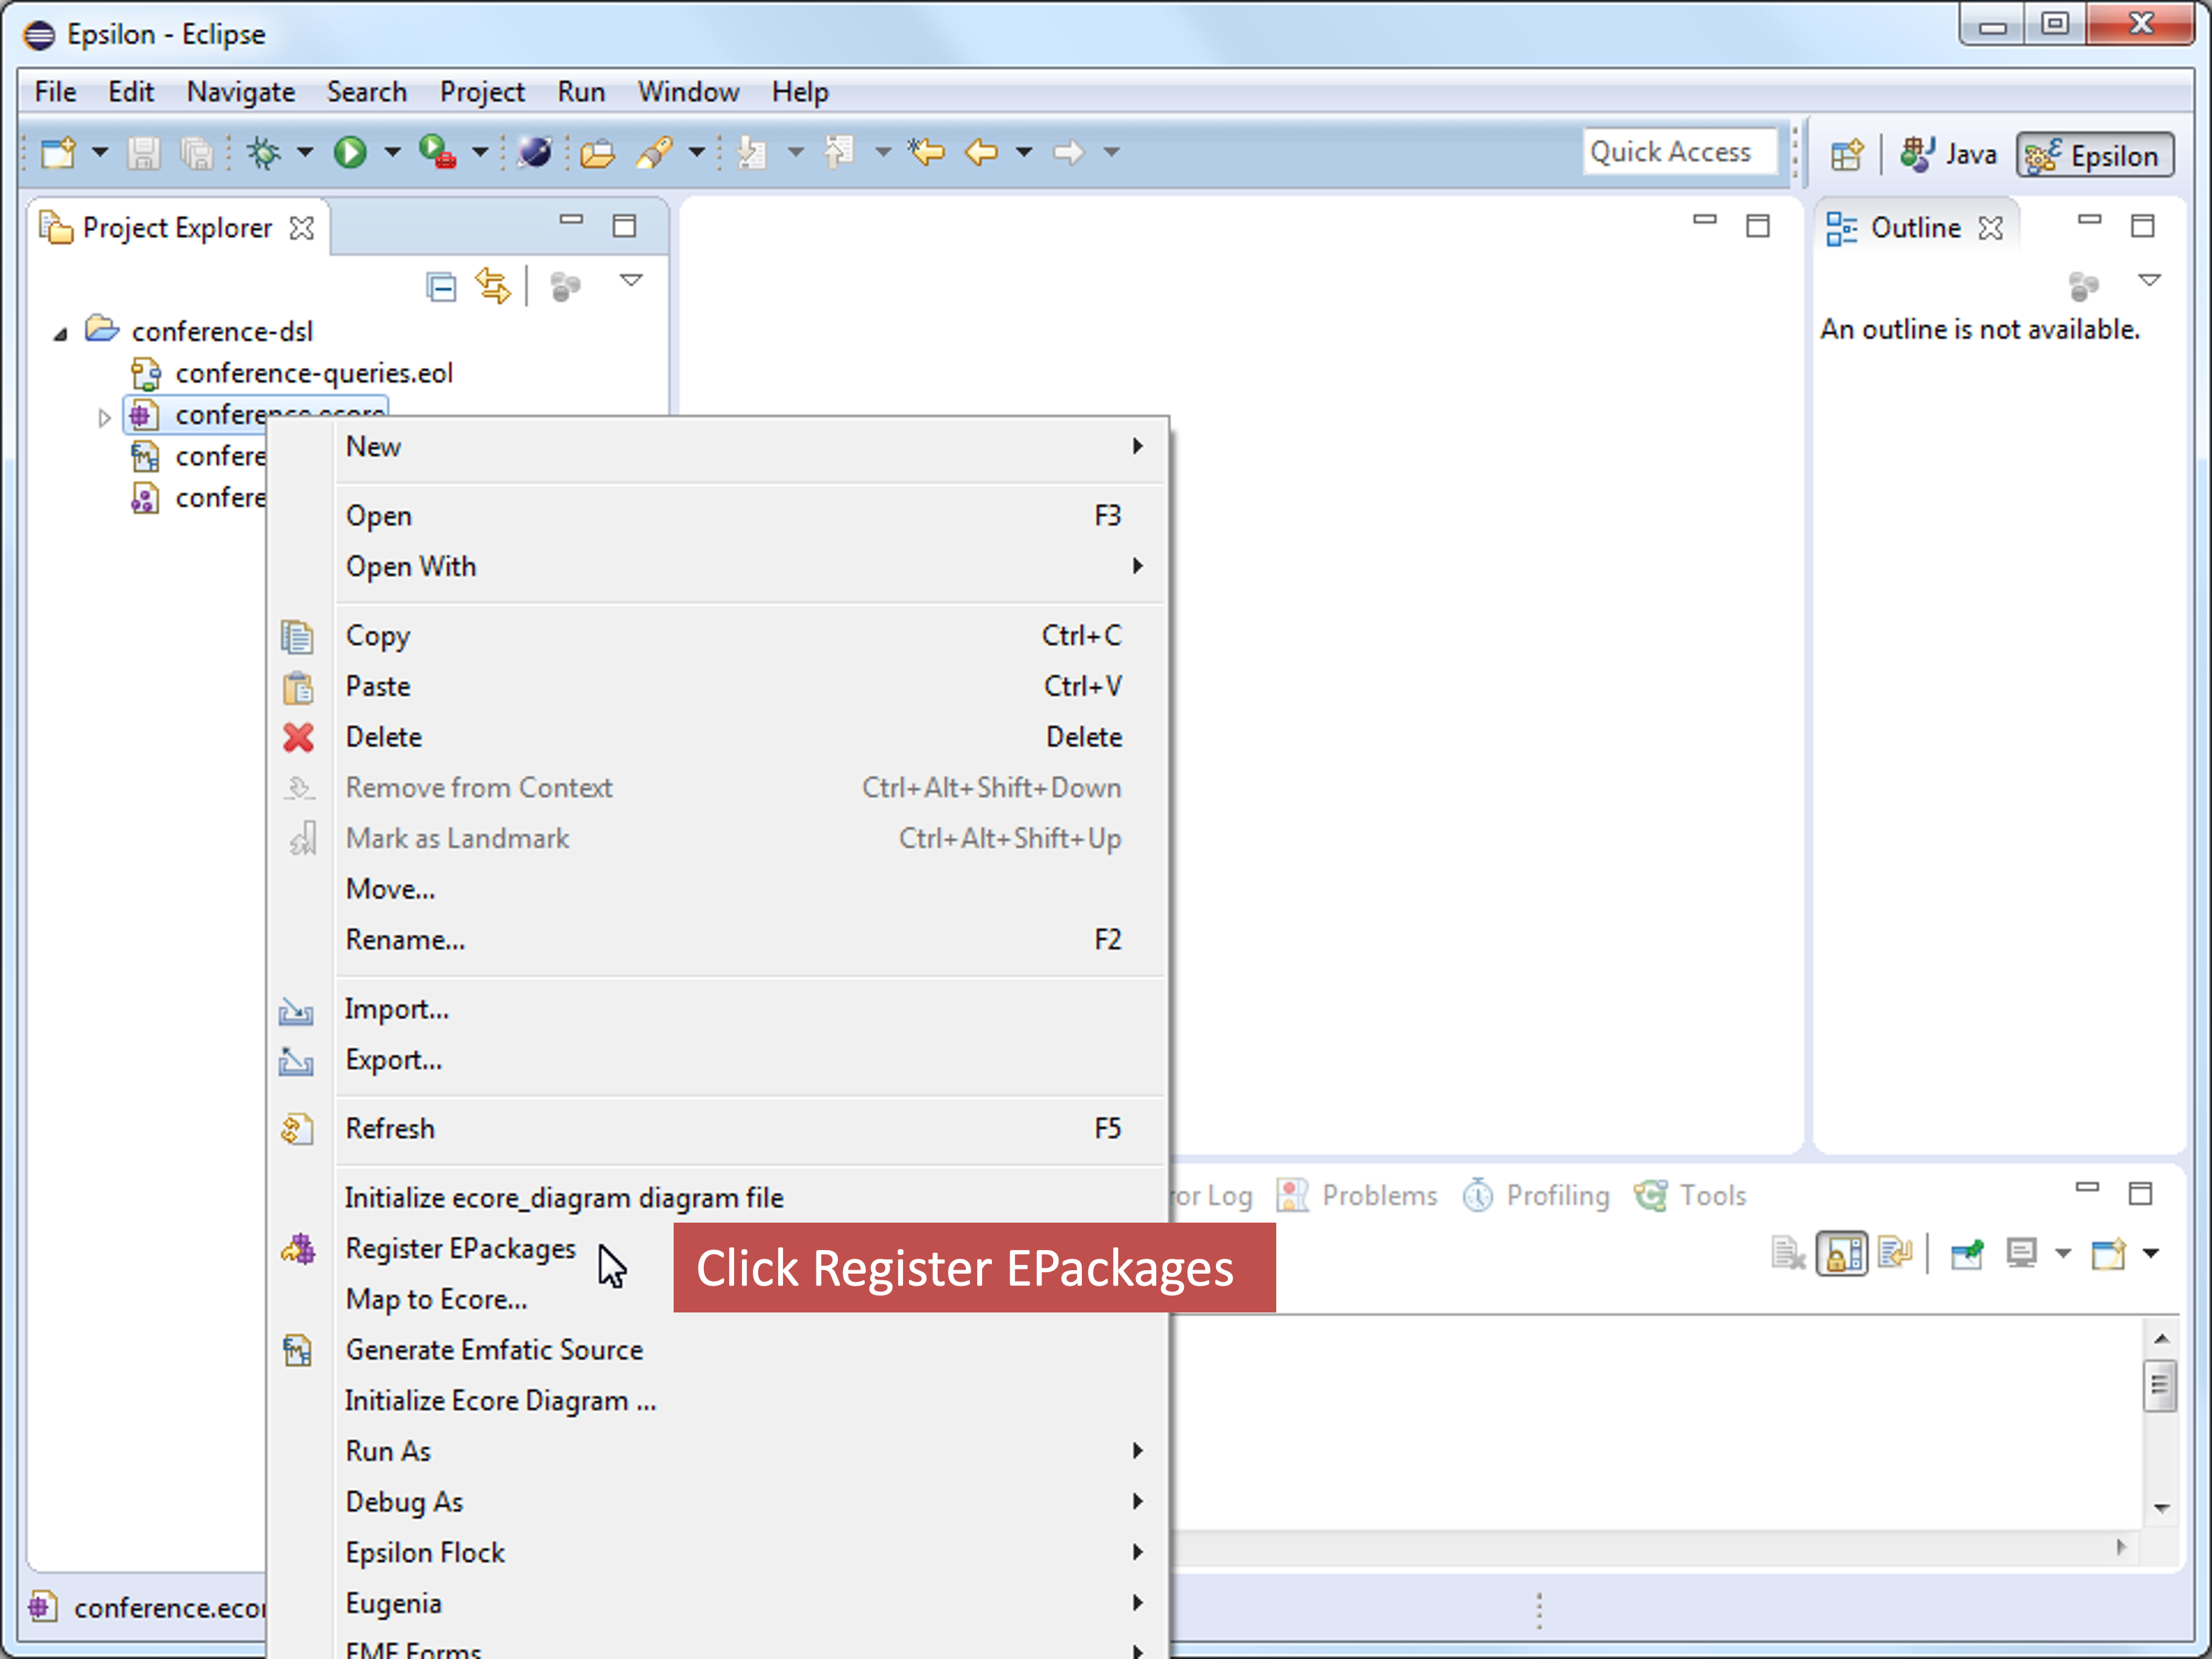
- Open your
conference-queries.eolfile and type/paste your queries in it.
- Create a new
EOL Programrun configuration to run your EOL queries.
- Double-check that the path of your EOL file appears in the
Sourcefield of theSourcetab of the run configuration dialog.
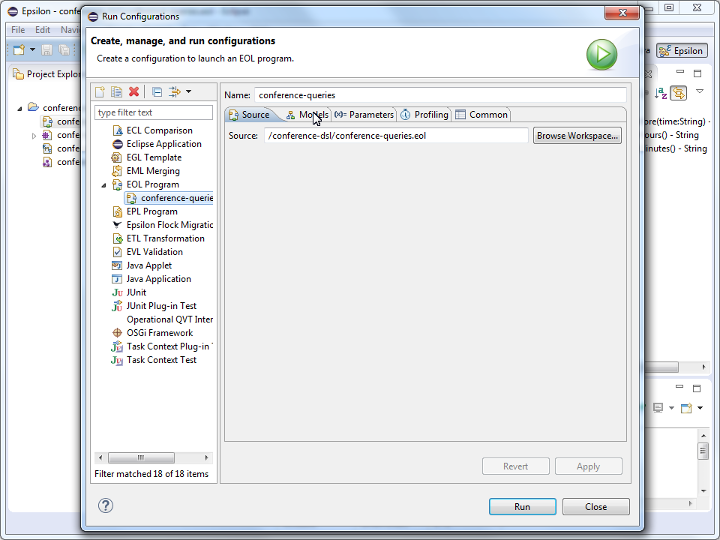
- Add the Conference model (
conference.model) to the run configuration through theModelstab of the dialog.
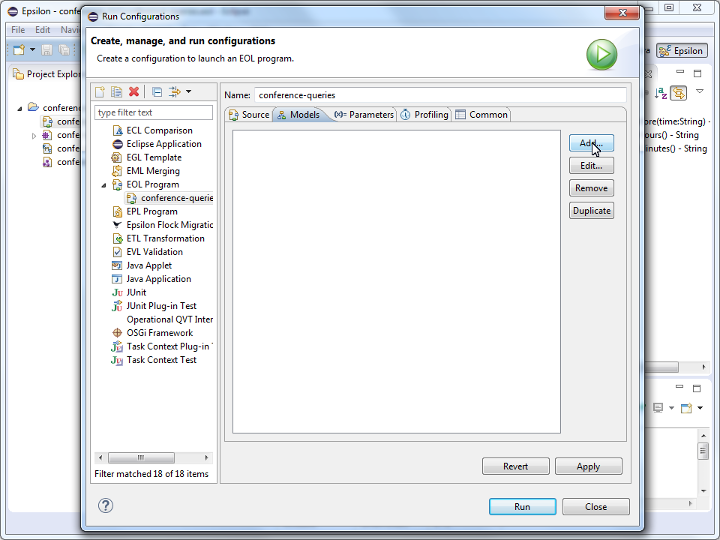
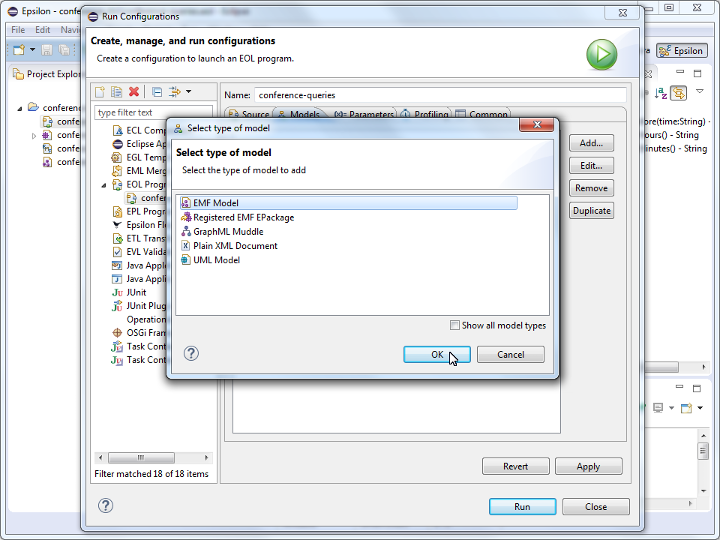
- Set the name of the model to
M
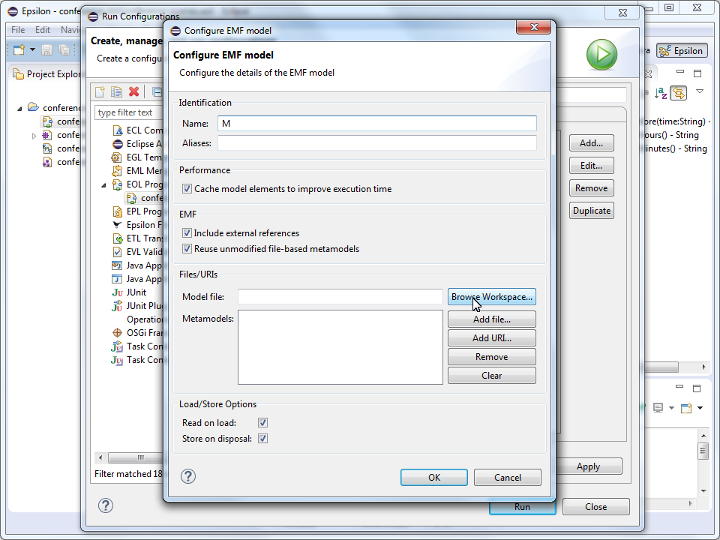
- Select
conference.modelas the model file. If the file selection dialog is empty, start typing the name of the file or**to display all workspace files.
Warning
Double-check that you have selected the model file (
conference.model) and not the metamodel file (conference.ecore) in this step. This is a common mistake to make.

- As soon as you select
conference.model, the URI of its metamodel (conference) should be added to theMetamodelslist of the dialog. If it doesn’t, it means that you have either not selected the correct model file, or that you have not registered your metamodel (conference.ecore) with EMF (see earlier steps).
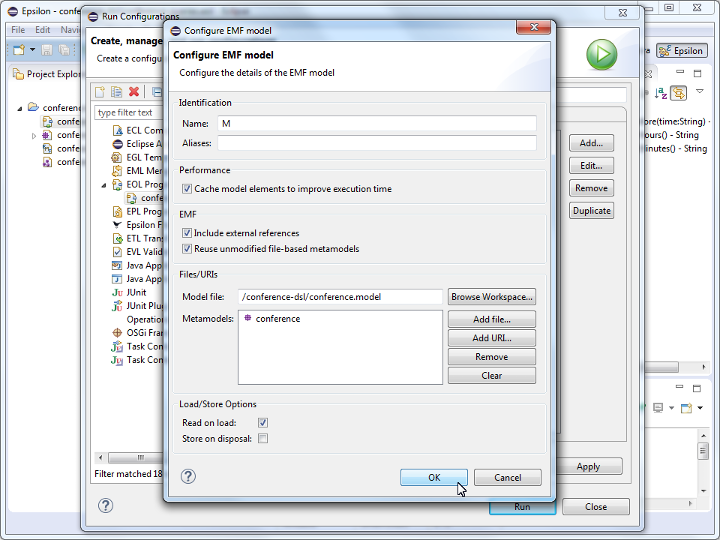
- Click the
Runbutton.
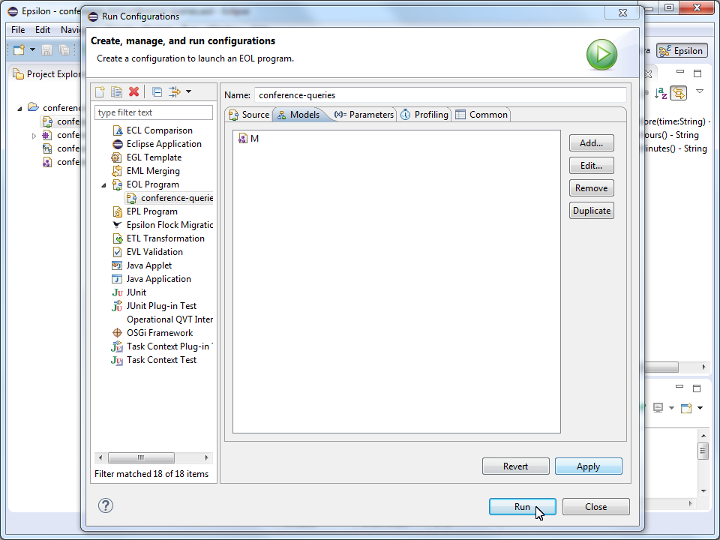
- The output of your queries should appear in the
Consoleview.
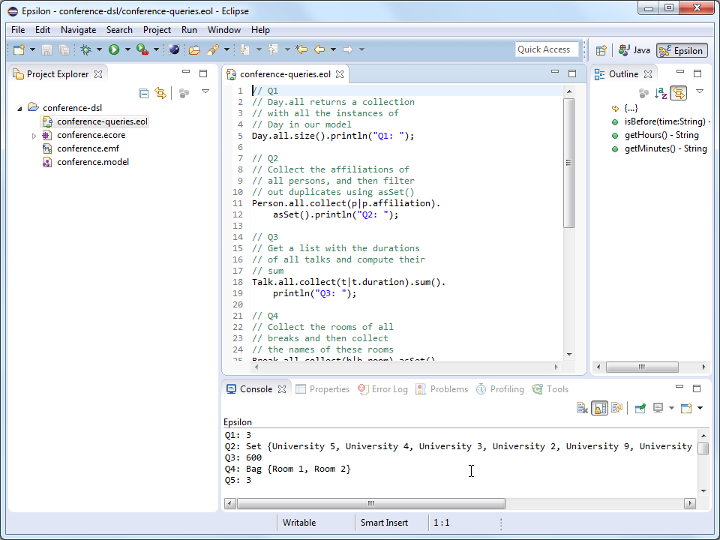
Software Distribution DSL queries
Write EOL queries that print:
- The number of components that have no dependencies
- The filenames of JARs that are not used by any component
- The names of components that are not used in any bundle
- The filenames of JARs that are not used by any bundle
- The names of the components involved in cyclic dependencies
- Tip: search the EOL documentation for
closure
- Tip: search the EOL documentation for
Create a sample model that conforms to the software distribution DSL and run the queries against the sample model.
Solutions
Model solutions for the exercises are available in this ZIP file.
Research Project DSL queries
Write EOL queries that print:
- The titles of all deliverables in the project, in chronological order
- The names of partners that have allocated effort to a work-package but don’t contribute to any of its tasks
- Labels for all tasks in the following form:
T<Work-package-index>.<Task-index>- The label of the second task of the third work-package is
T2.3
- The label of the second task of the third work-package is
- The titles of deliverables that are due before the start / after the end of the work-package in which they are contained
- The start/end month of a work-package can be computed through the work-package’s tasks
Solutions
Model solutions for the exercises are available in this ZIP file.
Practical 8: Model validation
This is the worksheet for the ninth practical in the Engineering 2 module.
In the sixth practical, you developed three metamodels and constructed models that conform to them. In this practical you will write model management programs to validate them.
Work through every section of the practical in sequence, without missing steps. You can use the “Previous” and “Next” buttons on the left and right sides to quickly go between sections.
Introduction
In this practical you will use the the Epsilon Validation Language (EVL) for model validation. EVL extends the syntax of EOL so it is important that you attempt the model querying exercises of Practical 8 before you move on to model validation.
What you should already know
- How to define domain-specific metamodels using Emfatic.
- How to create models that conform to such domain-specific metamodels.
- How to write and run EOL queries on EMF-based models.
What you will learn
- How to write and run EVL validation rules on EMF-based models.
What you will need
- An Eclipse installation with EMF and Epsilon (see the Tools section of Practical 6).
- Before you attempt the exercises in this practical you will also need to
- Download this zip file that contains Eclipse projects with metamodels, models etc. from Practical 6.
- Import the projects in the zip file to your Eclipse workspace using the
File -> Import -> Existing Projects into Workspacewizard as shown below.
Model Validation
We now wish to write EVL constraints for the Conference DSL, which check that:
- C1: The speaker and the discussant of a talk are two different persons
- C2: The duration of a talk is a positive number
- C3: The start time of a slot (i.e. break, track) is before its end time
Constraints C1-C3
Below are reference implementations of these constraints.
conference-constraints.evl
import "conference-queries.eol";

context Talk {

    constraint C1 {
        check : self.speaker <> self.discussant
        message : "The speaker and the discussant of talk "
            + self.`title` + " are the same person"
    }

    constraint C2 {
        check : self.duration > 0
        message : "The duration of talk " + self.`title` +
            " is not a positive number"
    }
}

context Slot {

    constraint C3 {
        check : self.start.isBefore(self.end)
        message {
            var msg = "";
            if (self.isTypeOf(Break)) {
                msg = "Break " + self.reason;
            }
            else {
                msg = "Track " + self.`title`;
            }
            msg = msg + " on " + Day.all.selectOne(d|d.slots.includes(self)).name;
            msg = msg + " ends before it starts";
            return msg;
        }
    }
}
- Both
C1andC2check the validity ofTalkmodel elements. As such they can be placed under the sameTalkcontext. - The property
titleappears between back-ticks in the expressionself.`title`because it is a reserved word (keyword) in EVL - In C3 we need to compare two
HH:MM-encoded dates. We’ve already written code that does this in the first part of this practical, which we reuse here by importingconference-queries.eol.
conference-queries.eol
// Get the hours part of the string
// and convert it to an integer
// e.g. for 15:45 it returns 15
operation String getHours() {
    return self.split(":").at(0).asInteger();
}

// Same for the minutes part
operation String getMinutes() {
    return self.split(":").at(1).asInteger();
}

// Compares the string on which it is invoked
// with its time parameter e.g.
// "15:15".isBefore("18:00") returns true
operation String isBefore(time : String) {
    return (self.getHours() < time.getHours()) or
        (self.getHours() == time.getHours() and
        self.getMinutes() < time.getMinutes());
}
Evaluating constraints
- Create a new text file with the name
conference-constraints.evlin yourconference-dslproject and type/copy the implementation of constraints C1-C3 in it.
- Create an
EVL Validationrun configuration to execute the constraints against theconference.modelmodel. The process of setting up the run configuration is very similar to the process you followed to run your EOL program, so we won’t repeat the instructions alongside the following screenshots.
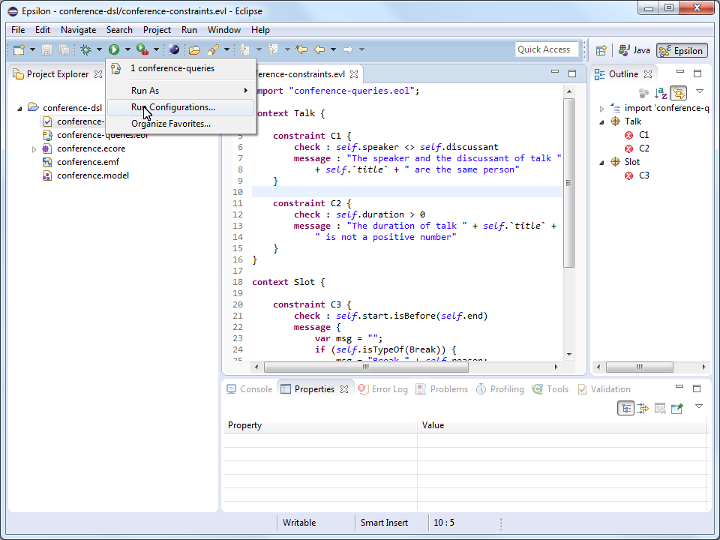
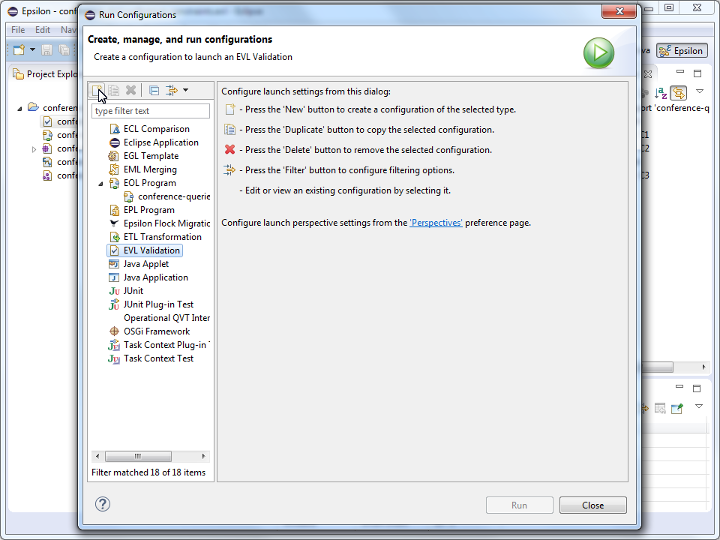
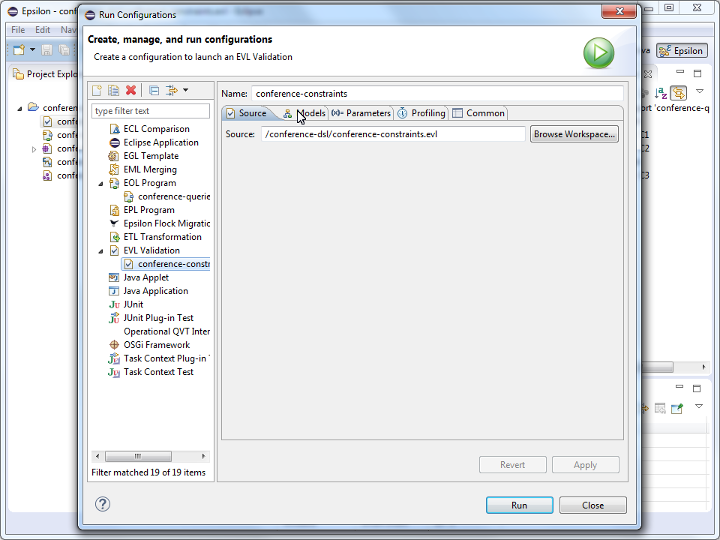
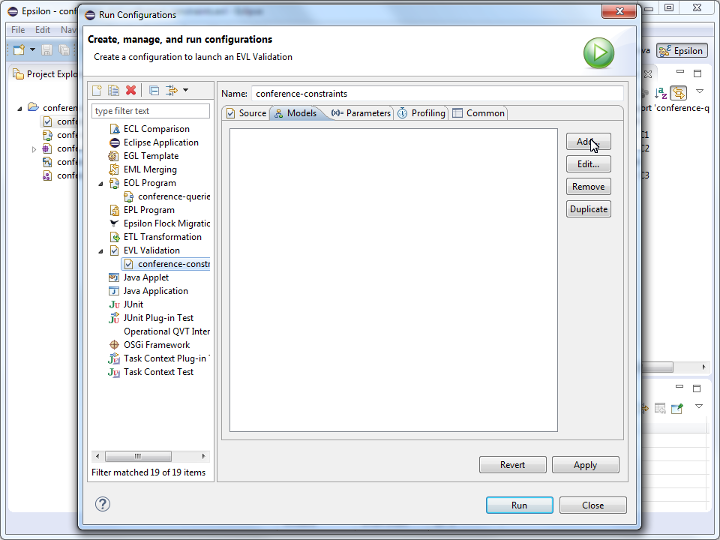
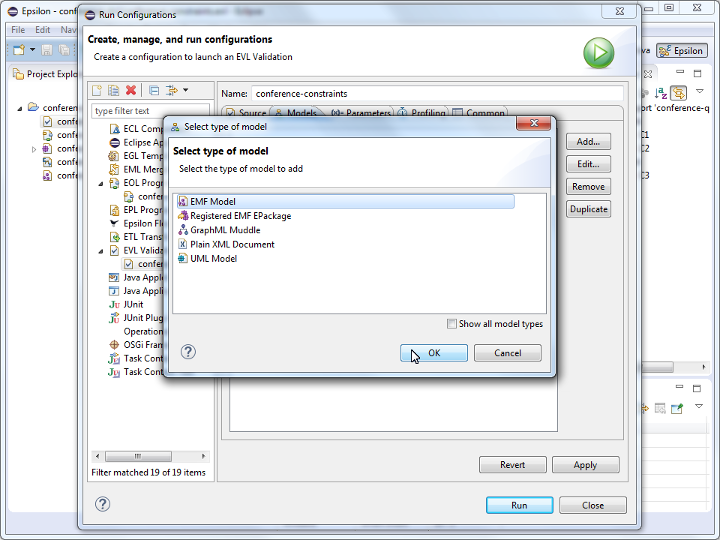
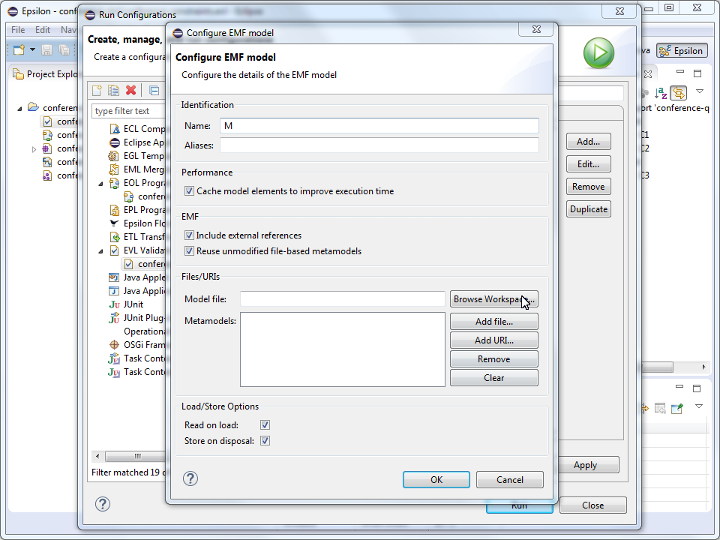
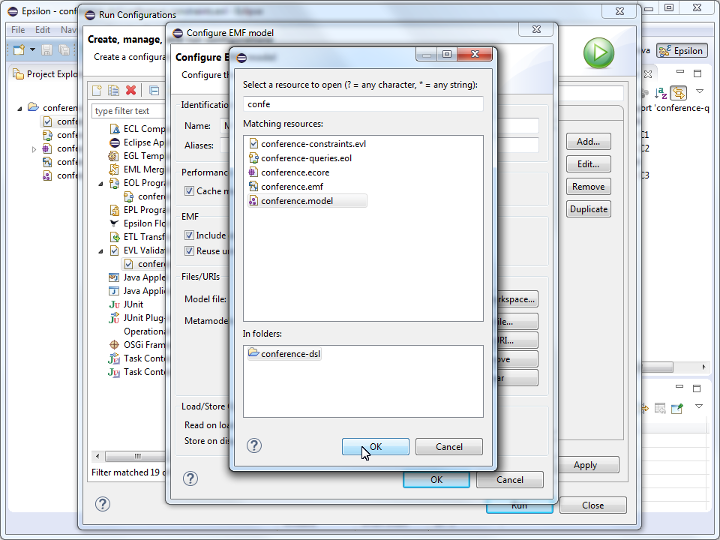
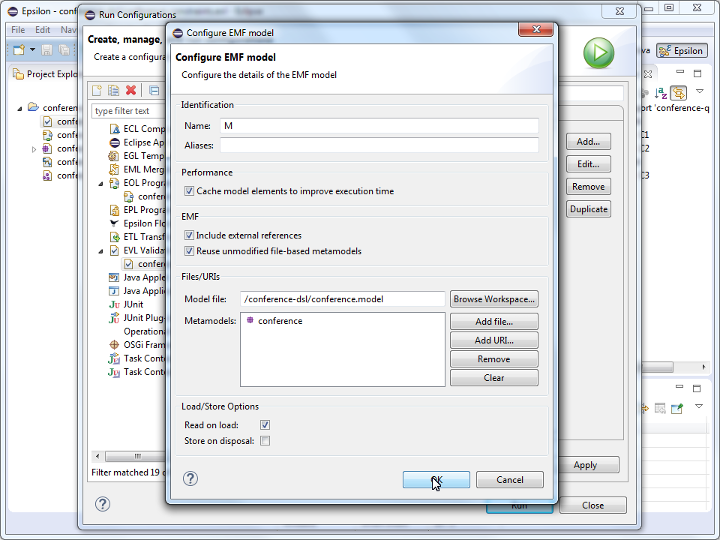
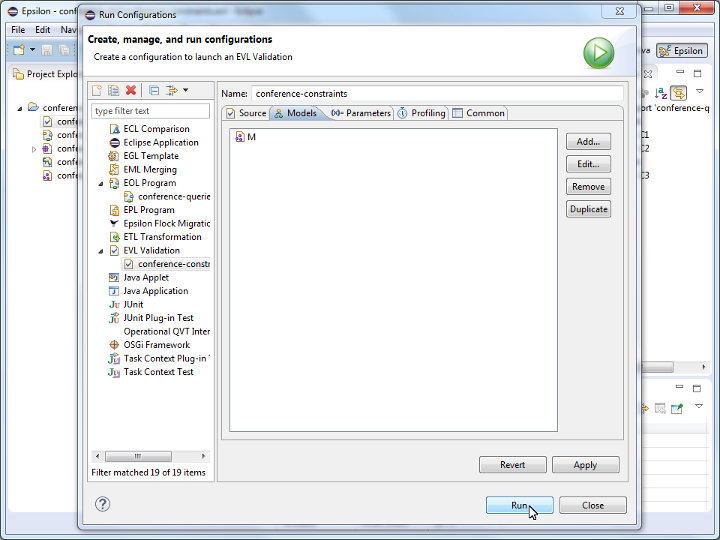
- Running the EVL program should report three unsatisfied constraints in the
Validationview of Eclipse.
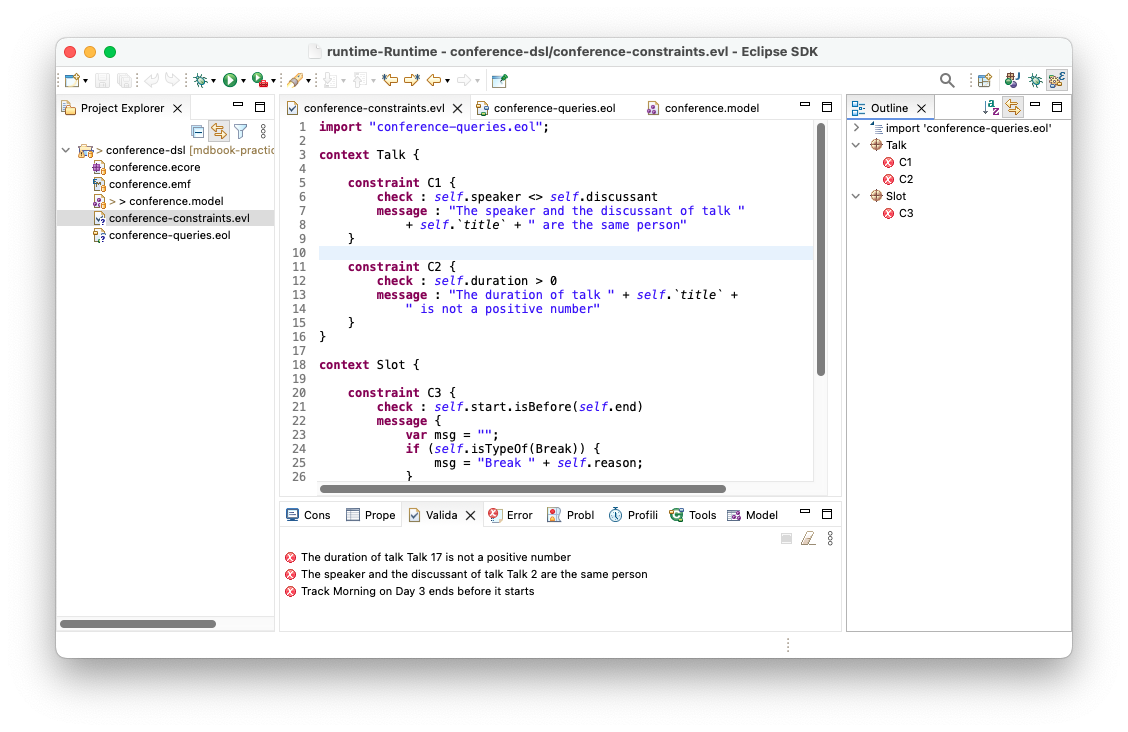
- Fix these issues in
conference.modeland re-run the EVL constraints until no errors are reported in theValidationview.
Exercise
Write and run the following constraints for the Conference DSL similarly to C1-C3 demonstrated above:
- C4: A track is long enough to accommodate the talks it contains
- e.g. a track that is one hour long cannot accommodate three 30-minute talks
- C5: Breaks don’t overlap with tracks
- C6: Slots that overlap in time do not use the same room
Solutions
Model solutions for the exercises are available in this ZIP file.
Additional exercises
Add support for model validation to the Sirius editor you developed in the previous practical using EVL, as shown here.
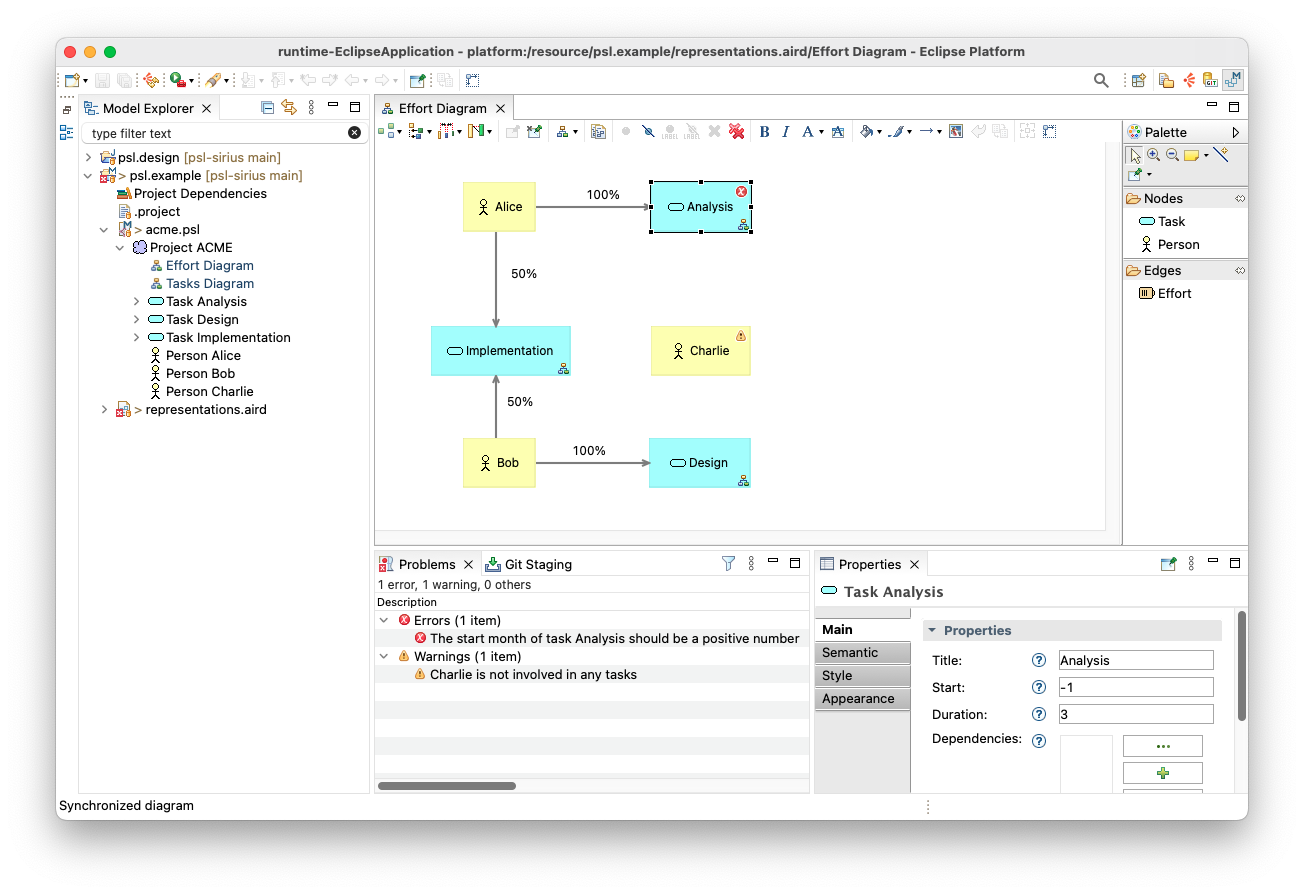
Your validation project (the equivalent of psl.validation in the example above) should be an Eclipse plug-in project that will host your EVL constraints as well as a plugin.xml file that will bind the constraints to the namespace of your metamodel (see below).
<?xml version="1.0" encoding="UTF-8"?>
<?eclipse version="3.4"?>
<plugin>
   <extension
         point="org.eclipse.epsilon.evl.emf.validation">
      <constraintsBinding
            compose="true"
            constraints="your-constraints.evl"
            namespaceURI="your-language-namespace-uri">
      </constraintsBinding>
   </extension>
	<extension point="org.eclipse.ui.ide.markerResolution">
		<markerResolutionGenerator
        class="org.eclipse.epsilon.evl.emf.validation.EvlMarkerResolutionGenerator"
        markerType="org.eclipse.emf.ecore.diagnostic"></markerResolutionGenerator>
		<markerResolutionGenerator
        class="org.eclipse.epsilon.evl.emf.validation.EvlMarkerResolutionGenerator"
        markerType="org.eclipse.sirius.diagram.ui.diagnostic"></markerResolutionGenerator>
	</extension>
</plugin>
Your validation project should also require the org.eclipse.epsilon.evl.emf.validation plug-in in its MANIFEST.MF (as psl.validation does).
Practical 10: Model transformation
This is the worksheet for the tenth practical in the Engineering 2 module.
This practical covers model-to-text (M2T) transformation using EGL/EGX and model-to-model (M2M) transformation using ETL.
Work through every section of the practical in sequence, without missing steps. You can use the “Previous” and “Next” buttons on the left and right sides to quickly go between sections.
Introduction
In this practical you will use the Epsilon Generation Language (EGL) for model-to-text transformation and the Epsilon Transformation Language (ETL) for model-to-model transformation. Both EGL and ETL extend the syntax of EOL so it is important that you have attempted the EOL exercises in Practical 8.
What you should already know
- How to use Sirius-based editors to create and edit models.
- How to use EOL to query models.
What you will learn
- How to write and run model-to-text transformations with EGL on EMF-based models.
- How to write and run model-to-model transformations with ETL on EMF-based models.
What you will need
- An Eclipse installation with EMF and Epsilon (see the Tools section of Practical 6).
Model-to-text transformation
As a warm-up exercise, modify this M2T transformation in Epsilon’s online playground so that it generates a table with task names as column headers and person names as row headers, as shown below.
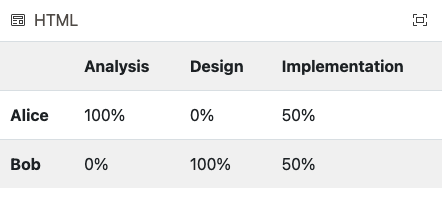
Problem
While the callcentre2java model-to-text transformation discussed in the M2T lecture works fine for models that end with call redirections, it crashes for models that end with statements.
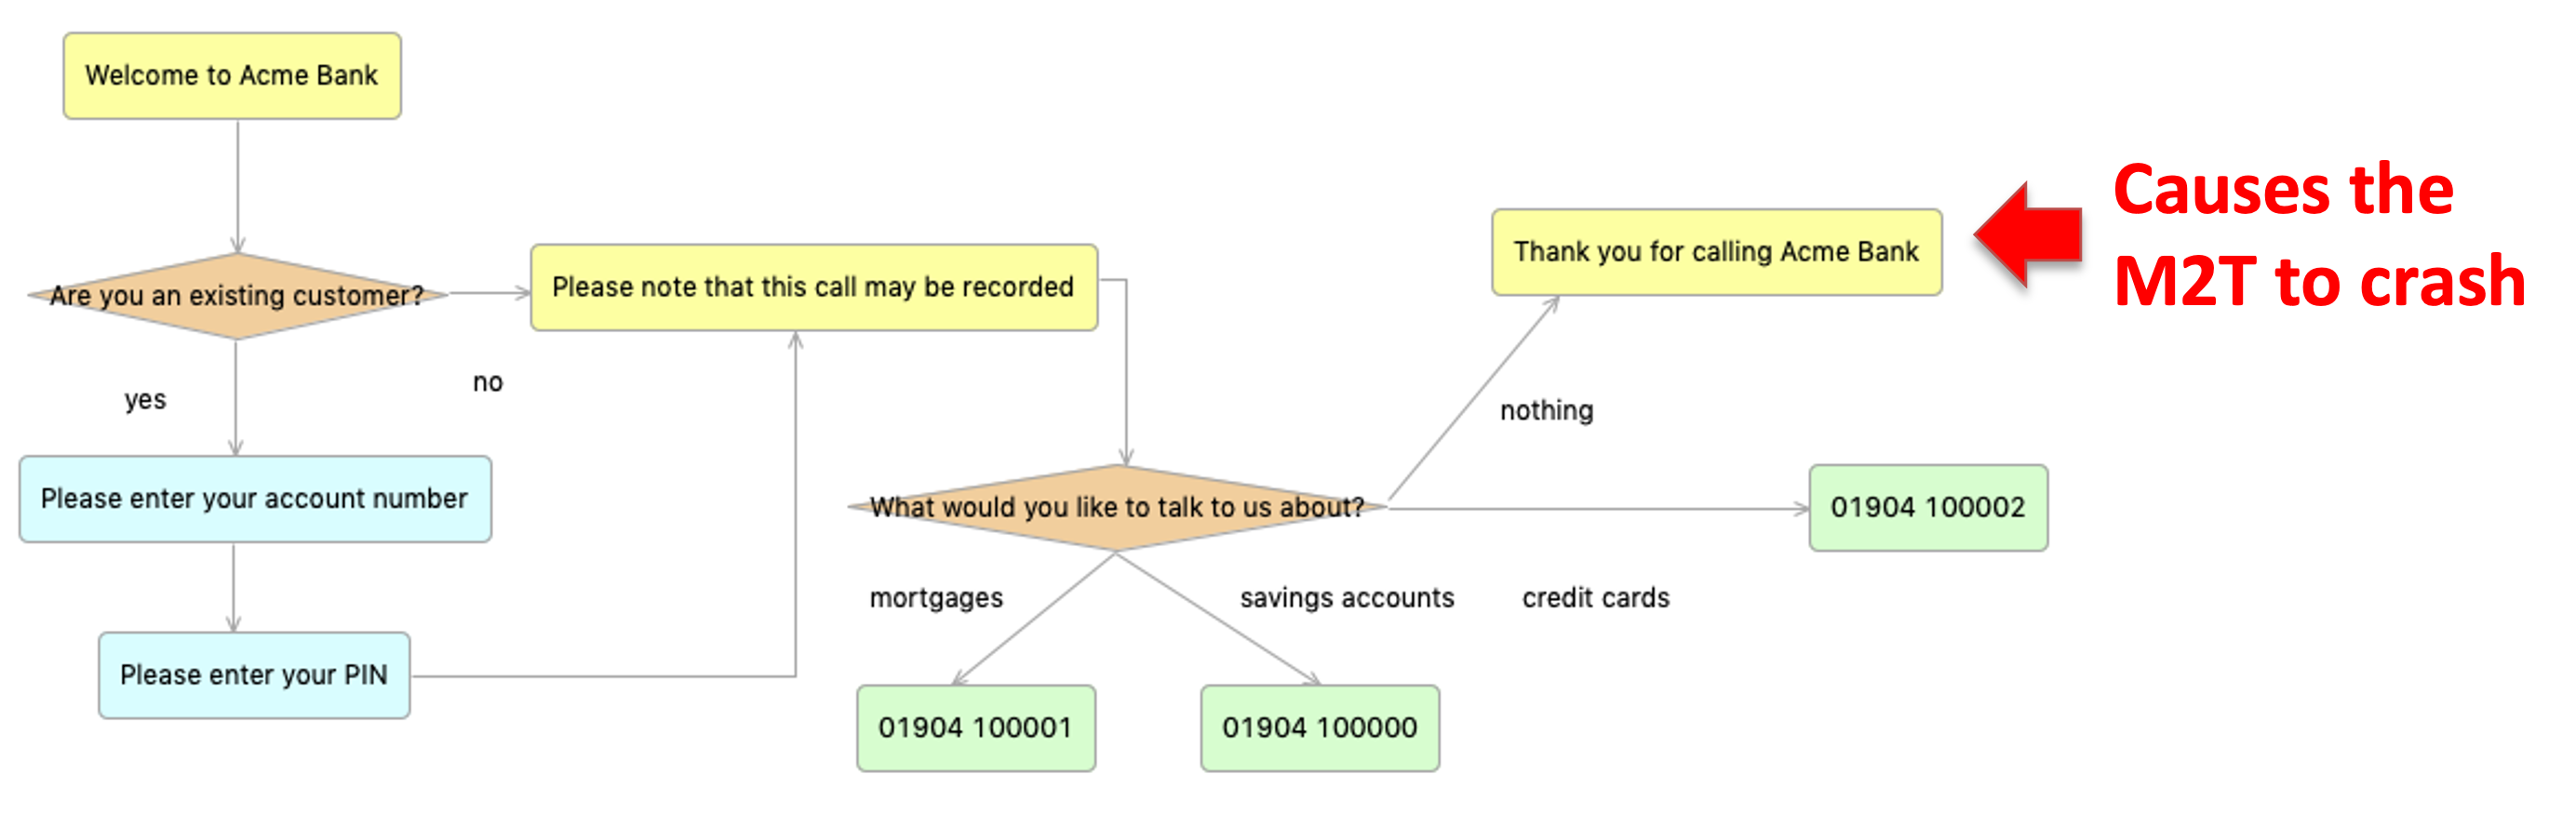
Preparation
- Clone this Github repository
- Alternatively, download a copy of its contents
- Run the Epsilon Eclipse distribution
- Import only the following projects from the repository/zip file
ac.uk.york.callcentreac.uk.york.callcentre.editac.uk.york.callcentre.editorac.uk.york.callcentre.validationac.uk.york.callcentre.design
- Make sure that all imported projects are under the
H:orC:drives - You can double-check their location by right-clicking on them in Eclipse and selecting the
Propertiesmenu item - Run a nested Eclipse instance by right-clicking on one of the projects above within Eclipse and selecting
Run as -> Eclipse Application - In the nested Eclipse instance import only the following projects from the repository/zip file
ac.uk.york.callcentre.m2tacmebank.modelacmebank.application
- Run the
callcentre2java.egxEGX M2T transformation against theacmebank.callcentremodel so that it generates code under thesrc-genfolder of theacmebank.applicationproject- Create a new
EGL Generatorrun configuration (like you did for EOL and EVL in previous practicals) - Set its source to
callcentre2java.egx - Set the
Files should be generated indirectory to theacmebank.applicationproject
- Create a new
- Run the generated
AcmeBank.javaclass- Optional: implement the validation logic for PINs as shown in the M2T lecture
Fix the M2T transformation
- Add a
Thank you for calling Acme Bankstatement to your model, and a transition to it as shown in the problem description- Don’t forget to give the new statement a name in the
Propertiesview!
- Don’t forget to give the new statement a name in the
- Re-run the M2T transformation and notice how it crashes with a runtime exception (
Called feature 'to' on undefined object) - Exercise #1: Modify the source code of the M2T transformation to fix the problem
Extend the M2T transformation
- In the current version of the generated code, a user needs to enter the number of the transition they wish to take at decision points
- e.g.
1 for yes, 2 for noinAre you an existing customer?
- e.g.
- Exercise #2: Modify the M2T transformation so that the code produced accepts both the number and the text of the transition
- e.g.
1 or "yes" for yes, 2 or "no" for noinAre you an existing customer?
- e.g.
HTML generation
- So far, you have been modifying the existing callcentre2java.egx M2T transformation
- Exercise #3: write a new M2T transformation that transforms a call centre model into a set of HTML pages
- One HTML page for each step
- Hyperlinks in the generated pages to represent transitions

Solutions
Model solutions for the exercises are available in this ZIP file.
Model-to-model transformation
Exercise 1: Study this ETL transformation, which demonstrates generating multiple output elements from a single source element. Modify this ETL transformation on Epsilon’s Playground so that it generates 2 deliverables per task:
- One interim report halfway through the task
- One final report at the end of the task
Exercise 2: Study this Flock migration transformation on Epsilon’s Playground. Now complete this Flock migration to add effort elements to the migrated model.
Note
The names of the original and migrated models in the Flock transformation of Exercise 2 are
OriginalandMigratedrespectively. Therefore, to create a newEffortelement in the migrated model you can usevar effort : new Migrated!Effort;.
Note
You can develop the transformations above either directly on the Playground or in Eclipse, as demonstrated in the respective lectures. If you develop them on the Playground, we advise you to also download copies (using the Playground’s
Download -> Ant (Eclipse)menu and dialog) and run them within Eclipse.
Exercise 3
Write a M2M transformation with ETL that produces a MiniVoiceXML model from a call centre model. MiniVoiceXML is a toy version of the W3C VoiceXML specification.
MiniVoiceXML metamodel
- A
Documenthas 0+Dialogs, which can beFormsorMenus: execution starts from firstDialog - A
Formhas 0+FormItems:Formgets inputs from the caller and assigns them to variablesField: prompt the caller, read line of input, and assign input to var with givennameTransfer: transfer the caller to another number (destusestel:NUMBER)Block: 0+ executable elementsGoTo: switch to another DialogPrompt: output text to user
- A
Menuhas aPromptand 1+Choice: runs thePromptthen shows options and waits for choicedtmf: number (1-9) to be typed by callernext: Dialog to traverse to if chosen
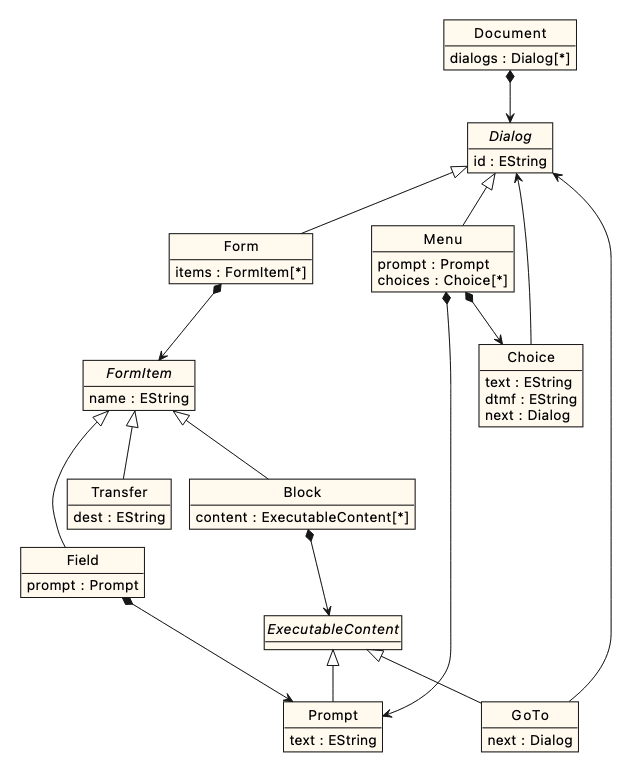
The transformation
- Clone this Github
- Alternatively, download a copy of its contents
- Import the metamodel project (
minivoicexml) into Eclipse - In a nested Eclipse, import the interpreter (
minivoicexml.interpreter) project - In the nested Eclipse, create a new project named
callcentre2minivoicexml - In the new project, create an ETL script with these rules:
Model→Documentwith theDialogsproduced from theSteps- The first
Dialogshould be the one from the firstStepthat would be run
- The first
Statement→FormwithBlockcontaining aPromptCallRedirection→FormwithTransfer(watch out fordestformat)InputQuestion→FormwithFieldcontaining aPromptDecision→MenuwithPromptTransition→- If the source is a
Decision: addChoiceto theMenufrom the source node- Remember to set the
dtmf,text, andnextfeatures correctly!
- Remember to set the
- Any other: add
GoToto theBlockat the end of theFormfrom source node- If such a
Blockdoes not exist, add it as well - Remember to set the
nextreference to the equivalent of theTransitiontarget
- If such a
- If the source is a
- Run your ETL script on your sample model:
- Configure the launch so the new model is saved to
generated-voicexml.modelinside yourcallcentre2minivoicexmlproject
- Configure the launch so the new model is saved to
- Run the resulting MiniVoiceXML models on the interpreter:
- In
minivoicexml.interpreter, right-click onLauncher.launch, selectRun As –> Launcher - The interpreter will run from the
Consoleview: check that the model behaves as expected by entering your answers
- In
Solutions
- Exercise 1
rule Project2Project
	transform s : Source!Project
	to t : Target!Project {

	t.name = s.name;

	// Transform the tasks of the source
	// project using the Task2Deliverable
	// rule and assign the result to
	// t.deliverables
	t.deliverables ::= s.tasks;
}

// Transform each task to two deliverables
// to be submitted in the middle and at the end of the task
rule Task2Deliverable
	transform t : Source!Task
	to interim : Target!Deliverable,
       final : Target!Deliverable {

	interim.name = t.name + " Interim Report";
	interim.due = t.start + (t.duration / 2);

	final.name = t.name + " Final Report";
	final.due = t.start + t.duration;

	// The lead of the deliverables
	// is the person with the highest
	// effort in the task
	var lead = t.effort.sortBy(e|-e.percentage).
		first()?.person;

    interim.lead ::= lead;
    final.lead ::= lead;
}

// @lazy means that persons will be transformed
// only upon request. As such, Charlie will not
// appear in the target model because he leads
// no deliverables
@lazy
rule Person2Person
	transform s : Source!Person
	to t : Target!Person {

	t.name = s.name;
}
- Exercise 2: A reference solution is available on Epsilon’s playground.
- Exercise 3: A reference solution is available on Epsilon’s playground.
Additional exercises
Download the following transformations from the Epsilon Playground and run them in your Java IDE of choice as discussed here.
Epsilon development tools for VS Code and IntelliJ
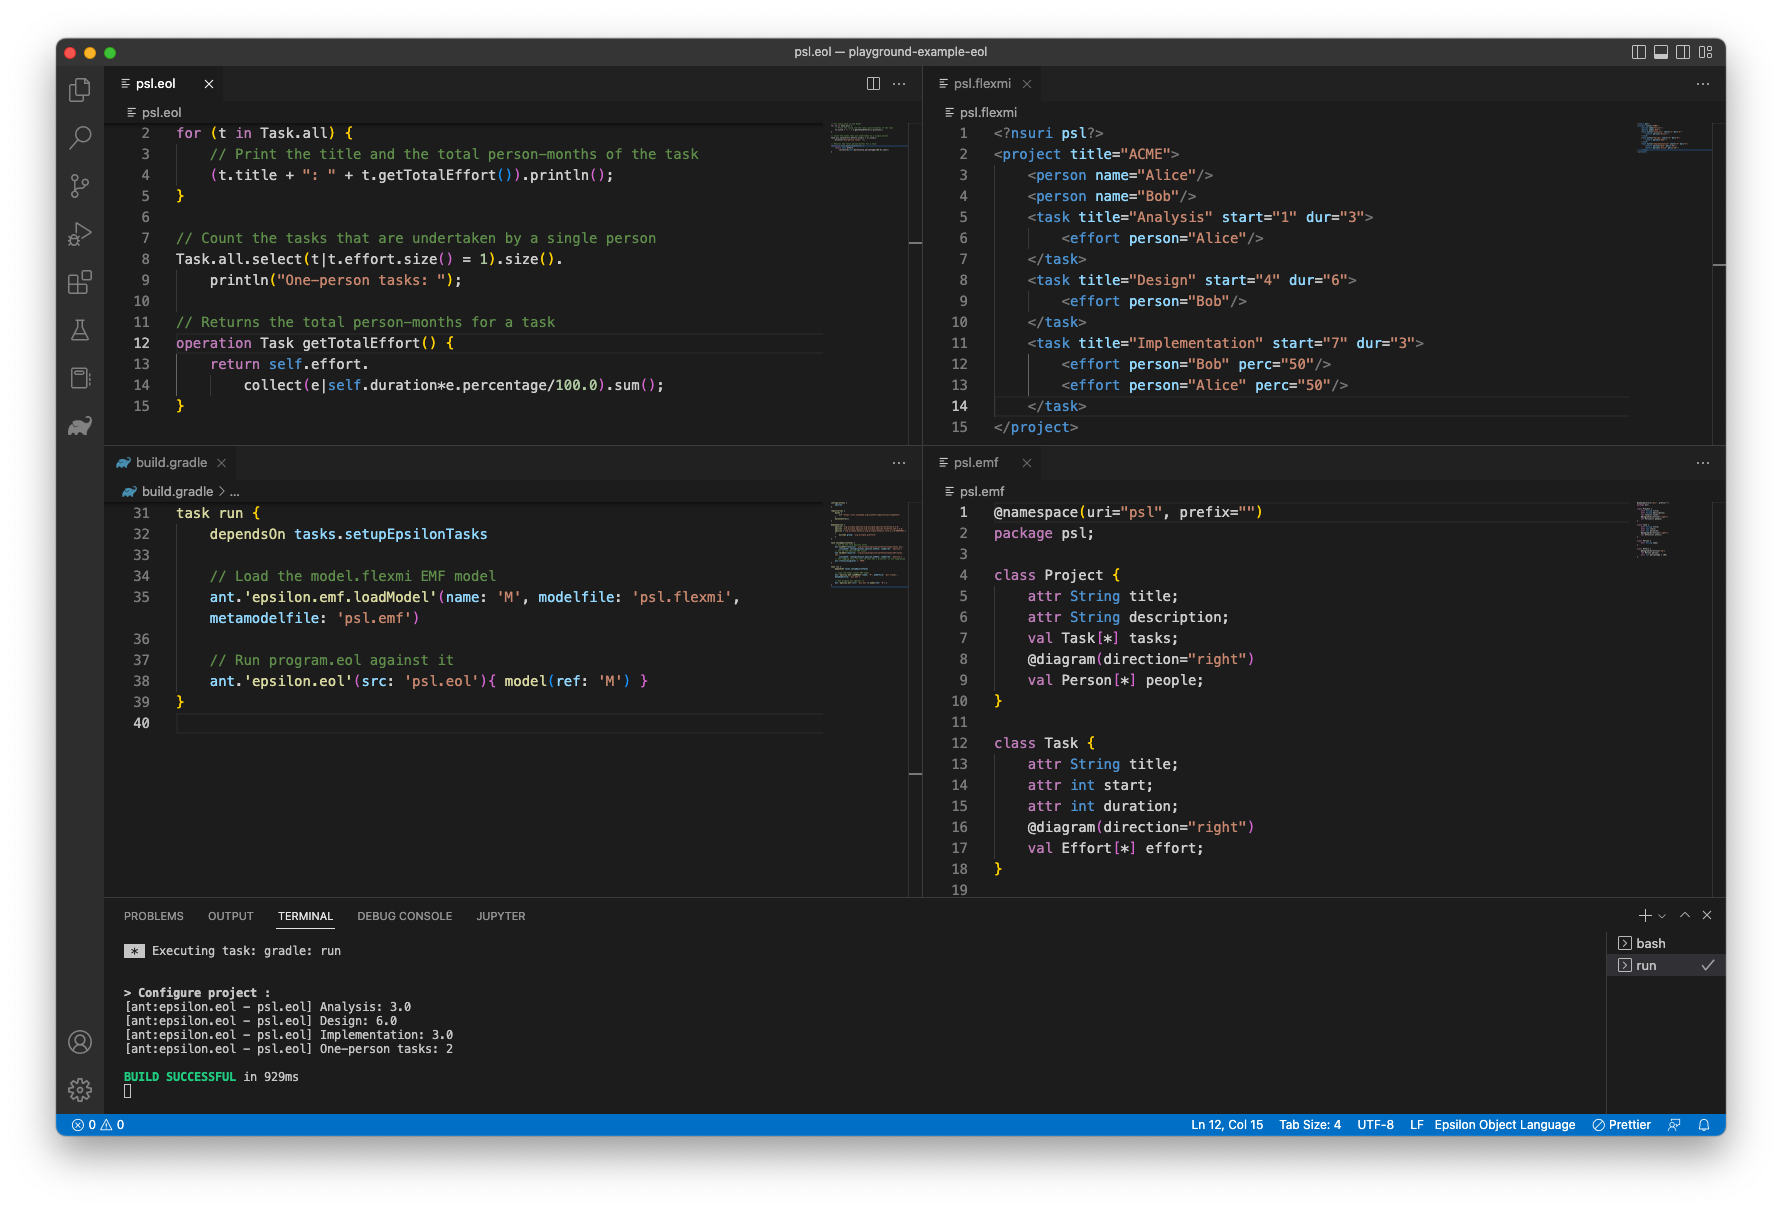
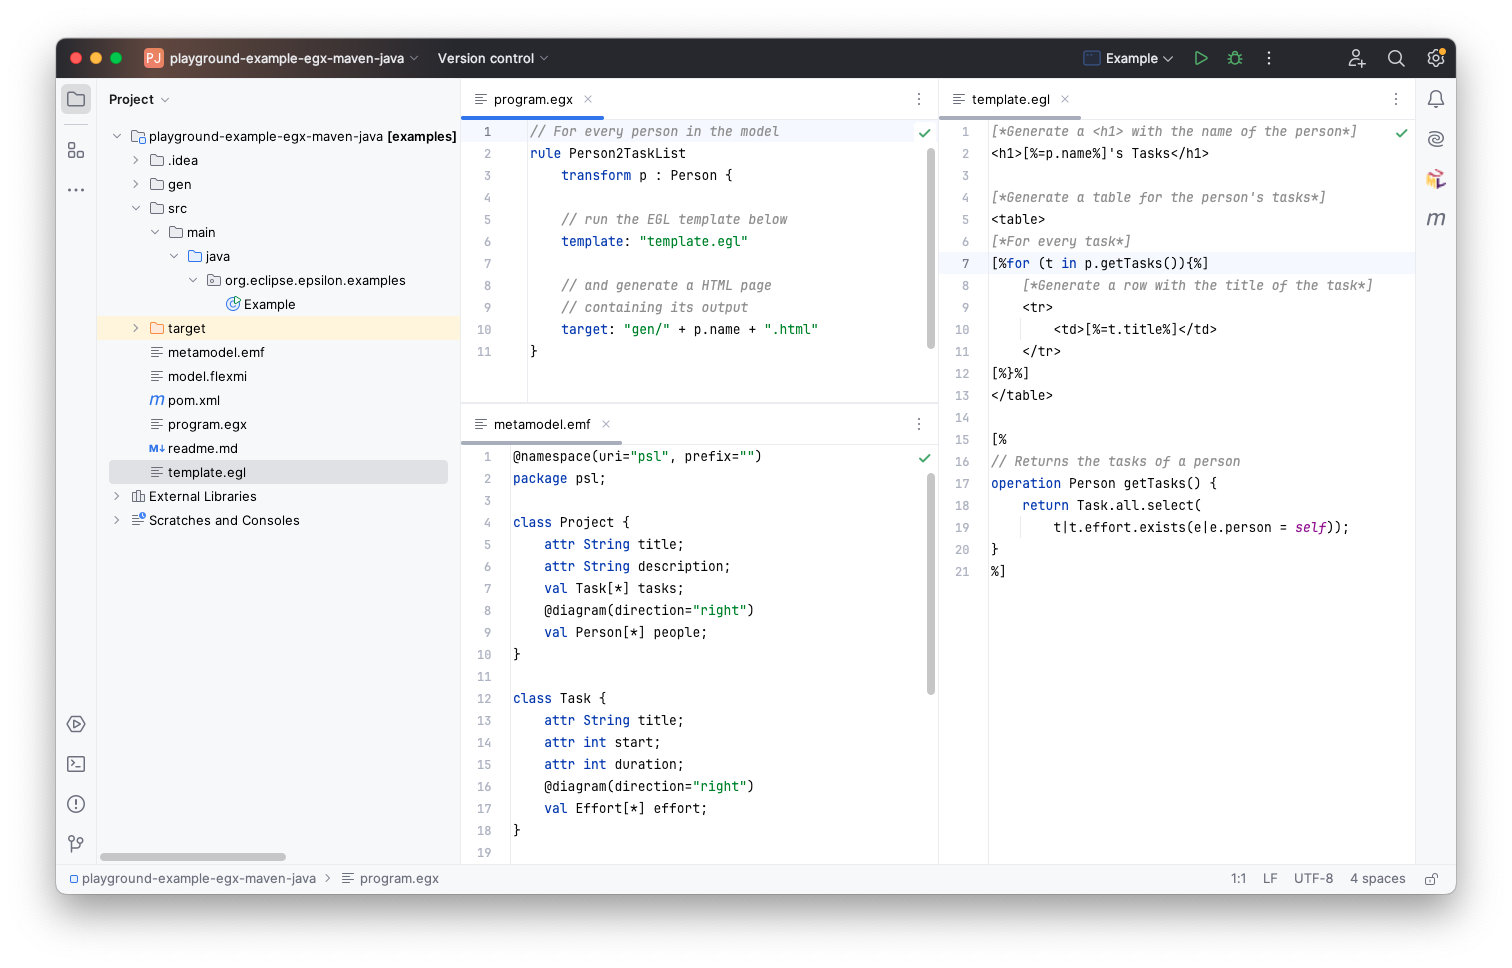
Practical 11: Model managment workflows
This is the worksheet for the eleventh practical in the Engineering 2 module.
This practical covers automating model management workflows using the Epsilon Ant tasks.
Work through every section of the practical in sequence, without missing steps. You can use the “Previous” and “Next” buttons on the left and right sides to quickly go between sections.
Introduction
In this practical you will run the Epsilon Ant tasks to combine an EVL program and an EGL program into a single automated pipeline.
What you should already know
- How to use EOL to query models.
- How to use EVL to validate models.
- How to use EGX/EGL to transform models to text.
What you will learn
- How to write and run model management worfklows from Eclipse with Ant.
What you will need
- An Eclipse installation with EMF and Epsilon (see the Tools section of Practical 6).
Ant workflows
Running the EGL example via Ant
Download a copy of the Generate Task Lists EGL example from the Epsilon Playground.
Make sure to choose the “Ant (Eclipse)” option from the Download dialog:
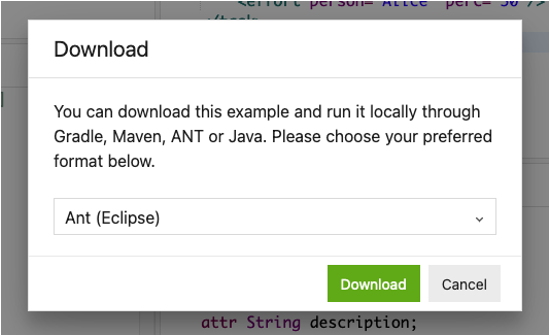
Import the downloaded project into Eclipse, and then right-click on build.xml and select “Run as -> Ant build…”.
In the window that pops up, in the JRE tab, select “Run in the same JRE as the workspace”:
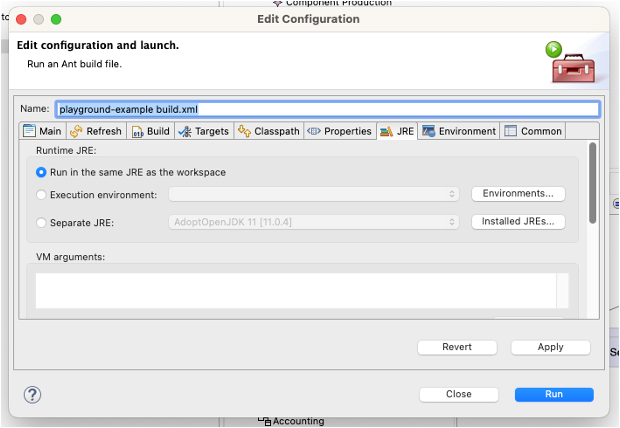
Click Run.
Combining the EVL and EGL scripts
Modify build.xml so that the constraints in the related EVL example are executed before the EGL model-to-text transformation. For more information, see the Model Management Workflows lecture.
First, paste the Ant tasks in the main target of the EVL build.xml before the ones in the EGL build.xml file.
Ensure this works as intended, by changing model.flexmi so that it violates one of the EVL constraints (e.g. set the duration of the Analysis task to a negative number), and running build.xml again: the build should fail in the validation step and code generation should not take place.
The above approach would result in a significant amount of duplication, and it would also mean loading the model twice (once before EVL, and again before EGL). Change the buildfile so it only loads the model once at the beginning, runs EVL, then EGL, disposes of the model, and refreshes the project in Eclipse.
Finally, let’s take advantage of the fact that Ant targets can depend on each other, like this:
<!-- A, B, and C will be automatically run before X starts -->
<target name="X" depends="A,B,C">
  ...
</target>
Reorganise the build.xml so it has these targets:
load-modeltarget only loads the model.dispose-modeltarget disposes of the model and refreshes the project.run-evltarget only runs the EVL script, and depends onload-model.run-egltarget only runs the EGL script, and depends onload-model.maintarget depends onrun-evl,run-egl, anddispose-model, in that order, and is otherwise empty.
Ensure the build still works as expected before moving on.
Solutions
Model solutions for the exercises are available in this ZIP file.
Additional exercises
Using Gradle instead of Ant
Try to replace the Ant file with a Gradle build, as demonstrated during this week’s lecture.